Paid webinars
How can I charge for my webinars hosted on ClickMeeting?
Integrate your account with Stripe for an easy and secure way to monetize your events and manage payments.
You can also integrate your paid ClickMeeting account with PayPal. Please note that PayPal has a different policy in each country due to various specifications of its market. The customers are able to benefit from a PayPal account to the extent determined by PayPal for these countries.
Now, when scheduling an event, you can choose a Paid access type and enter the fee that your attendees should pay to obtain access to your live webinar.

The minimum ticket price in a selected currency cannot be lower than 1. Please note that the current limits for the event ticket of each of the currency are listed below:
| Currency | Limit |
|---|---|
| USD | 2000 |
| EUR | 2000 |
| GBP | 2000 |
| PLN | 8000 |
| RUB | 200000 |
| AUD | 3000 |
| CAD | 3000 |
| CZK | 46000 |
| DKK | 13000 |
| HKD | 20000 |
| ILS | 74000 |
| MXN | 40000 |
| NOK | 17000 |
| NZD | 3000 |
| PHP | 106000 |
| SGD | 2800 |
| SEK | 18000 |
| CHF | 2000 |
| THB | 66000 |
| HUF (only Stripe) | 700000 |
| BGN (only Stripe) | 4000 |
| RON (only Stripe) | 8000 |
Please note that if you use the Paid Webinars feature ClickMeeting applies a service charge of 5% to the gross price of the ticket.
Can I create a paid event with a trial account?
During the free trial period, you can try out our paid events! The following features will be available to you:
- Integration with Stripe or PayPal payment systems;
- Discount tickets;
- Promo codes;
- Editing the registration page for paid events (except for branding).
You will be able to create 2 paid events, and the ticket price cannot exceed 4 in your chosen currency. The maximum number of sold tickets for live, automated, and on-demand webinars is 25, and for meetings – 5.
Please note that after purchasing a paid plan, you will not be able to increase the event price. In such a case, creating a new event will be necessary.
ClickMeeting does not charge a service fee for events held during the trial period.
How can I integrate with PayPal?
With PayPal integration, you can sell event tickets and make money on donations from attendees.
Please note that it is necessary to have a PayPal business account.
Connect ClickMeeting and PayPal in four simple steps:
1. Log in to your PayPal account via https://developer.paypal.com/dashboard/applications
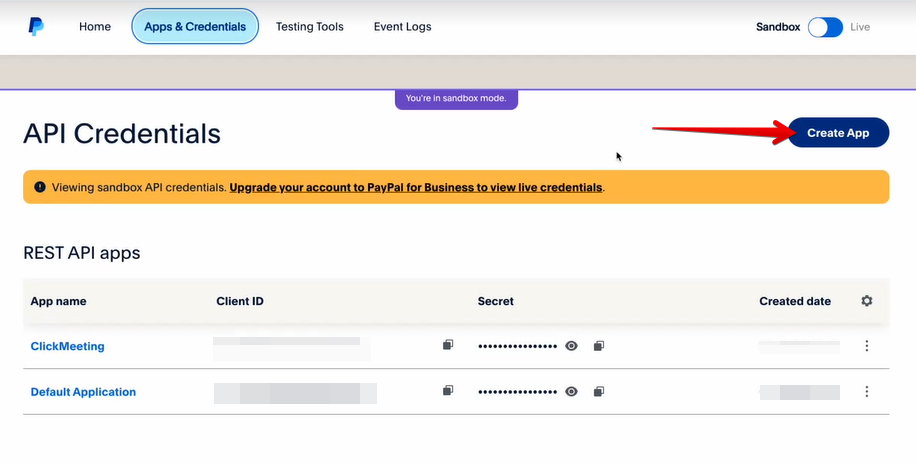
2. Go to the Developers tab >> Apps & Credentials and select the Api Credentials section from the list. Click the switch in the upper right corner to change from Sandbox mode to Live.
3. Create a new app, name it and copy the Client ID and Secret key data.
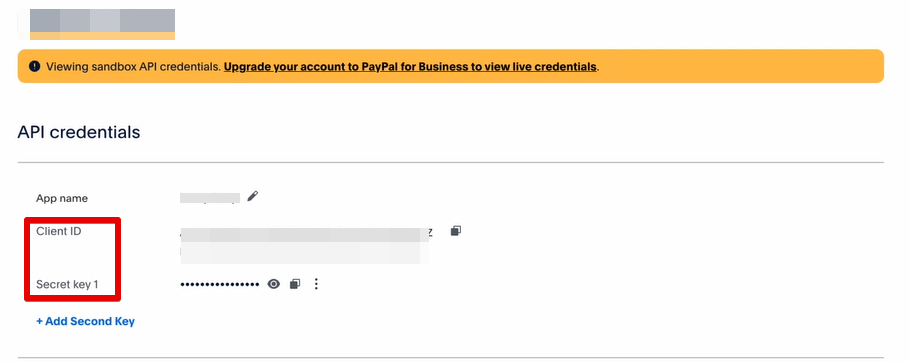
4. Paste the ID and key into the fields in the ClickMeeting account panel and click Authorize.
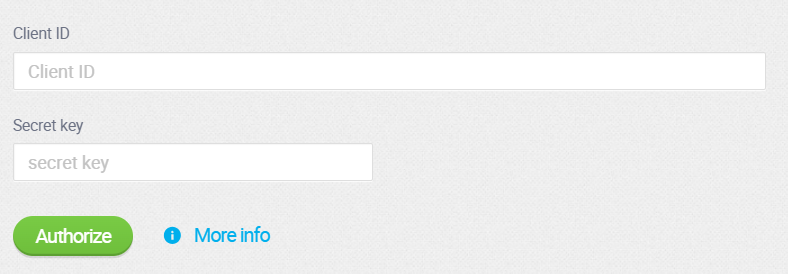
This authorization process needs to be done only once.
If you don’t have the PayPal account yet, please click here to create it and benefit from the integration!
Please note that PayPal has a different policy in each country due to various specifications of its market. The customers are able to benefit from PayPal account to the extent determined by PayPal for these countries.
How can I integrate with Stripe?
Thanks to Stripe Connect, you can connect your Stripe account with ClickMeeting. The entire process is based on completing data in an intuitive wizard.
You can create a new Stripe account if you are just starting to accept payments, or integrate an existing account. Check out our step-by-step guide here.
How to create discount tickets?
Do you want to encourage attendees to purchase tickets by organizing time and/or limited ticket discounts? You can find the necessary settings in the “Discount tickets” section when creating a paid event. To use them, set the switch to the “On” position.
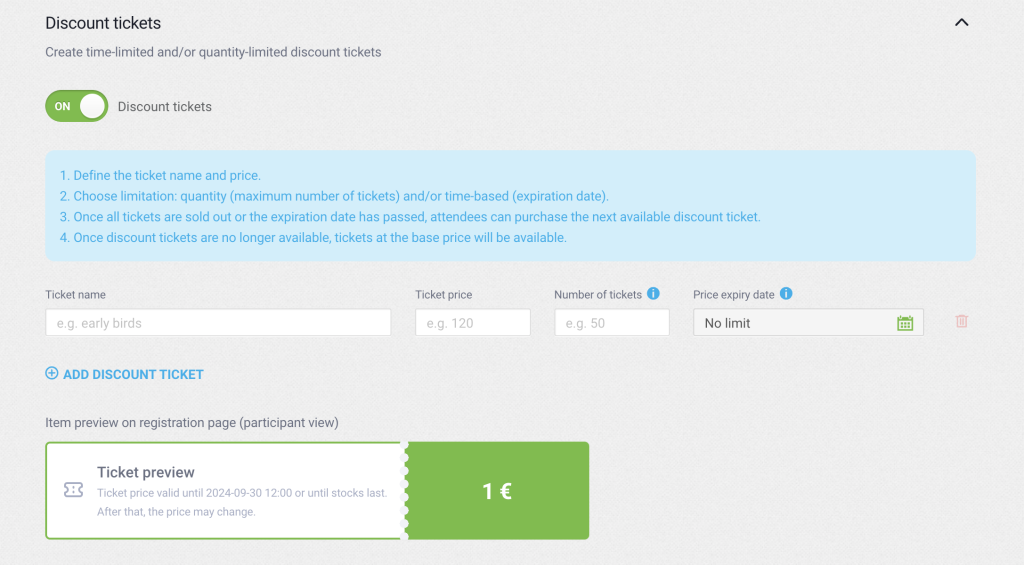
This tool will be useful in several scenarios. Let’s take a closer look at them.
How to create early birds promotions?
Reducing the price of tickets in the first stage of sales can be a great way to encourage your audience to buy. To create a ticket of this type, all you need to do is:
- Enter the name of the ticket
- Enter the discounted price
- Set an expiration date.

Remember that you can also put a limit on the number of discounted tickets. For example: if you want the first 50 tickets to be available in the early birds formula, enter this number in the “Number of tickets” box.

In this case, 50 more tickets will be included in the promotion with no time limit. Nothing prevents you from applying both a time and quantity restriction at the same time.
For example, if you want the promotion to be valid until a certain date, but no more than 100 tickets are included, fill in the “Number of tickets” and “Price expiry date” fields at the same time.

How to create ticket pools?
Using these simple settings, you can also create other promotions. An interesting way to increase sales will be to set up ticket pools. Each of them can be limited in time and/or quantity. To add more ticket pools, select “Add discount ticket” and then enter the terms of the promotion.
As in the previous cases, the number of tickets can be limited by:

Price expiration date:

Or both the number of tickets and the expiration date:

Once all tickets available in the pool are sold out or price expiration date has passed, your attendees will be able to purchase tickets from the next ticket pool (if established) or tickets at the basic price.
In the details of your event under the “Paid Event” tab, you will quickly see the number of tickets sold, along with information on their price, the buyer and the discounted conditions they took advantage of.
Please note that discounted tickets are not available for permanent events and on-demand events.
How to create promo codes?
Promo codes are another great way to attract attendees to your paid webinar. You can place them, for example, in the ads or mailings. Your recipients will be able to enter the code when making a purchase, and therefore get a discount.
In ClickMeeting you will create promo codes directly in the event configuration window. To do so, set this switch to the “ON” position.
Then enter the code and its value either in percent or price. You can also limit the promotion’s validity by quantity, specifying the number of discounted codes, and/or by time: to do so, specify the code’s expiration dates.
Each payment system provider has a minimum transaction amount. If the ticket price after applying a promo code is below this minimum, the amount may be rounded up. Please refer to the information below:
- Stripe – https://docs.stripe.com/currencies#minimum-and-maximum-charge-amounts;
- PayPal – 1.00 for currencies: USD, EUR, PLN, GBP, AUD, BRL, CAD, CHFCZK, DKK, HKDILS, INR, MXN, MYR, NOKNZD, PHP, RUB, SEKSGD.
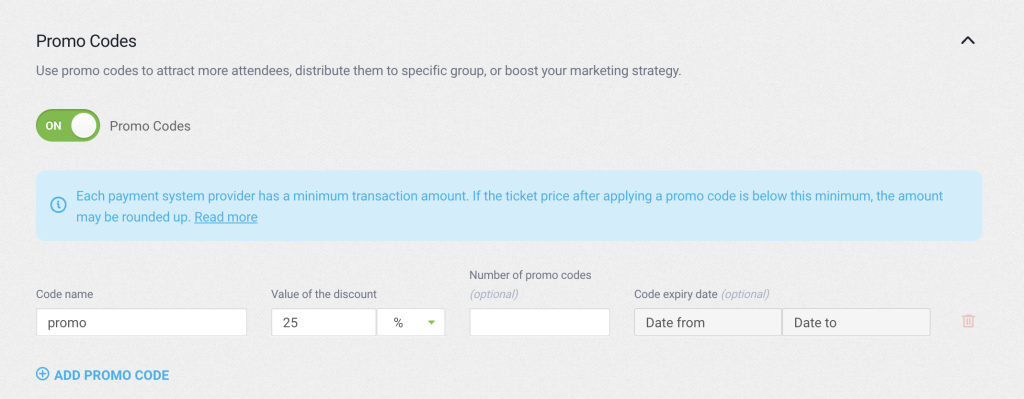
This way you can also provide your audience with free tickets: just set a discount at 100%.
Note that promo codes are compatible with discount tickets. The value of the discount will be calculated in relation to the current price of the tickets.
If you want to create several promo codes, simply select “Add promo code”.
You can also attach the discount codes to event reminders and invitations.
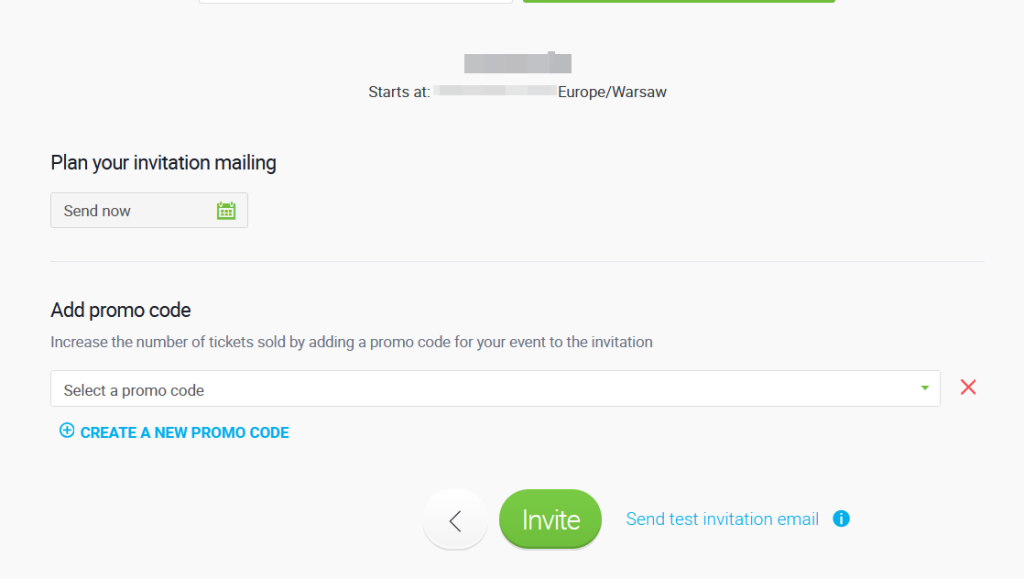
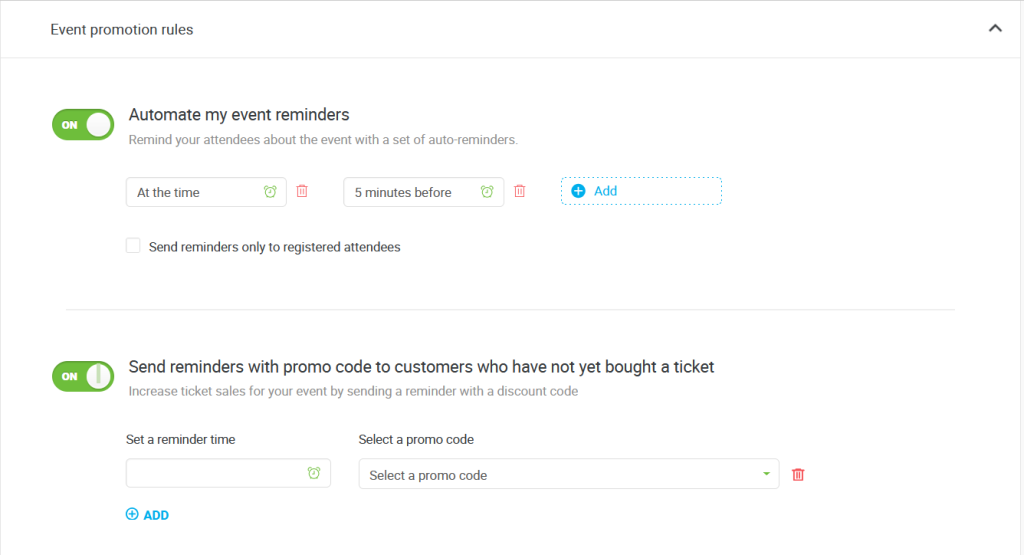
At any time during the sale of your events, you have the possibility to edit the discount codes and reminder settings. This gives you the flexibility to respond to ongoing ticket sales.
Promo codes are available for all types of events
How does the payment work for permanent events?
For permanent events, your attendees pay once, and then can enjoy your series of webinars using just one access.
Where can my attendees see the ticket for a webinar after paying the fee?
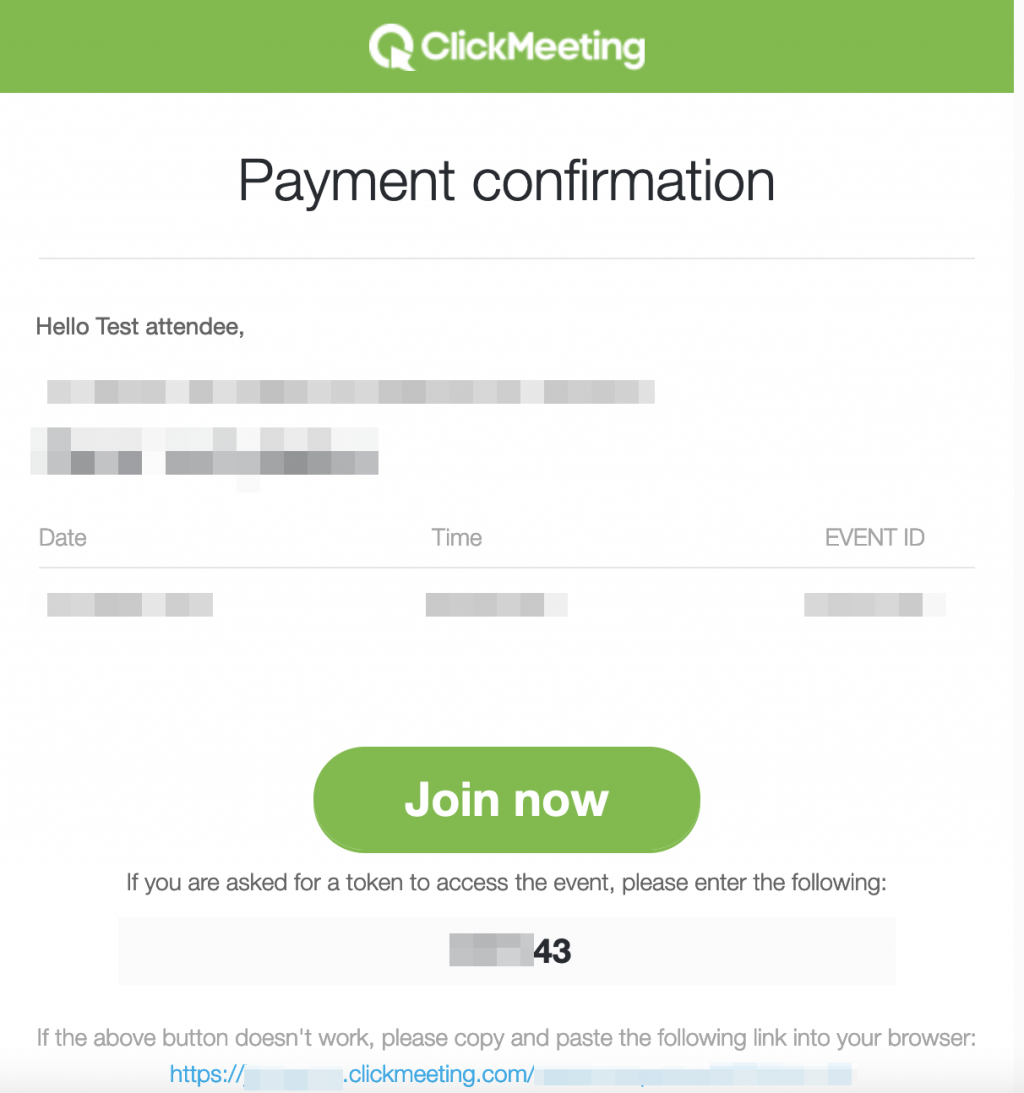
The attendees will receive the payment confirmation to the email address provided in the registration form.
To attend the event, attendees can click the Join button in the email or save the token for later. If the attendee loses this email, the organizer of the event can resend it.
Can I change the fee while the event registration is in progress?
Once the entry fee is submitted while scheduling the event, it cannot be changed. This means that if you want to alter the price of the event, you will need to delete the webinar and schedule it again with the changed price.
What happens if I change the date of the event?
If you decide to hold the webinar another day, simply edit the event.

When the changes are submitted, your attendees will be notified immediately.
Where can I see who paid for the event?
Go to your event and select the Paid Event tab. You will see all the attendees with their payment status. From here, you can manually Confirm or Reject each attendee.
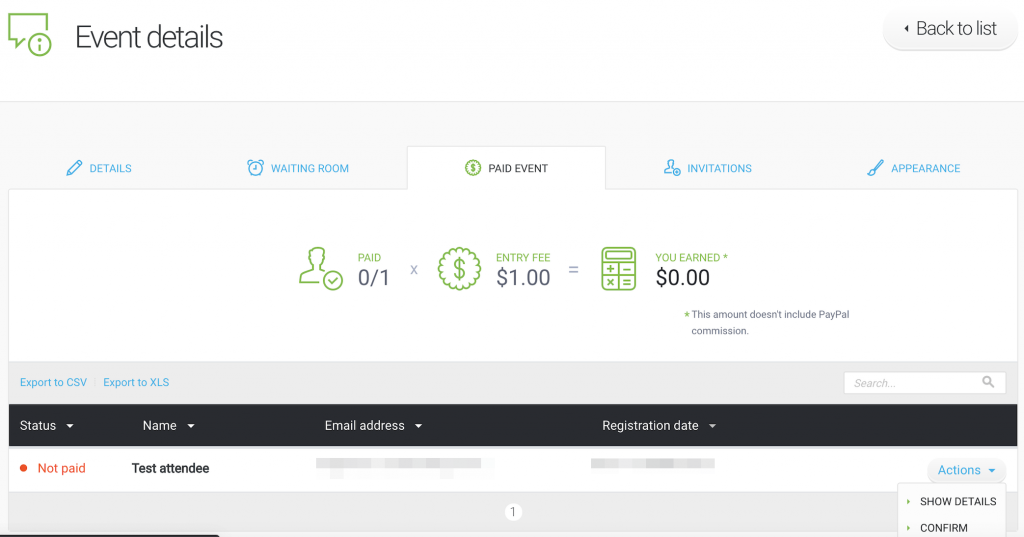
What will happen with my attendees’ money if I cancel the event?
If you choose to cancel the event or reject the admittance of the attendee, your attendee(s) will receive a notification. You can return the paid fees from your PayPal/Stripr account. Please note that the refund does not happen automatically when you cancel the event.
How do I receive payments from the attendees?
The payments are directly transferred into your PayPal/Stripe account. From there you can transfer it onto your bank account linked with the service.
How can the attendees pay for the event?
Your attendees can pay either via PayPal/Stripe or with a card; MasterCard, Maestro, Visa, Discover or American Express.
What is the maximum ticket number for a paid event?
The number of tickets depends on your plan size. If you have a plan for 50 attendees, you can sell up to 50 tickets. With a 200 attendees plan, you can sell up to 200 tickets, etc.
How to make money from attendees’ donations?
Supporting your favorite creators by sending them funds in the form of one-time voluntary donations is very popular today. Receiving donations is also possible via ClickMeeting. Read more.
How does the free preview of a paid on-demand webinar (PayWall) work?
In the on-demand webinar settings, you can set up a free preview of the recording that will be available to all participants. To access the full version of the recording, a ticket must be purchased. You can find the step-by-step instructions here.
