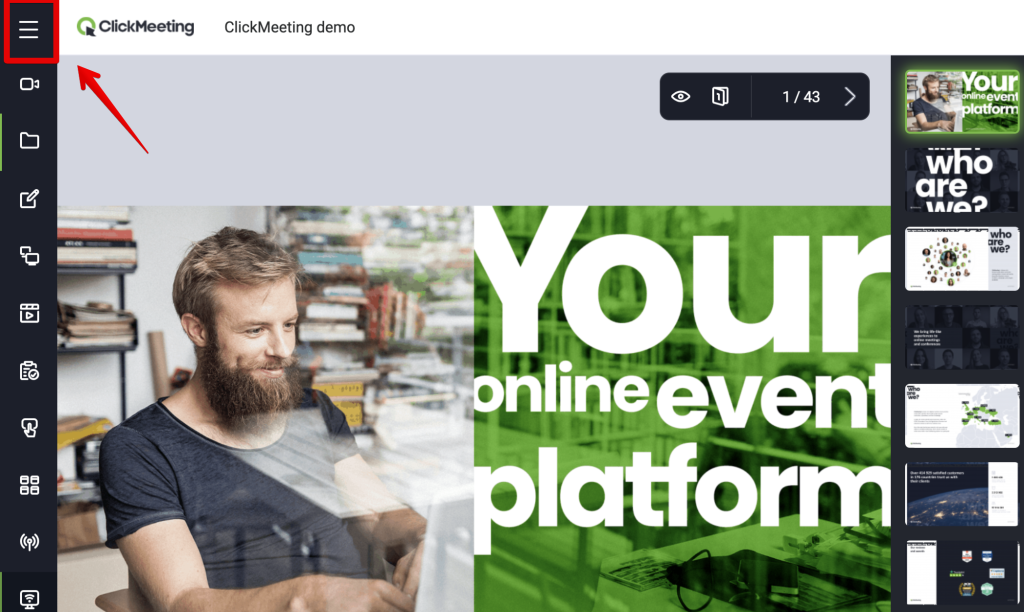
Left side menu
Whiteboard
Collaboration with attendees
Collaborate with unlimited space and unlimited number of pages.
You can collaborate with up to 40 people. Once collaboration mode is enabled by the host or presenter, attendees can start using various whiteboard tools:
- add sticky notes
- add shapes
- add text
- put grid lines on the whiteboard
- draw with the pencil tool
- change the pencil size and color
Participants can use keyboard shortcuts for quick navigation.
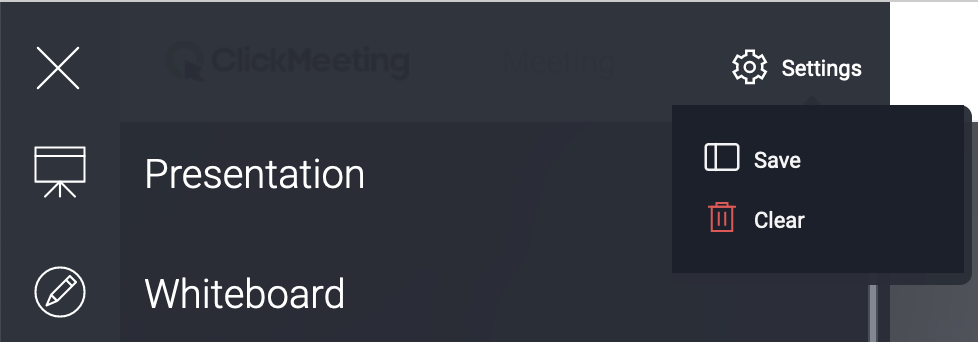
When hosting an event, you can switch to another tab (e.g. Presentation) and then get back to Whiteboard without losing any changes. The host and presenters can clear the whiteboard if necessary. Once collaboration is ended, they can save the whiteboard as jpeg/png.
Be sure to save the whiteboard before ending the event if you need to save the effects of your collaboration. Note that you cannot access and continue working on a whiteboard after you have ended the event and closed the room.
Whiteboard is included in Live and Automated plans. You can also test it in the free trial of ClickMeeting. It is available in all event types: meetings, webinars, Edu mode and private mode.
To use the Whiteboard tool, you need the latest version of Google Chrome, Mozilla Firefox, Safari, Edge (Chromium), Yandex or Opera, as well as the latest version of Windows or MacOS.
Whiteboard navigation
When using a mouse: right click and drag to move around the whiteboard. Use the scroll wheel for vertical scrolling. For horizontal scrolling press and hold Shift and use the scroll wheel.
When using a touchpad: swipe with two fingers to move around the whiteboard.
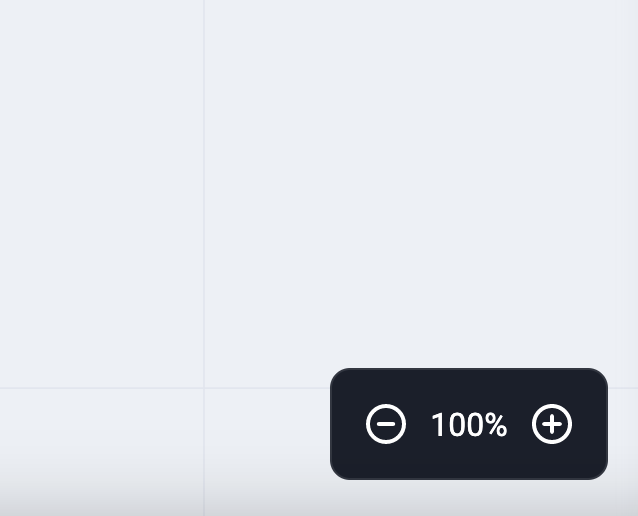
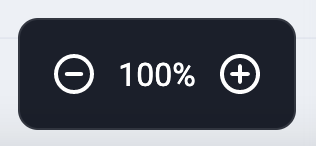
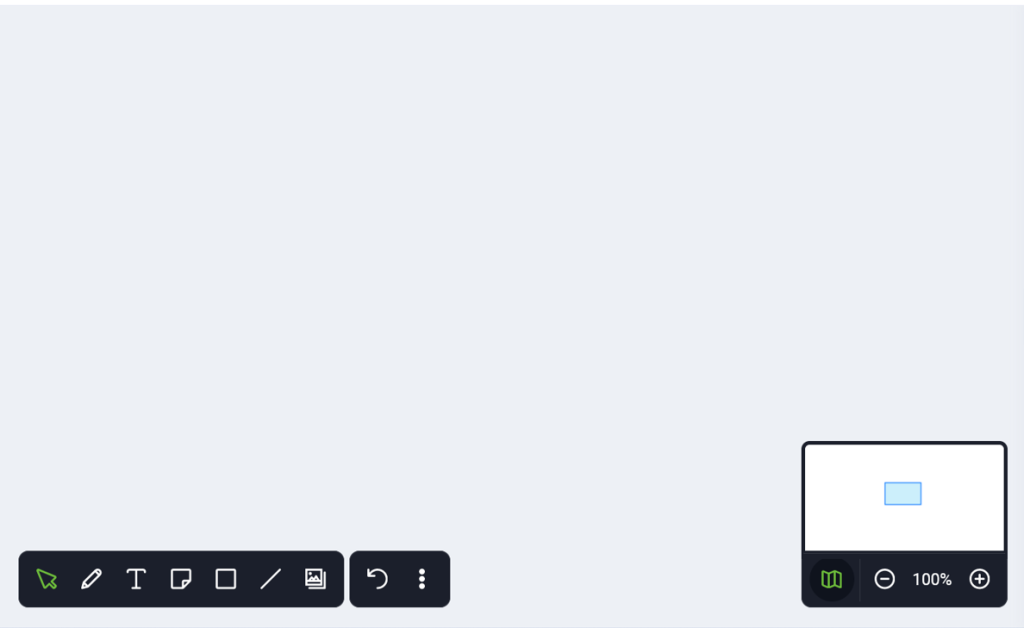
How to zoom in/out
To zoom in/out, click +/- in the bottom right corner of the whiteboard:
Alternatively, use the scroll wheel and press & hold Ctrl to zoom in/out on Windows.
For macOS: use the scroll wheel and press & hold Control to zoom in/out.
If you are using a touchpad, pinch to zoom in/out. Double click on % to go back to 100%.
Minimap: in the bottom corner of the whiteboard you can now see a preview of the entire project, making it easier for you to navigate through it.
Use the Follow me feature to easily keep your event participants focused when using the Whiteboard. To enable it, open the Whiteboard and click the three dots menu.
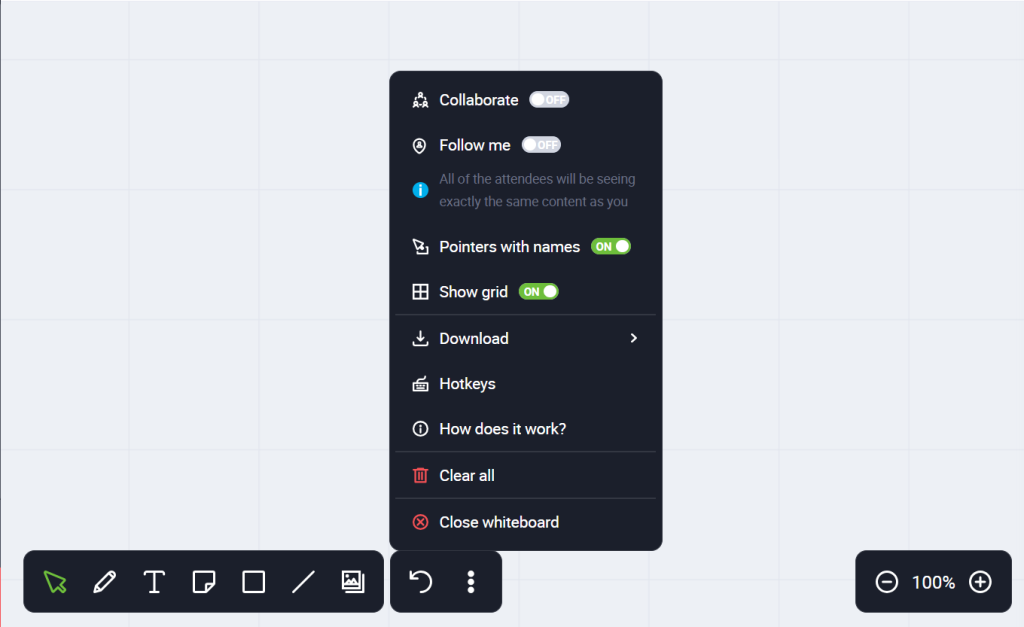
This feature is available for hosts and presenters only and can be used by one person at a time (first come, first served). The button is greyed out until someone stops using the feature and disables it.
Once Follow me is enabled, participants will be seeing what the person who is using this feature is seeing. A recording of the event will reflect that. While Follow me is on, attendees cannot move around the Whiteboard on their own. They can still use all the tools available in the collaboration mode as long as collaboration has been enabled.
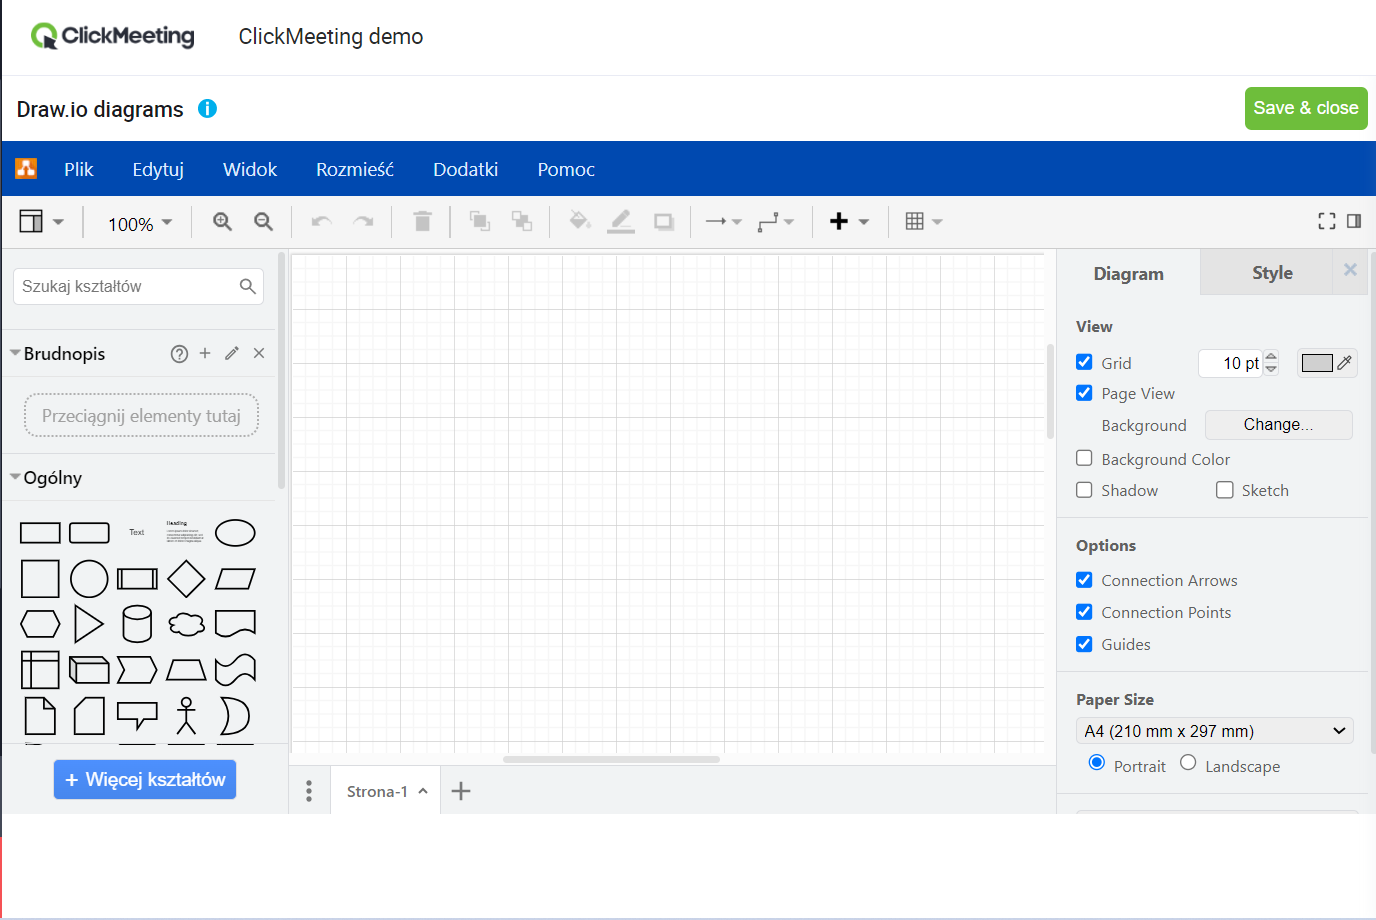
The whiteboard can also be filled in with diagrams and schematics by running:
- templates
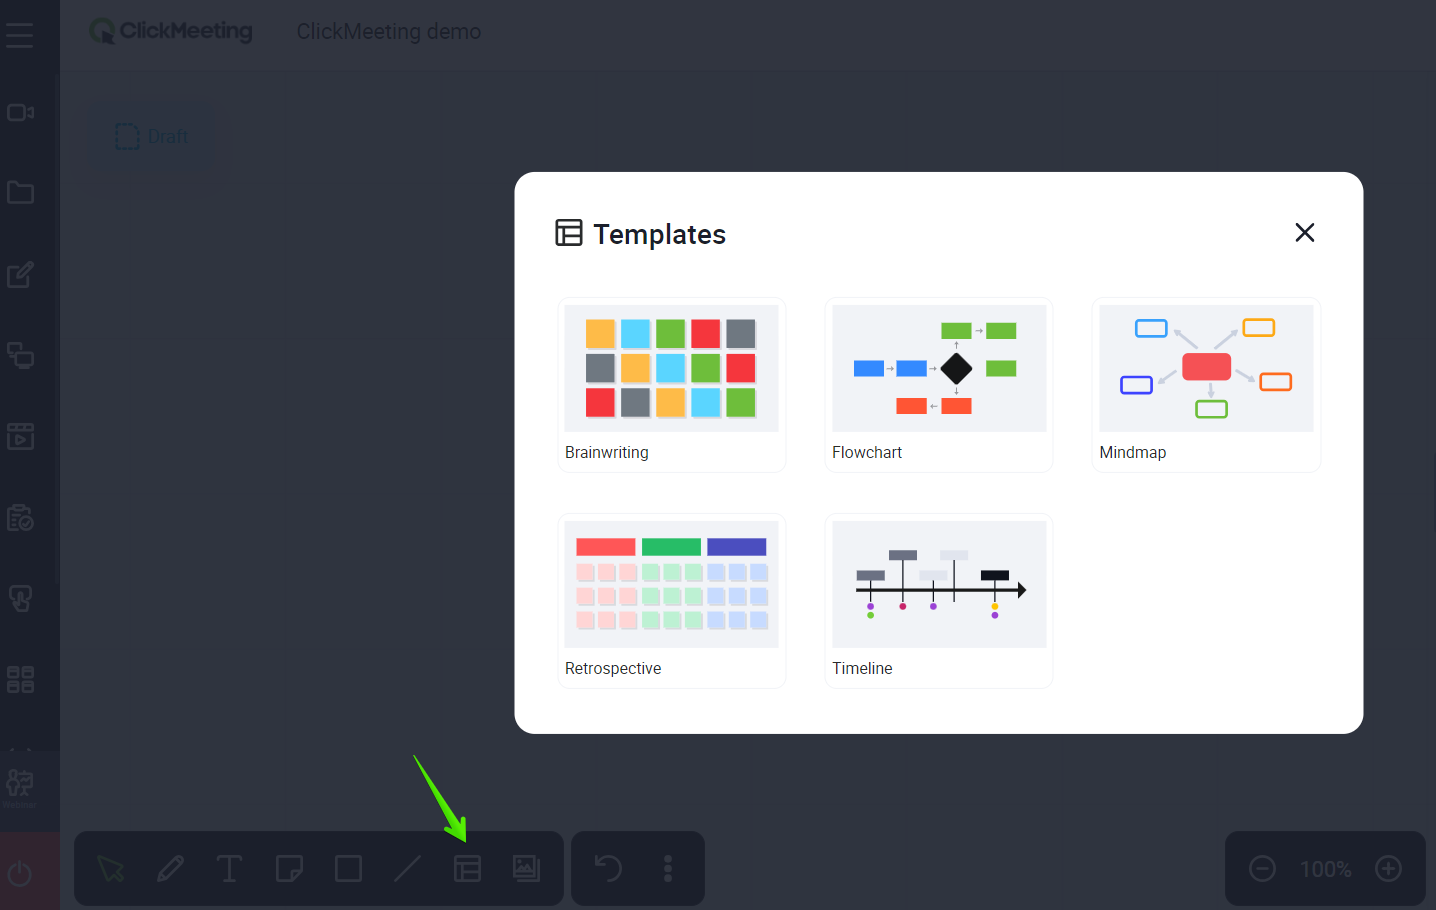
- draw io
Presentation
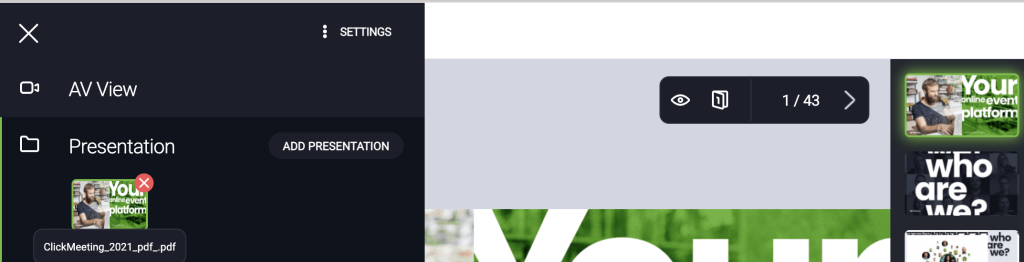
You can display presentations, photos, video files, and more without needing to share your screen. In the menu on the left, click on the Presentation icon. There, you will find all the files uploaded to your account, along with additional tabs dedicated solely to presentations, photos, videos, audio files, and others to make them easier to find. Locate the file you want to show and click on its name to open it.
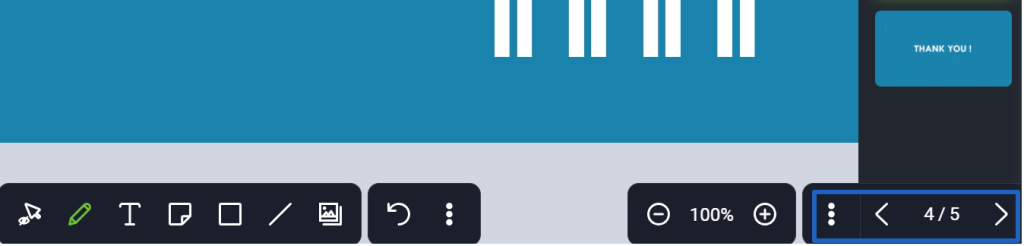
You can switch between slides by:
- clicking the slide on the preview bar on the right side
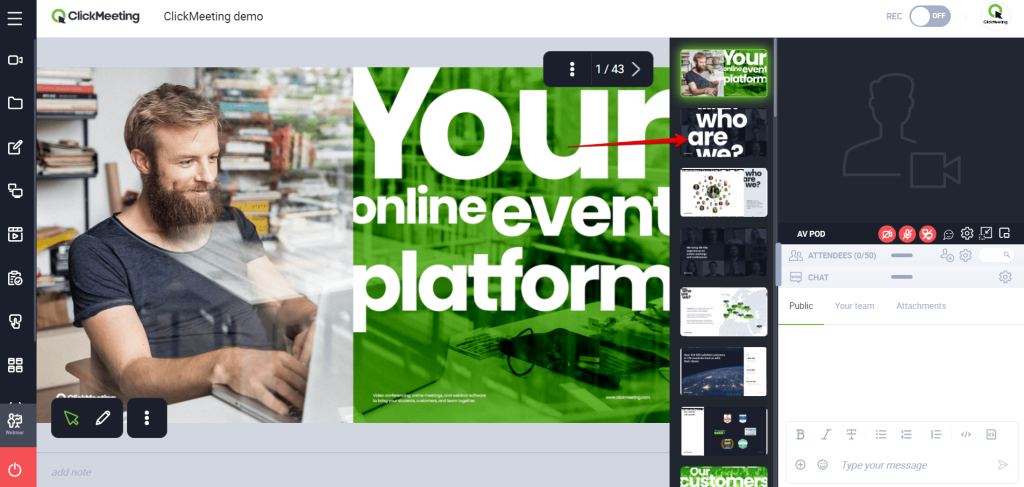
- using the arrows in the bottom right corner of the presentation area
If you want to close the presentation, expand the menu on the left side of the room by clicking the three horizontal lines in the upper left corner.
Hover over Presentation. Here you can close the current presentation or open another one.
In the presentation area, your cursor is invisible by default for your attendees (it’s private). You can enable it by clicking on the pointer icon in the bottom left corner and selecting the appropriate icon.
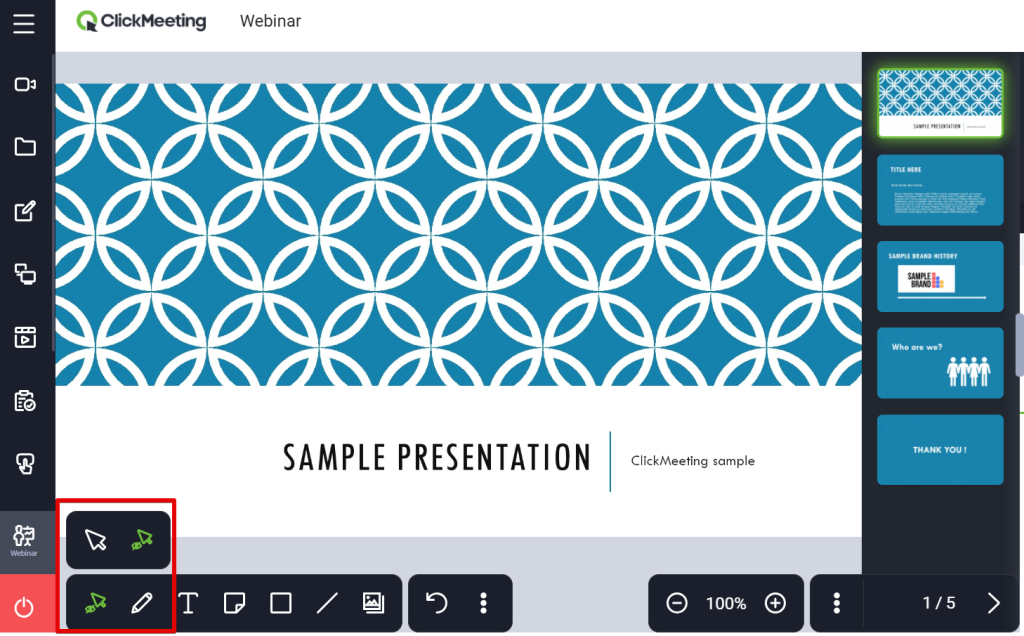
Next to the pointer you can find a marker. This feature allows you to highlight the most important information from the presented materials. The highlight will disappear after a couple of seconds. To write something down permanently on your presentation you would need to use the pencil.
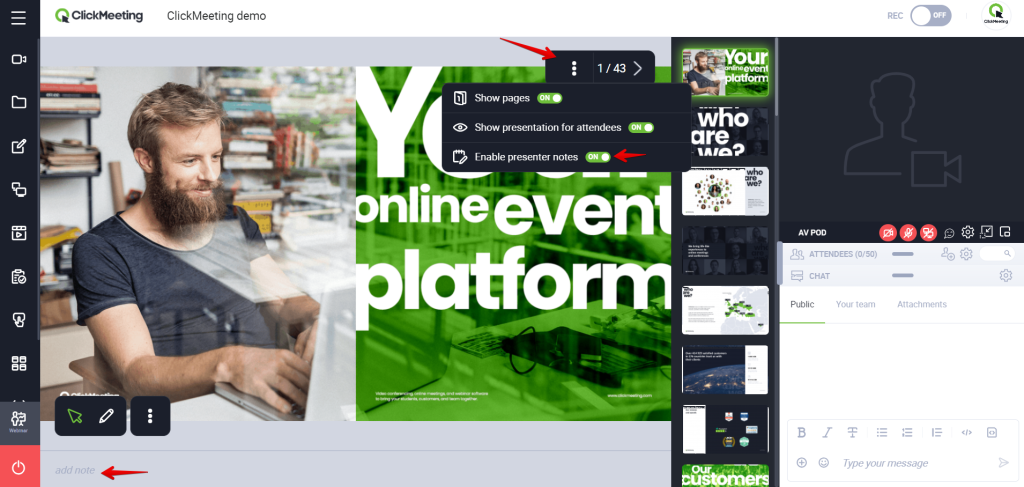
You can place notes on the uploaded presentation (in ppt, key, pdf format). Notes on the presentation:
- can be added by the organiser or presenters,
- are added to each slide separately,
- can be edited by several people at the same time and changes made will be overwritten;
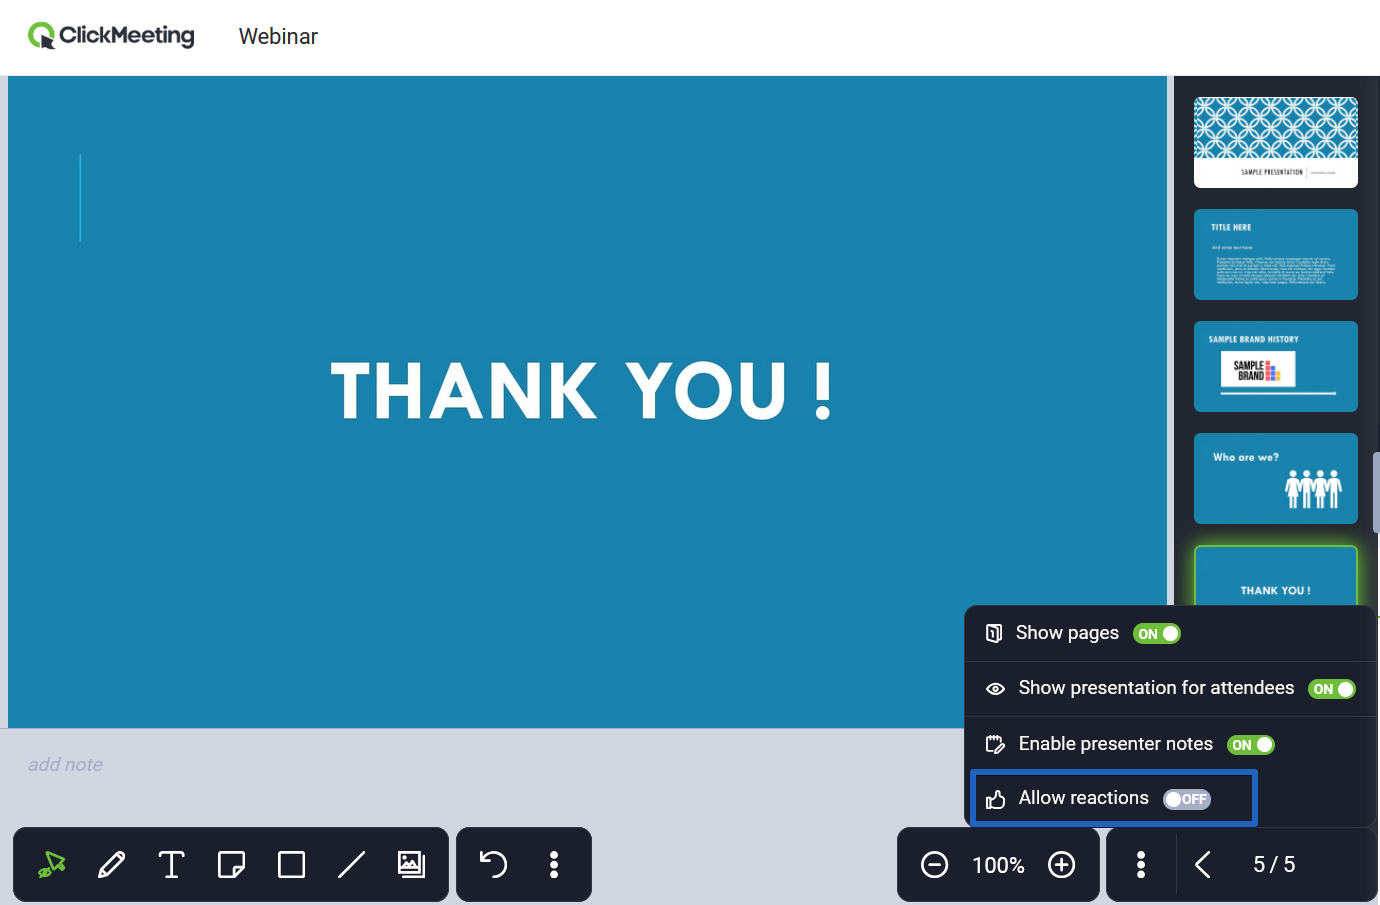
- are enabled by default, but you can always turn them off by clicking on the three dots at the top right corner of the presentation area,
- can be created during Event Preparation, then when you save the event room and rejoin, the notes will be visible on the selected presentation.
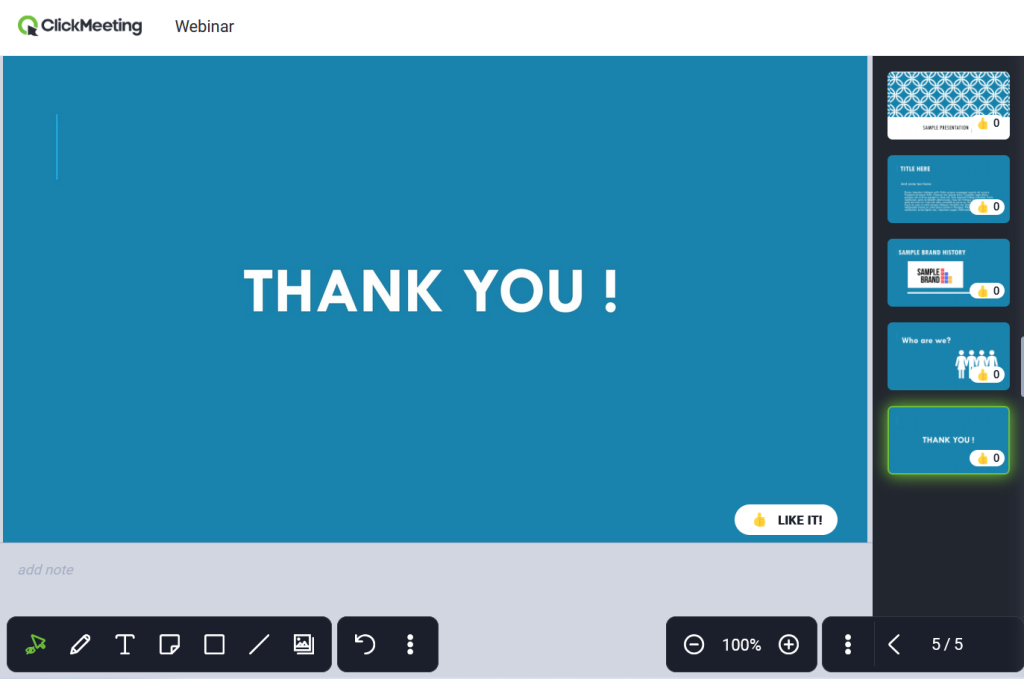
Under the presentations’ settings, you can enable and disable reactions (thumbs up) on the slides.
Attendees will see a Like button on the displayed slide and the number of total likes. It is also visible for the organiser and the presenters. This feature is available to users joining events using the desktop browser.
Whiteboard library
Use the Whiteboard library feature to create and work with multiple whiteboards. Save your whiteboards and get back to them at subsequent events.
You can save 1 whiteboard during the free trial and up to 3 after purchasing a paid plan.
If you have a paid ClickMeeting plan, feel free to buy an add-on that will allow you to save an unlimited number of whiteboards.
To create a new whiteboard, enter an online event room, choose the Whiteboard tool from the left-side menu and click on Create new whiteboard.
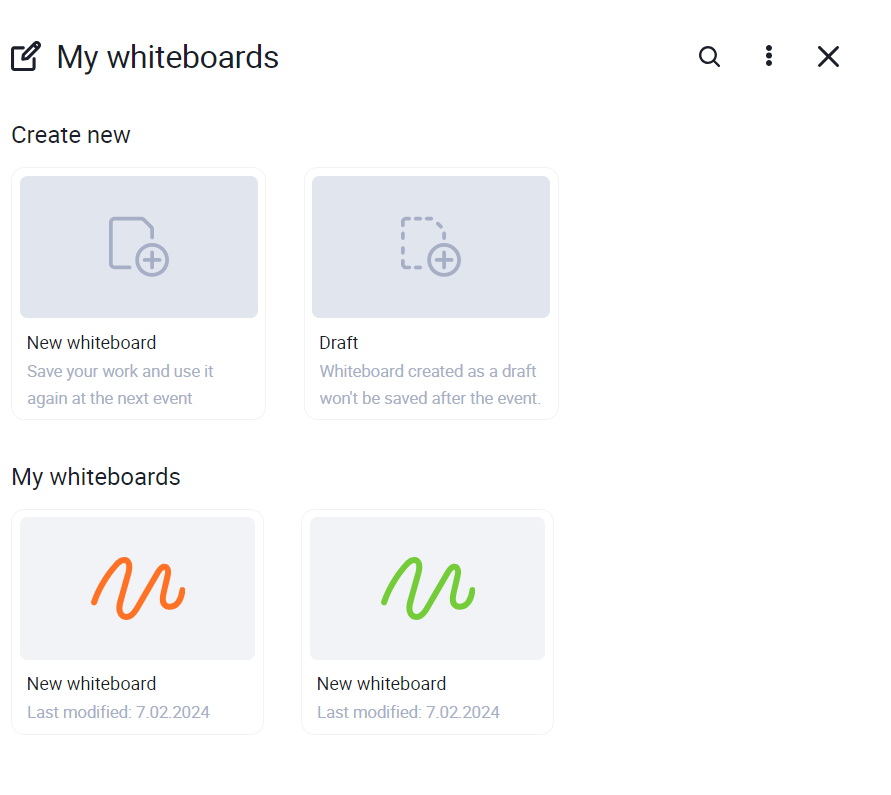
By default, a new whiteboard is called new whiteboard. Feel free to give it another name to make it more recognizable. To facilitate your workflow even more, consider sorting your whiteboards by name or date.
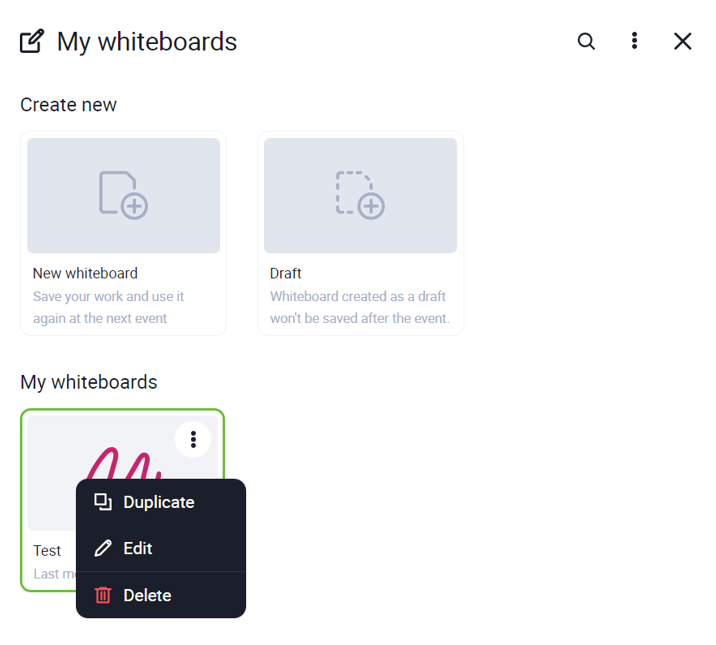
You can check when each whiteboard has been last edited.
Any whiteboard can be duplicated if needed. Hover over the whiteboard you want to duplicate, click the three-dot menu and choose the Duplicate option.
To delete whiteboards you no longer need, click the three-dot menu and choose the Delete option. Deleting old whiteboards will free up space for the new ones.
To open an existing whiteboard, go to My whiteboards and click on the whiteboard that you want to display.
You can work on 1 whiteboard at a time during an online event. Changes are saved automatically. To switch to another whiteboard, close the one you are using at the moment and open a new one.
Use the Draft Board feature if you don’t want a specific whiteboard to be saved in your whiteboard library. You can still use all whiteboard tools when using the Draft Board.
If you have any feedback on the Whiteboard library feature, please email us at support@clickmeeting.com.
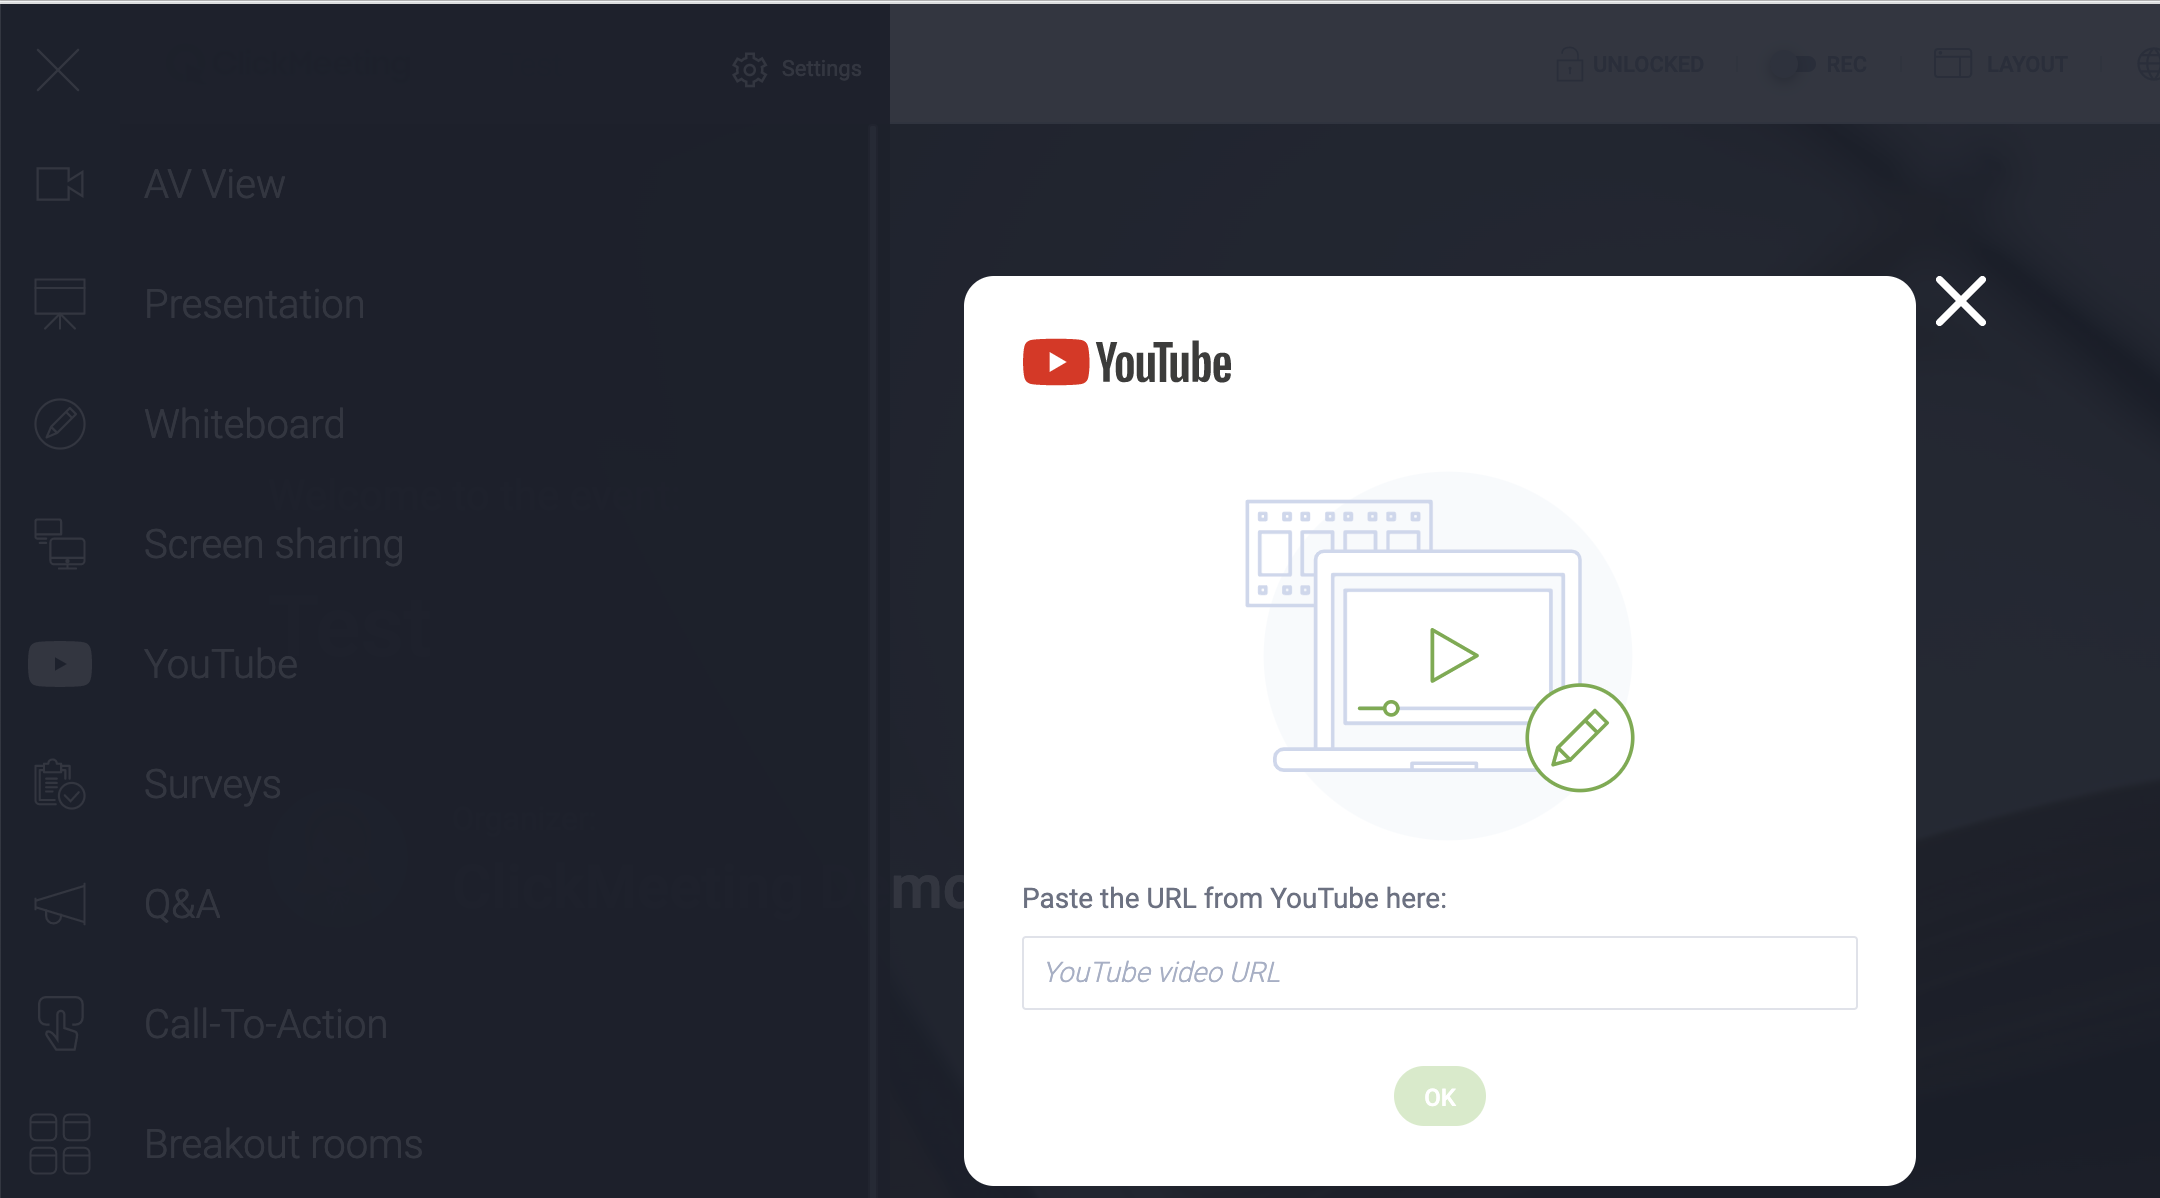
Can I play a video for my attendees?
Yes, there are two methods:
1. Use the YouTube feature in the Dashboard on the left-hand side of the webinar room to play any video hosted on YouTube.
2. Upload one or more videos into the Presentation feature available in the Dashboard. To play an uploaded video during an event, click the Presentation icon in the Dashboard and choose the video.

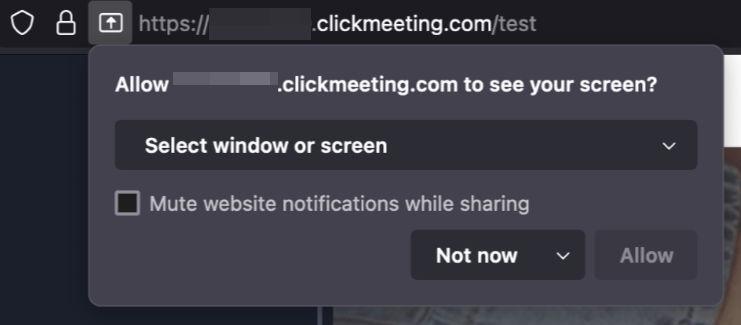
How can I share my screen?
Join your webinar room and navigate to the menu on the left to click the Screen sharing icon. A new pop-up window will appear. Choose what content you want to share. Select the entire screen or application window and click the Share button.
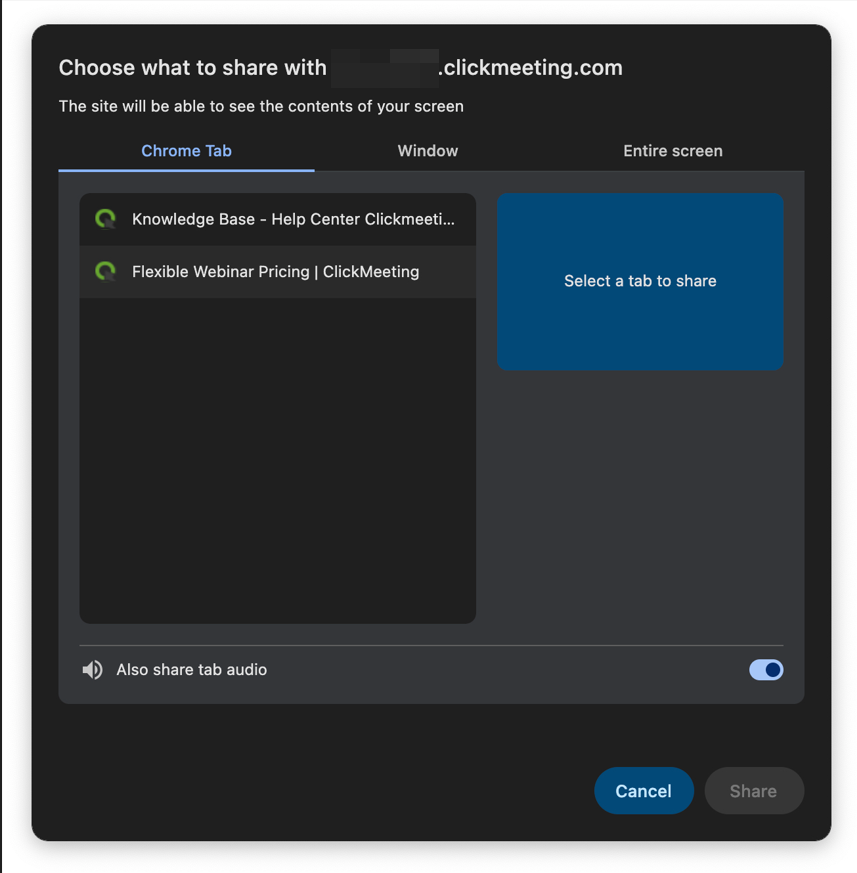
Embedded screen sharing employs your browser’s native functions. This solution enables you to share your full screen, your selected application, or a selected bookmark within a given browser. This version is available for Chrome, Opera, and Firefox. This option also allows you to share your audio while sharing your screen. On devices with a macOS or Windows system, you can share your audio within Google Chrome and Edge browsers tabs only. Additionally, the Windows system allows you to share your audio when choosing to share your whole screen.
Screensharing is available to hosts, presenters and online meeting attendees using the ClickMeeting mobile app on Android devices.
While sharing your screen, you can select the most suitable option:
- Image clarity (default) – an option useful for presenting static documents, so that the content on them is displayed in the best possible quality
- Smoothness – an option useful for presenting dynamic content, ensuring that the content is as smooth as possible.
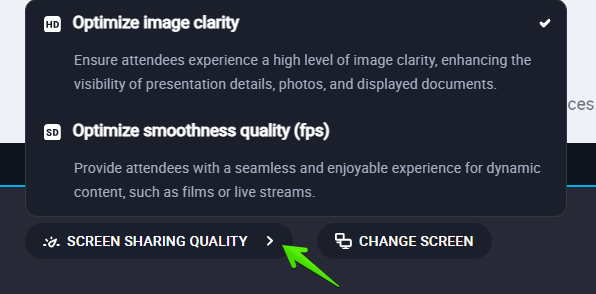
These features are available on all browsers except Firefox and are not available on our mobile app.
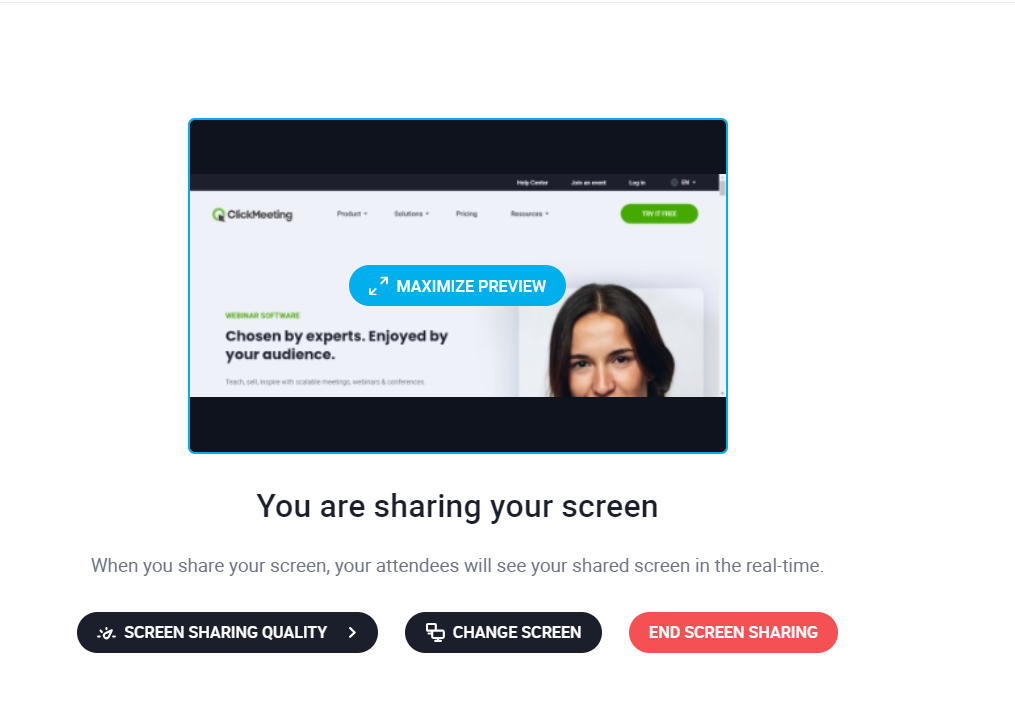
When you select a screen share area, you will see a preview of it in the event room in the full presentation area, this preview can be minimised if necessary.
When you use the zoomed-in preview option, you can also use the tools to add content to the shared screen.
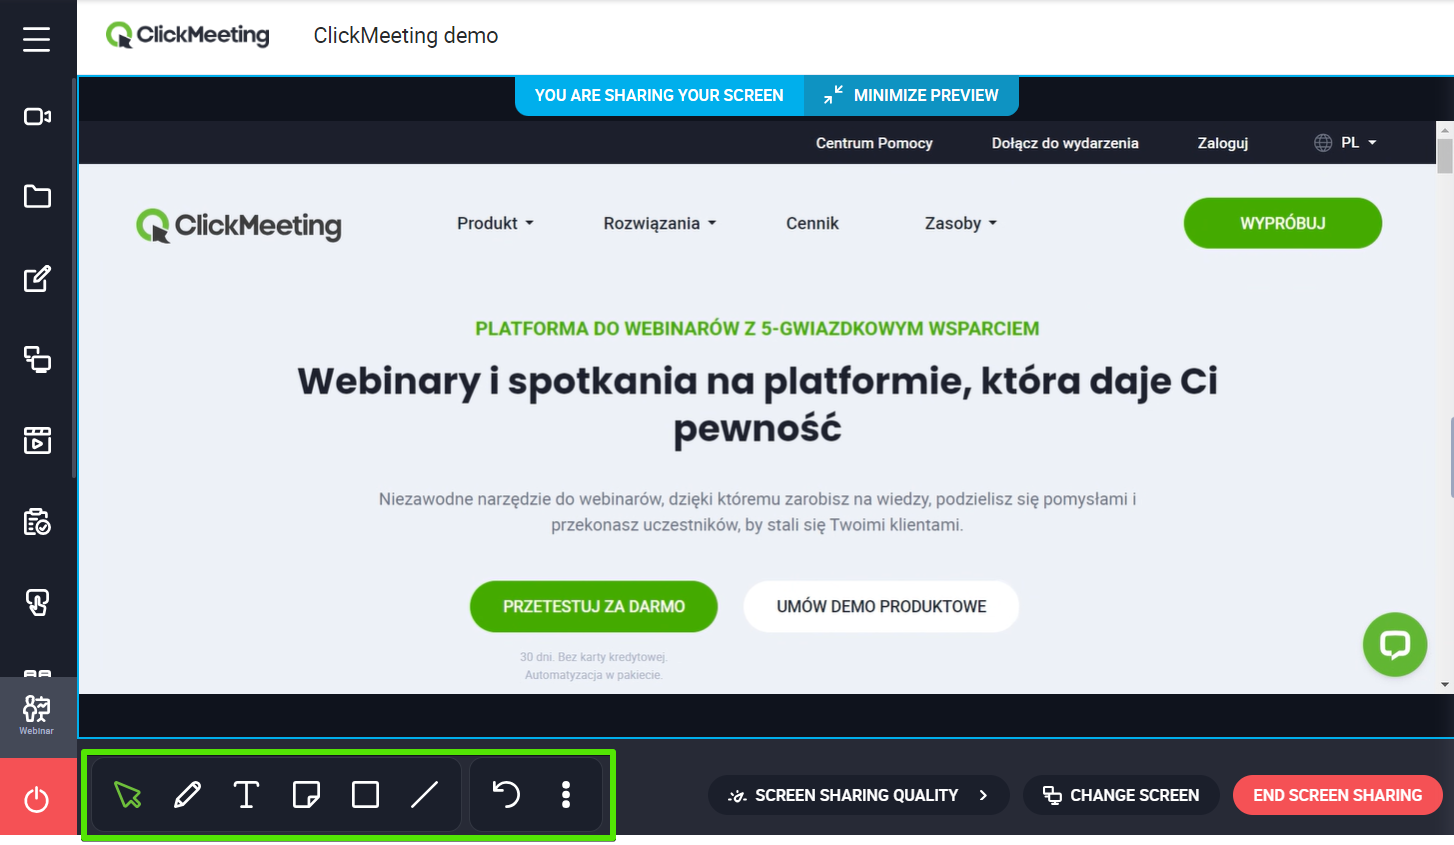
The tools are available to event presenters or, if you select the collaboration option, also to event participants.
This function will work well when working on documents or worksheets. The pencil and text options allow you to collaborate with participants on sequentially displayed material by the presenters, or to draw participants’ attention to specific elements of a document.
Before moving on to the next material displayed, remember to clear anything you have added so that you can start working with new material.
The screen sharing feature is available to both the organiser/presenter and meeting participants (including those using the ClickMeeting mobile app on an Android device).
Below you can find a short summary of how our Screen Sharing feature works with different browsers and devices.
Mac OS
| Browser | Full screen | App window | Browser tab |
| Chrome | ✅with sound | ✅with sound | ✅ with sound |
| Edge | ✅ | ✅ | ✅ with sound |
| Safari | ✅ | ✅ | ✅ |
| Opera | ✅ | ✅ | ✅ with sound |
| Firefox | ✅ | ✅ | ✅ |
| Desktop App | ✅ | ✅ | ❌ |
Windows
| Browser | Full screen | App window | Browser tab |
| Chrome | ✅ with sound | ✅with sound | ✅ with sound |
| Edge | ✅ with sound | ✅with sound | ✅ with sound |
| Opera | ✅ | ✅ | ✅ with sound |
| Firefox | ✅ | ✅ | ✅ |
| Desktop App | ✅ | ✅ | ❌ |
Android
| Browser | Full screen | App window | Browser tab |
| Chrome | ❌ | ❌ | ❌ |
| Mobile App | ✅ | ❌ | ❌ |
iOS (iPhone i iPad)
| Browser | Full screen | App window | Browser tab |
| Safari | ❌ | ❌ | ❌ |
| Mobile app | ❌ | ❌ | ❌ |
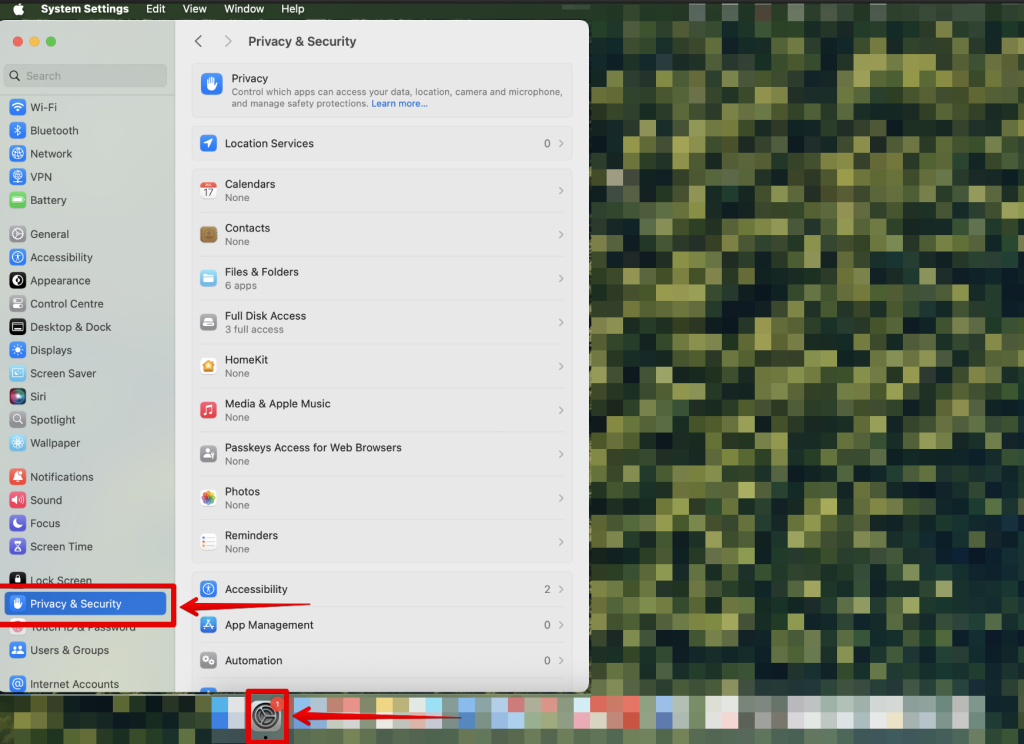
Screen sharing with MacOS
The MAC operating system may require you to approve screen recording permissions.
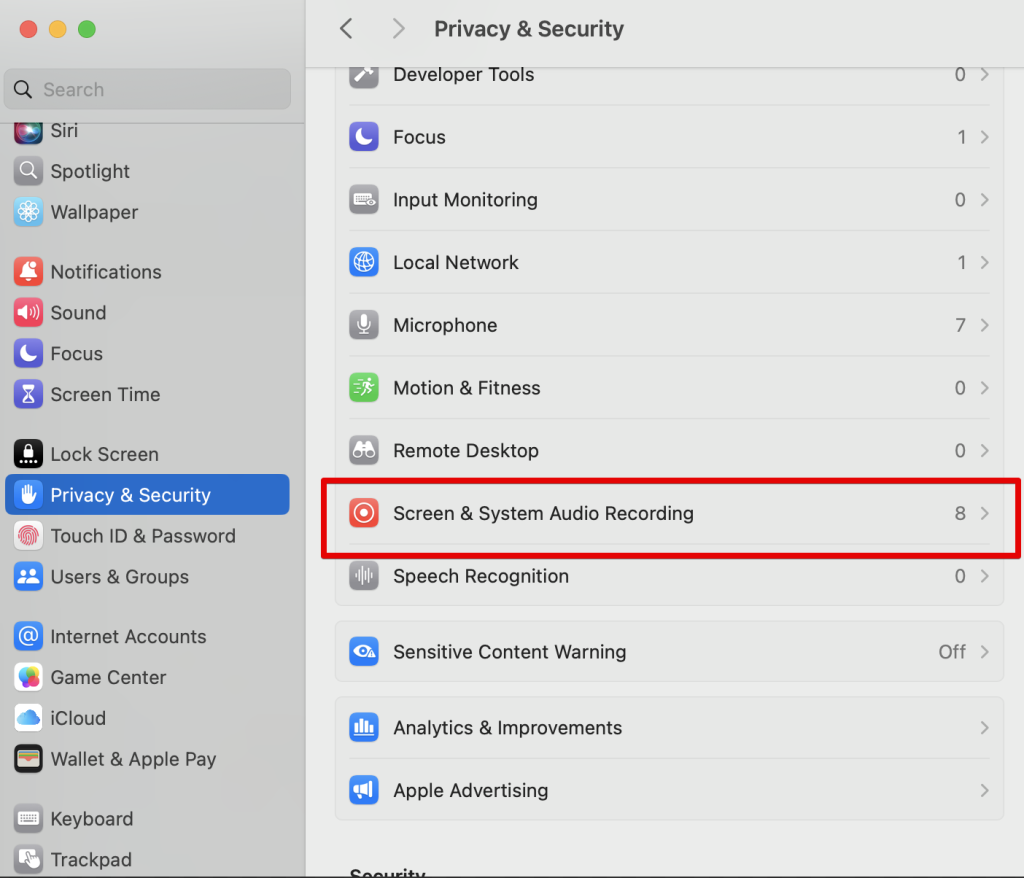
1. Select System Settings from the application bar, then Privacy and Security:
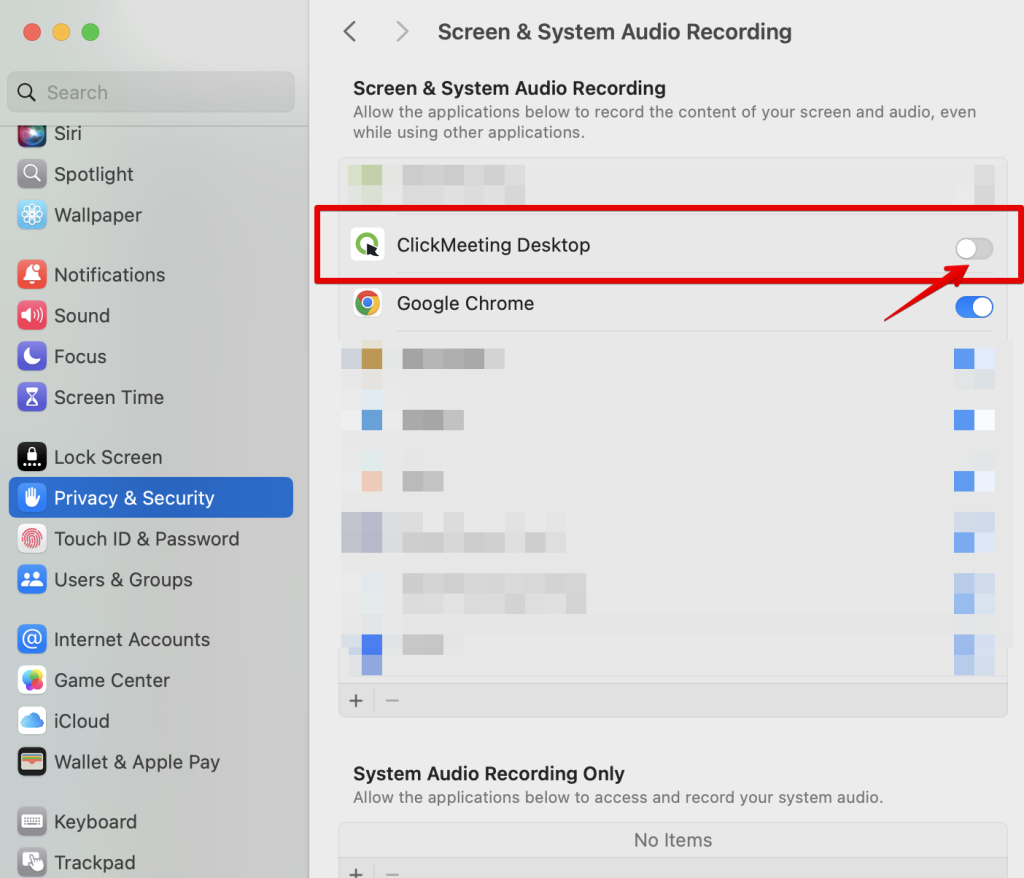
2. Then select ‘Record screen and system audio’:
3. Give permission to the ClickMeeting Desktop app or the relevant browser:
4. After restarting the app/browser, screen sharing will be available.
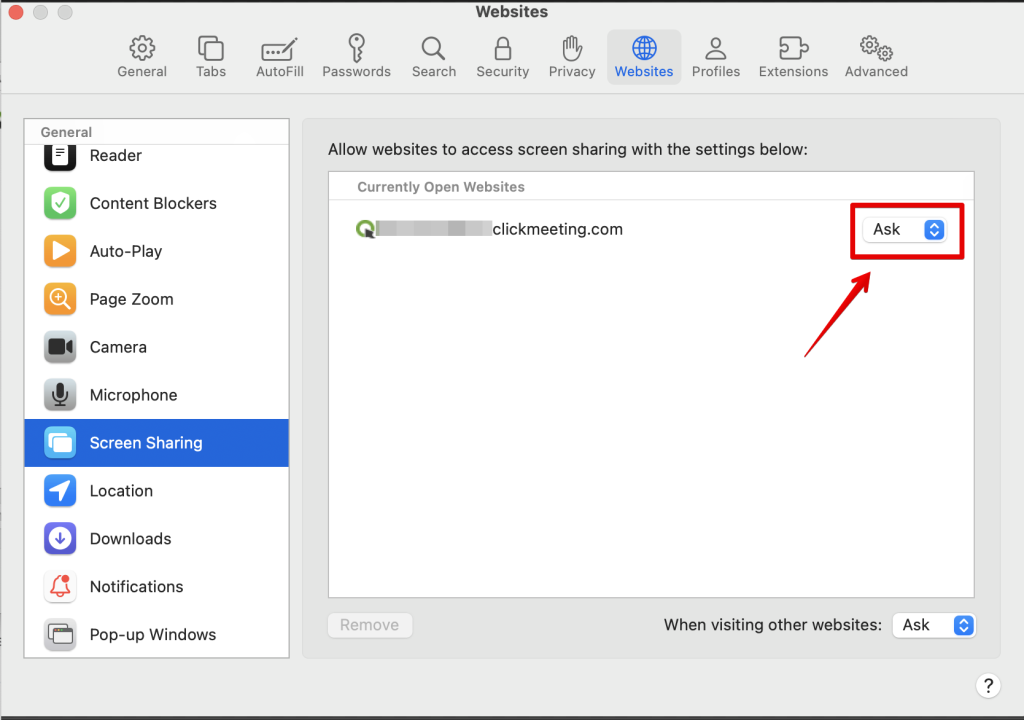
NOTE: In the case of the Safari browser, permission may need to be granted not only in the Mac settings, but also on the Safari side; to grant this permission, go to Safari to Settings, select Websites and then Screen Recording, where for the clickmeeting.com domain it is necessary to set the option AS Ask (if the option Do not allow is selected, screen sharing will not be possible):
Windows operating system does not require any permission to be granted for screen sharing.
Can my attendees also share their screen during an event?
If you work in a small group with up to 40 people, it is a great idea to collaborate with the whole audience by talking, seeing each other or each other’s screens. The ClickMeeting platform allows your attendees not only to turn on their cameras or microphones but also to display their screen and discuss issues or visualize ideas.
Simply, create a meeting or change the event type to a meeting directly in the event room. When the attendees join your event, they will see three icons within the AV pod that enable them to use audio, video, or screen sharing. Let your audience know where to click to turn on a chosen feature.
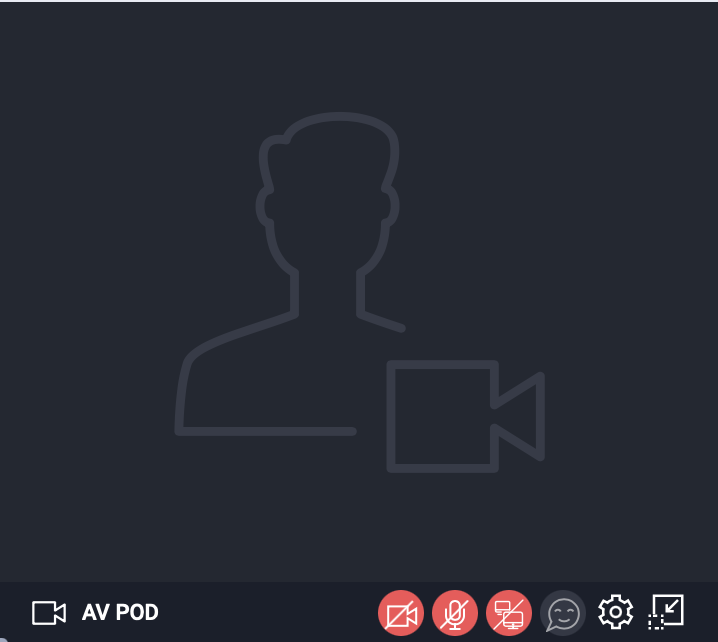
Please remember that only one person at a time can share their screen. You can see who exactly is sharing the screen on the Attendee list. The little icon indicating the enabled screen sharing will not be crossed through.
If you do not want a certain attendee to share their screen, you can click on their name and disable the screen sharing option for them. To block this option for the whole audience, please change the event type to a webinar. Note that blocking only one user (or blocking the whole audience by changing the event type to the webinar) takes away the right to turn on the camera and microphone or share the screen.
The possibility to share the screen is available for attendees using the latest updated versions of the following browsers: Google Chrome, Opera, and Mozilla Firefox.
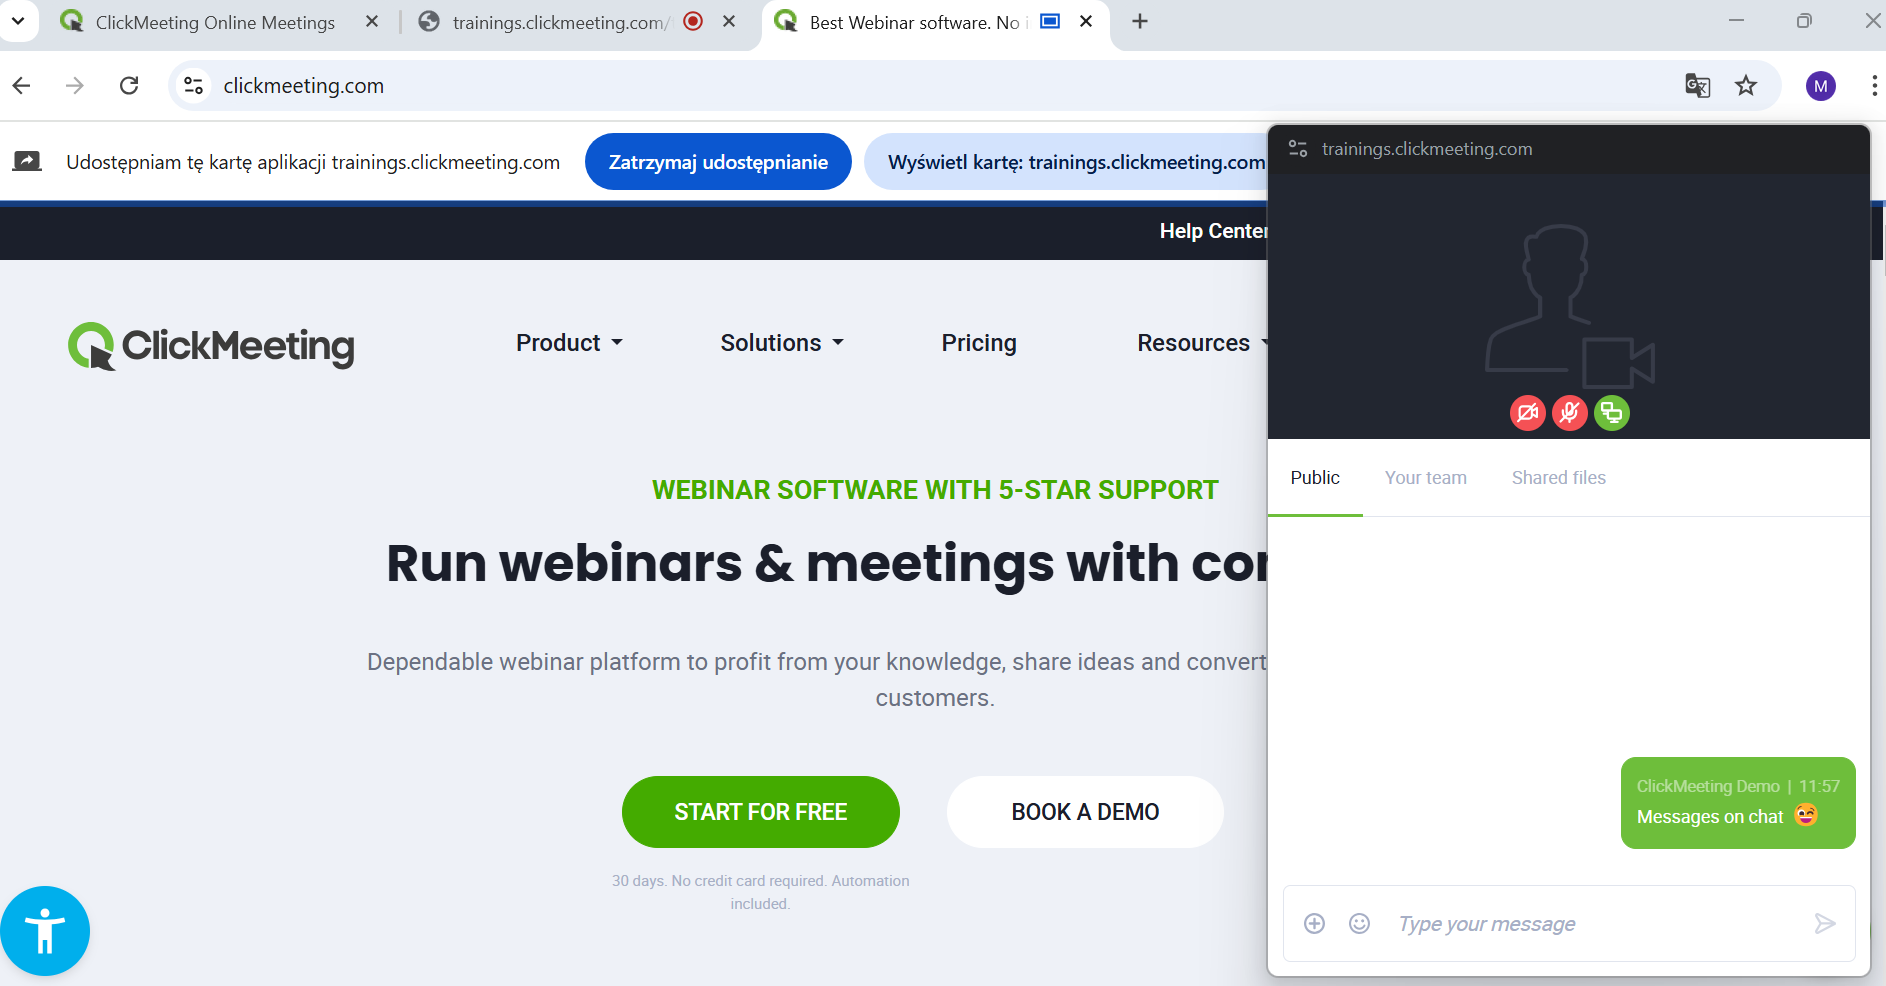
Picture-in-picture function during screen sharing
During screen sharing, you will see a floating video/audio and chat windows without having to use an additional monitor. You can move it freely to see the shared material, meeting attendees and messages at the same time.
The picture-in-picture feature is enabled by default. If you want to disable it, go to the sound/image settings and uncheck the automatic picture-in-picture function.
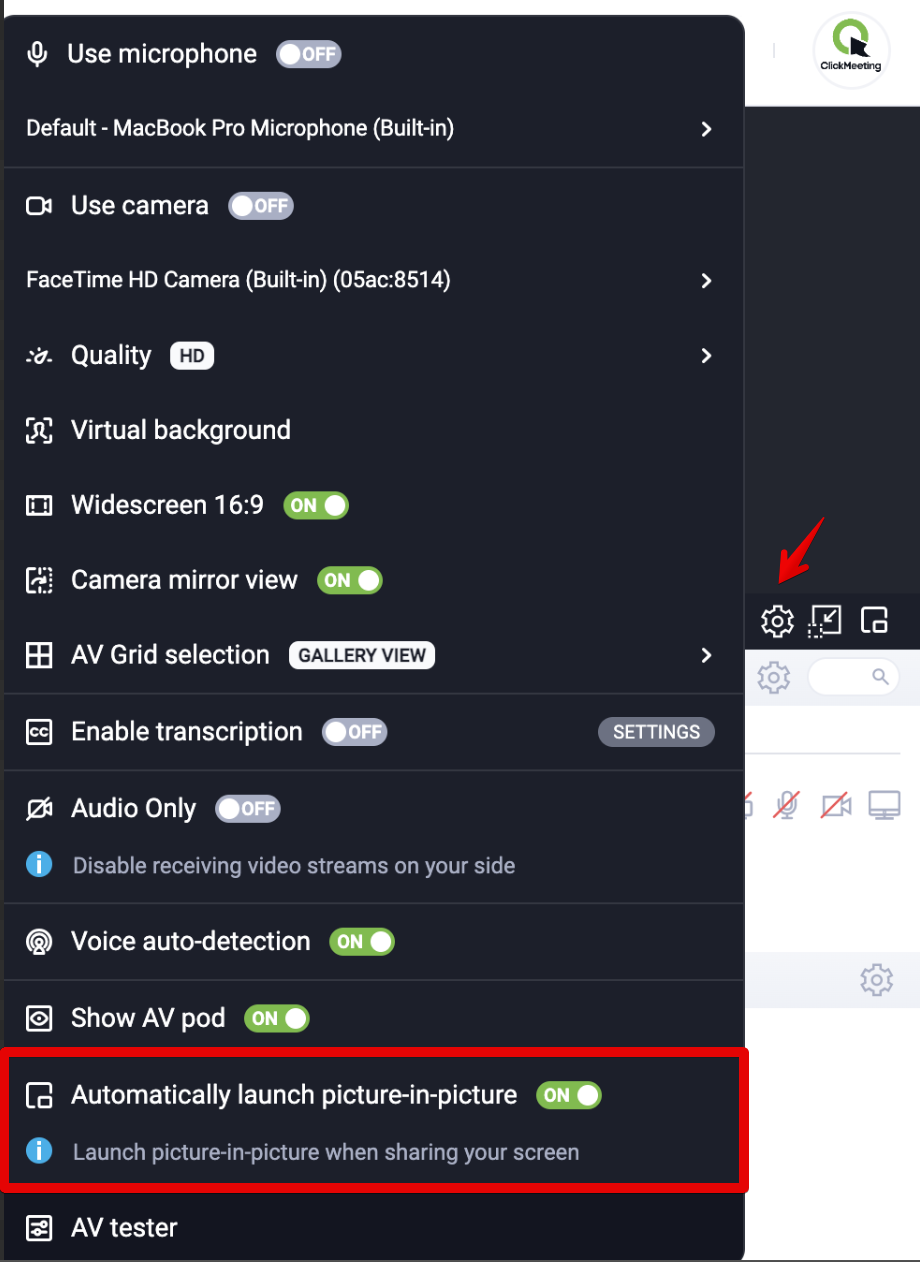
Note that currently picture-in-picture only works in Chrome, Edge and Opera browsers and with ClickMeeting desktop app. The picture-in-picture function is not available if you are using view synchronization. Also, when using picture-in-picture, you will not be able to synchronize views.
Donations from attendees
How to make money from attendees’ donations?
Supporting your favorite creators by sending them funds in the form of one-time voluntary donations is very popular today. Receiving donations is also possible via ClickMeeting. Note that currently this feature is available in beta version.
In order to start earning money from donations, first of all you need to have an active integration with Stripe payment system. In this article you will read how to properly integrate accounts.
If you’re all set, you can simply go to your event room. Donates work in either webinar or meeting mode, as well as in Edu mode.
In the left side menu you will find the donate settings. Click on the matching icon.
![]()
![]()

You will see a window that lets you enter text to prompt attendees to donate. You also decide what caption will be placed on the button and the colors of the background, button and texts. At the top you can see a preview of the banner that will be displayed in the event room.
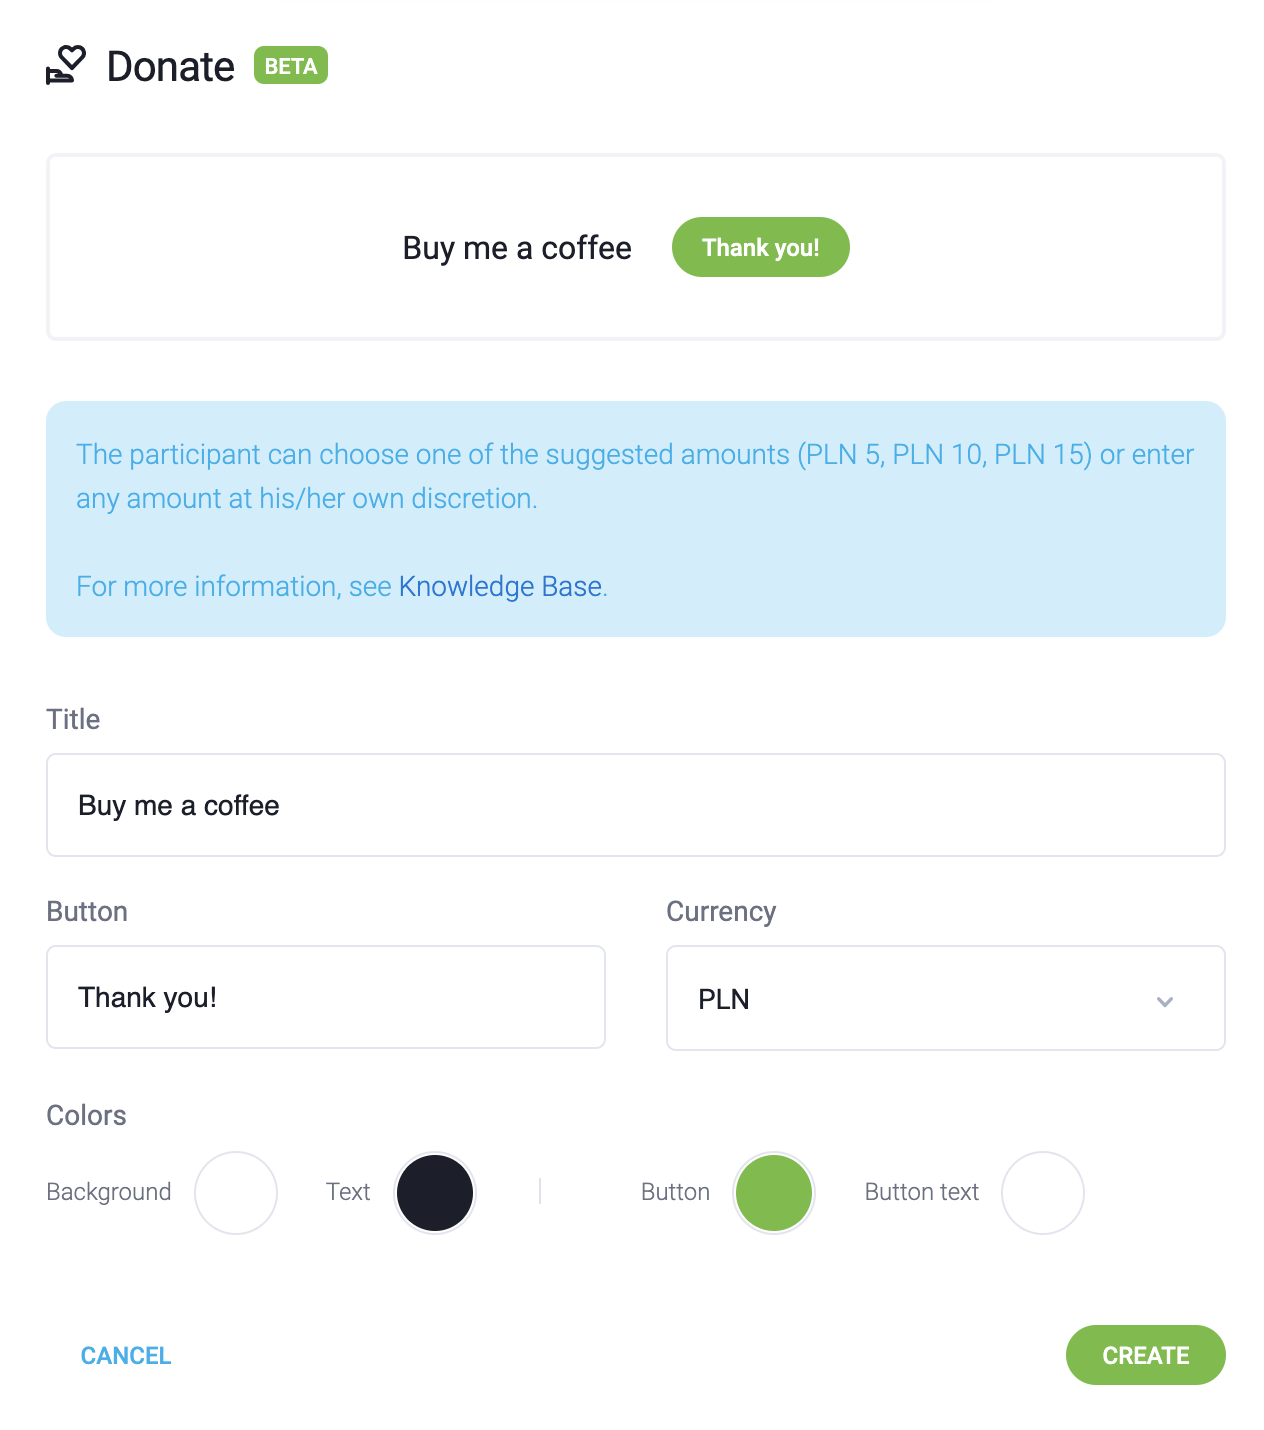
Fill in the “Title” and “Button” fields and set the currency. Then click “Create.” Done! The banner promoting donations will be displayed in the event room, and attendees can make donations by clicking on the button.
![]()
![]()
What does it look like from their perspective? After clicking on the button, a window pops up where they can specify the donation amount. They can either use the suggested amounts (5 USD/EUR, 10 USD/EUR, 15 USD/EUR) or enter the amount themselves. The maximum value of a single donation is 200 USD/EUR.
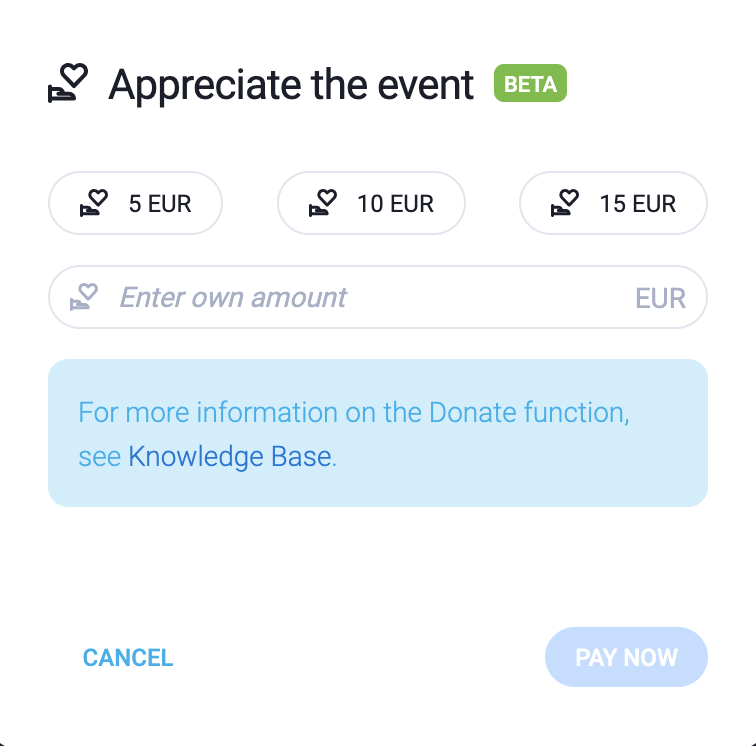
After clicking on the “Pay Now” button, a Stripe payment window will appear to complete the transaction.
You will see a counter indicating the number of clicks on the bar.
After the webinar, in the event statistics page you will find information about the amount and number of donations.
Additionally, activate donations after the event.
Important information for you and your attendees:
- Currently, donates are available for Live and Automated plan users.
- Currently, donates cannot be enabled and paid via the mobile app.
- The donation is not anonymous: the event organizer will see who sent the donate and the value of the donation.
- The donation is not refundable.
- Payment institutions may charge transaction fees. Currently, ClickMeeting does not charge commissions for such transactions. If this changes, we will inform you in advance.
- ClickMeeting does not process funds submitted by donors. This is handled by a third-party payment service. The organizer and the payment service are responsible for all issues related to the donations, including any refund requests and complaints.
- ClickMeeting is not responsible for the settlement of donations with tax authorities, nor does it guarantee that the donor will have the right to deduct the donation from tax.
- Contributors should direct any complaints or concerns to the donation organizer.
- The donate function cannot be used to organize investment crowdfunding or to conduct sales of goods and services.
What is the Call-To-Action feature and how does it work?
The Call-To-Action function is a personalized window that you can display at any time during your event. This allows your participants to navigate to any specified page with just one click, such as your paid event registration page, a landing page for purchasing your products, or contact forms. It’s a great way to increase participant engagement, present an external source, or make a product sale.
The CTA banner can contain a message, button, and graphics that redirect participants to a page of your choice. It’s available in two versions: a banner displayed at the top of the screen or in the chat window.
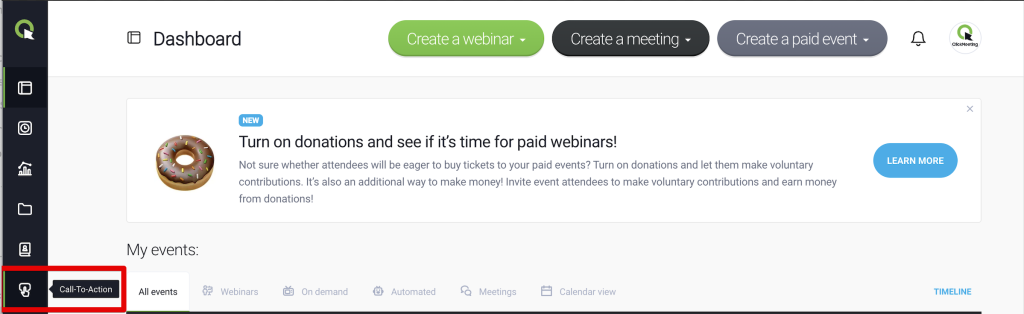
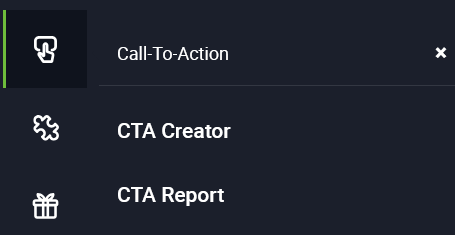
To enable this option, join the event room, go to the Menu on the left side of the screen, and click on the Call-To-Action function. The CTA creator will be displayed.
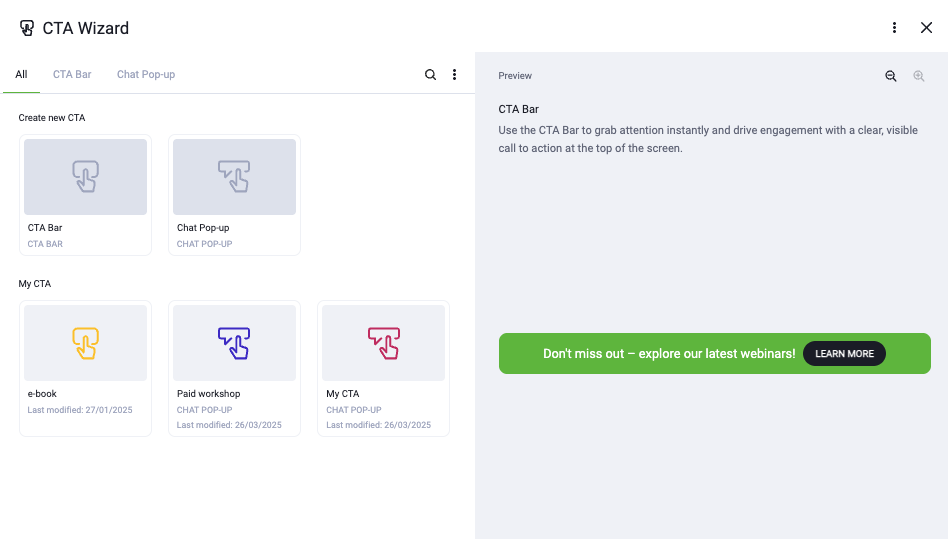
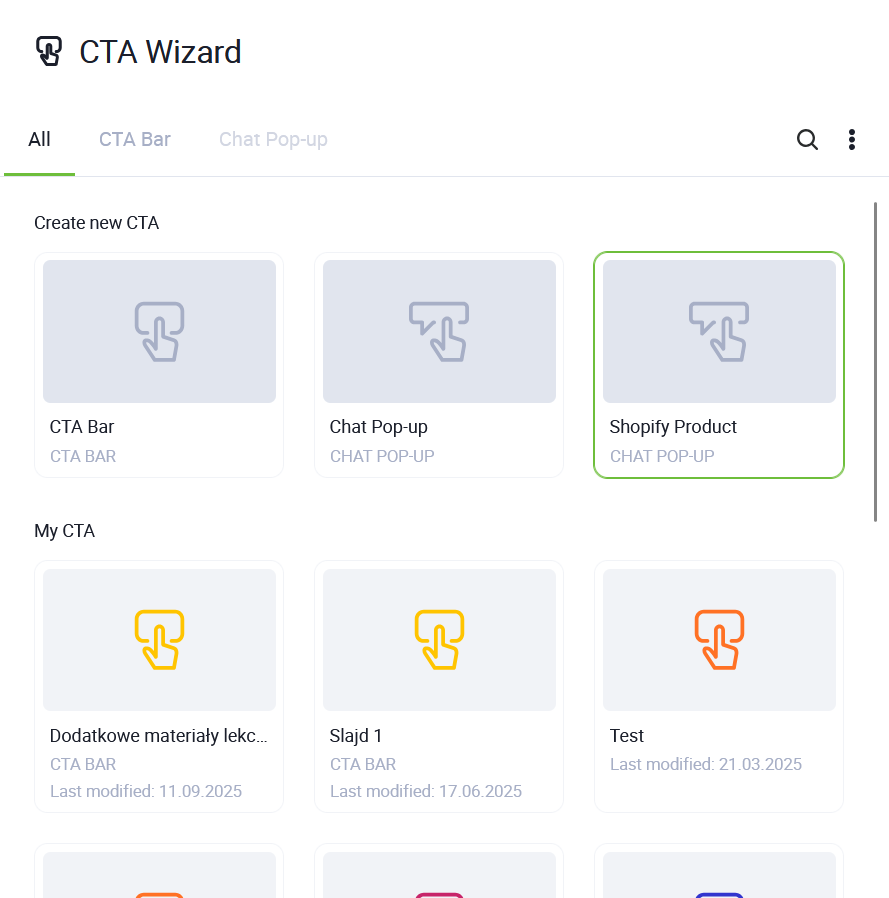
To create a new button, go to the “Create new CTA” section. Here you’ll decide whether you want to create a CTA banner displayed at the top of the page or a Chat Pop-up that will appear in the chat window.
In both cases, the editing looks the same. You also have the option to switch between the banner and chat pop-up.
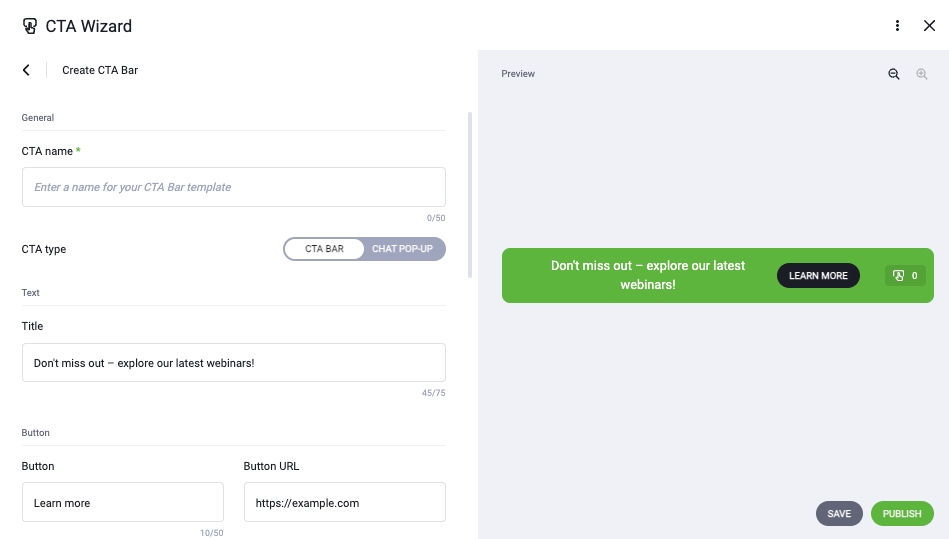
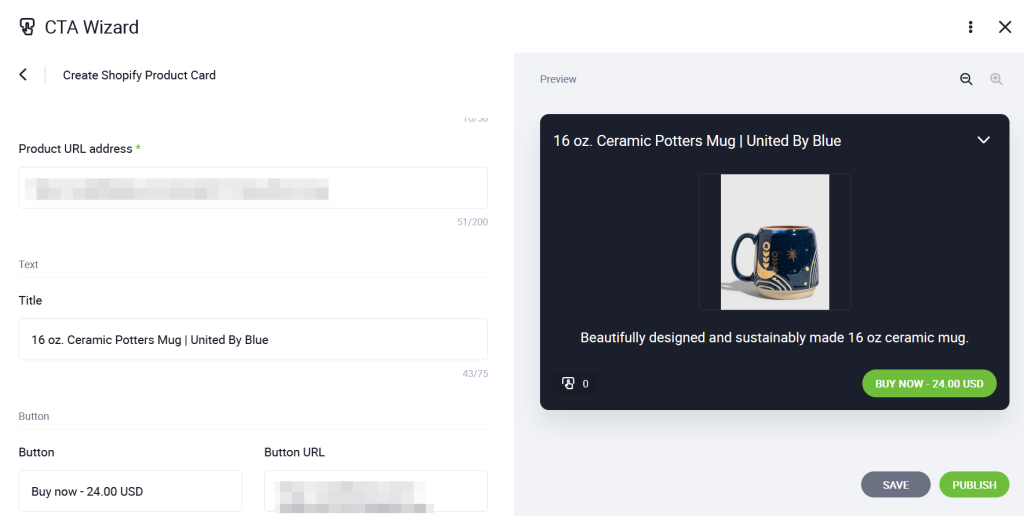
First, specify the CTA name, which will make it easier to find later in your button library. Then fill in the Title, which is a longer text where you can explain why it’s worth clicking the button. Also enter the button text. It’s worth using a call to action here, such as “Buy now!”, “Take advantage of the offer!” or “Learn more”. Complete the URL to which users will be redirected after clicking.
The maximum title length is 75 characters, and the button is limited to 50 characters.
In the preview window, you can see how your CTA button looks. Note that on the right side, there is a counter.
Click Limit Control and Automatic Clicks
Below you’ll find features that will encourage participants of your event to take advantage of your offer. You can use the click counter visible on the banner for this purpose.
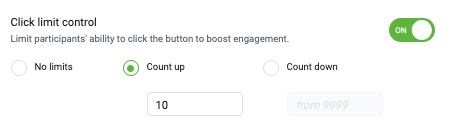
Click limit control allows you to restrict the number of possible transitions to the specified target page. Note that you can count both up and down. This gives participants additional motivation to click on the CTA button.
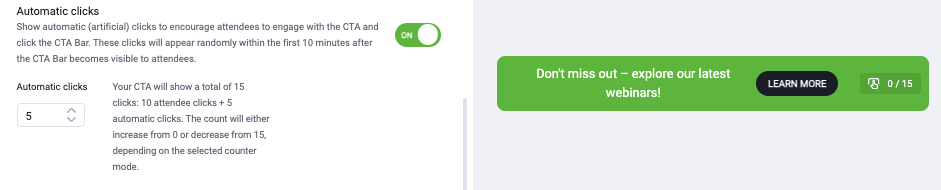
Enabling automatic clicks may prove useful. Within the first 10 minutes after enabling the CTA button, a selected number of clicks will be generated by the system and displayed on the counter, which will make the offer more credible in the eyes of participants and encourage them to take action.
Editing Button Appearance
In the next section, you’ll find appearance settings. You can choose the background color of the banner and button, as well as the color of the text. You can also upload your own image and optionally link it to increase the chances of participants visiting your chosen page.
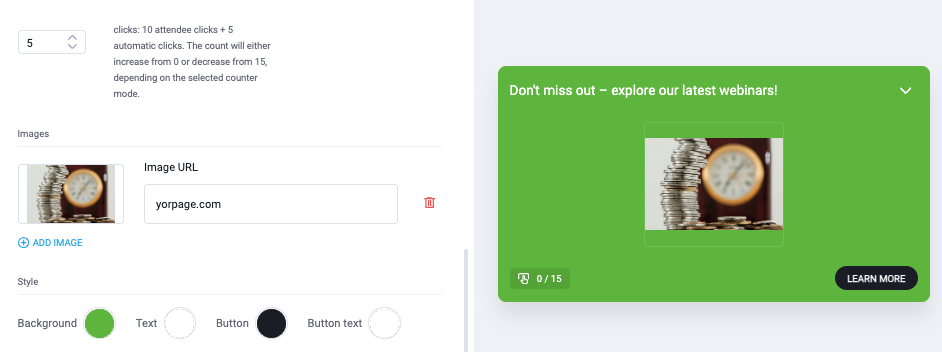
Display Settings
At the very end, you’ll decide whether you want to display the CTA button for a specific time or without time restrictions. Remember that you can manually turn it off at any time by going to the CTA settings in the event room.

You can also decide whether participants should see the counter. This can be another way to increase interest in your offer.
Publication, Template Saving, and CTA Library
Is your button ready? Great. As you can see, you now have two options: you can use it immediately and simply display it in your event room, or you can also save it as a template: it won’t be displayed right away, but it will be available in the library assigned to your account.
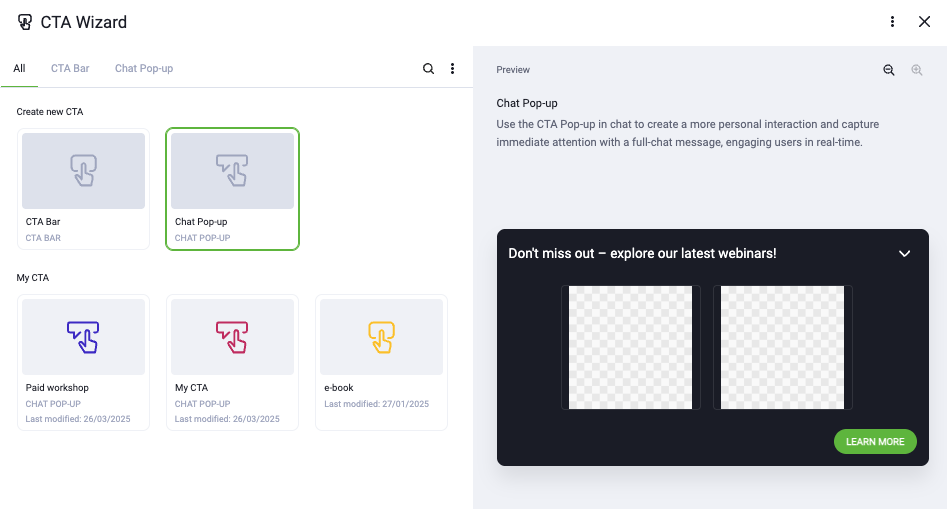
You can easily find it in the CTA creator in the “My CTA” section. This allows you to quickly enable previously created buttons during subsequent events. All settings will be preserved.
Available options for each CTA button:
- Rename – Users can change the name of the created CTA to make it easier to identify.
- Delete – Ability to remove CTA from the library.
- Duplicate – Ability to create a copy of the selected CTA to more easily modify its version or use it in different events.
Additional information:
- Each CTA has a recorded time of creation and time of last edit, which allows tracking the history of changes within a given CTA banner.
- CTA buttons are divided into banners and chat pop-up buttons.
Advantages:
- Makes CTA management easier, especially when organizing multiple events.
- Allows for faster event preparation by reusing previously created elements.
- Enables collaboration of multiple hosts using one library, ensuring consistency of used materials.
You can schedule your call-to-action even before the event by selecting the Call-to-action option from the menu on the left side of your account panel.
The Call-to-action button library is shared across the entire account, which means that the buttons you create will be available for all events.
In the account panel, under the statistics of the selected event, you can find information about the number of clicks on the Call to Action button. If the Call to Action button for a specific event was not set or not used by participants, it will not appear in the summary.
CTA Reports
The CTA Reports allow you to analyse the effectiveness of CTA buttons published during webinars (only for live webinars and meetings).
The main view includes:
• publication date,
• total number of clicks.

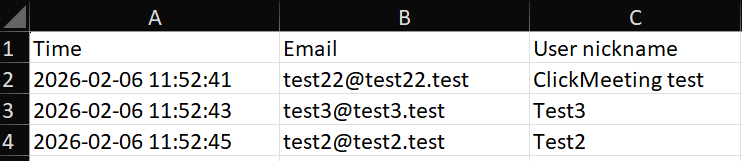
For each button, you can generate a detailed CSV report that includes:
• a list of participants who clicked on the CTA,
• the number of unique clicks per participant.
To open the CTA Effectiveness Reports view:
1. Go to the side menu in the account panel.
2. Select the Call To Action option.
3. Click CTA Report.
Please note! Reports are generated only for buttons published since this feature was made available, i.e. since 03.02.2026.
Shopify product within Call to Action
With the Call to Action button, you can set up a redirect to a product in your Shopify shop. Just add a link to the product, and the system will automatically pull the product details (title, description, price, photo, URL) into the Call to Action banner in the chat.
How to use surveys?
You can create your survey before the event by selecting Surveys from the left-side menu in your account panel.
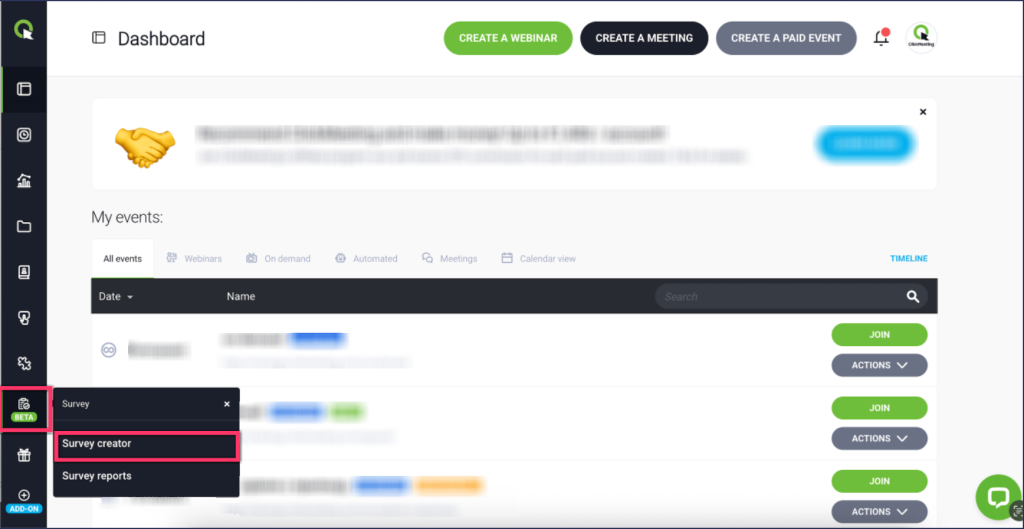
You can also create a survey in the event room. Join the room, then click Surveys in the left-side menu – the survey creator will open.
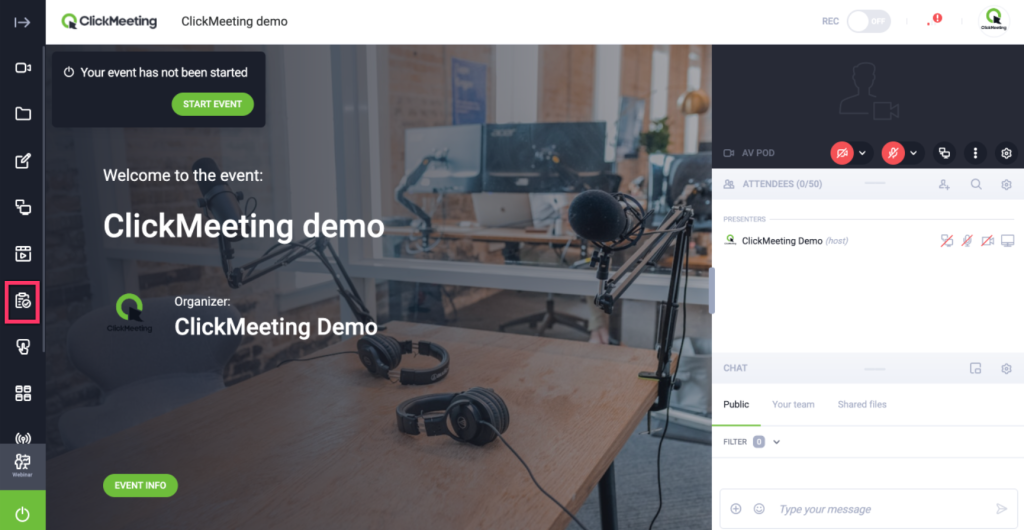
In the “Create survey“ section, choose whether you want to create a poll, survey, or quiz.
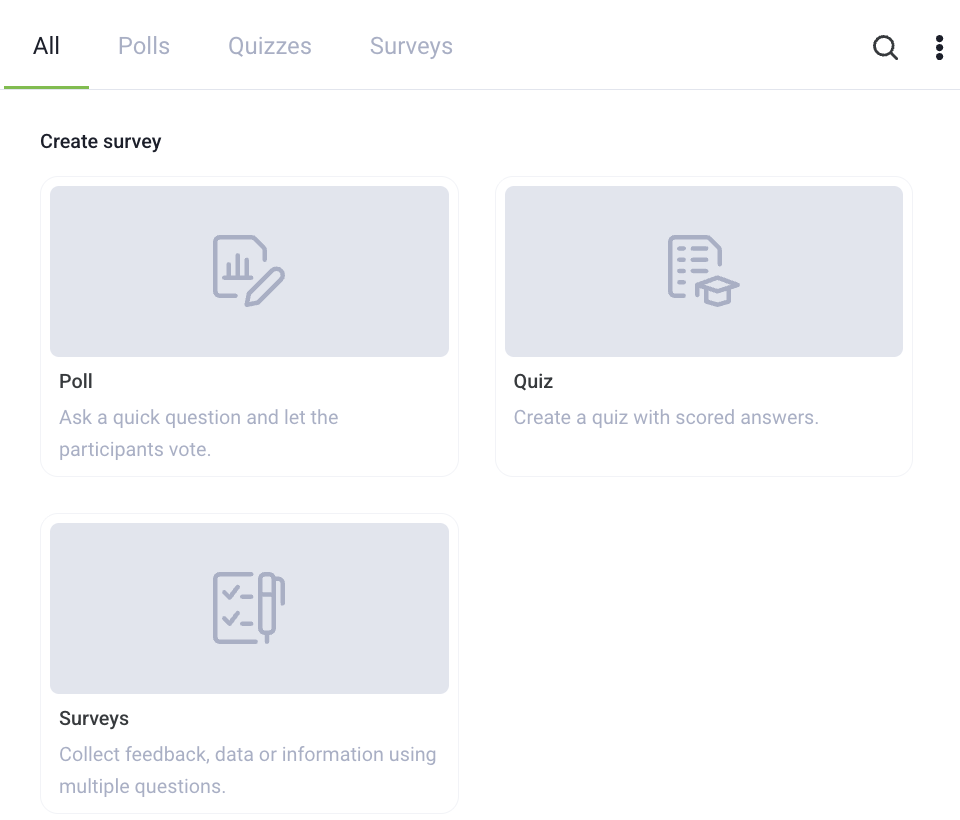
Poll
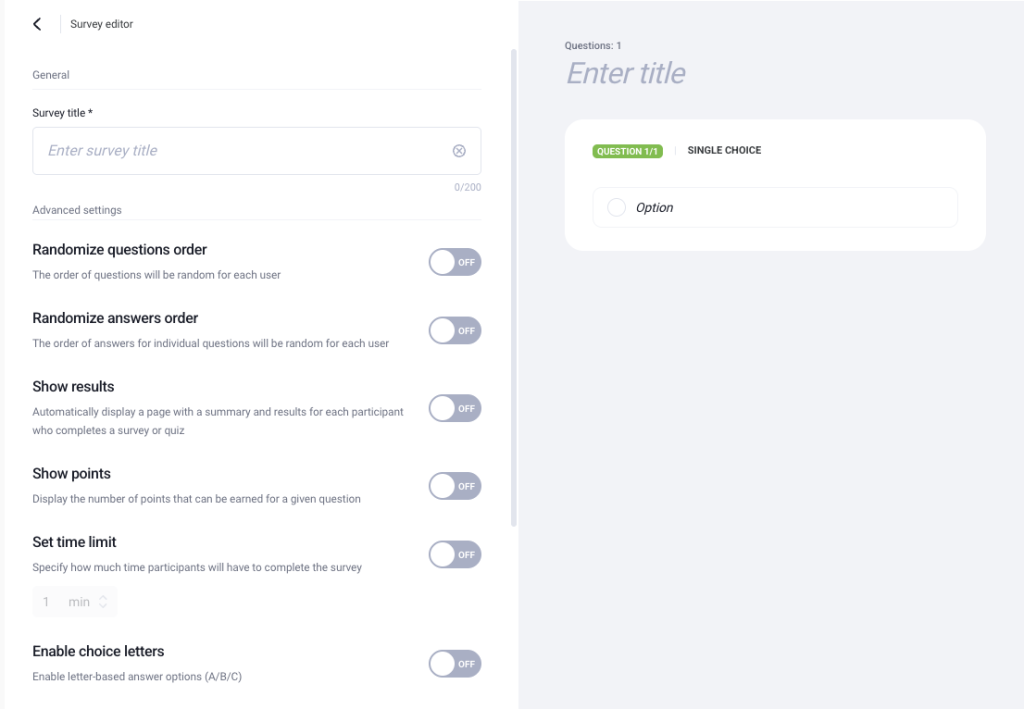
First, enter the name of the poll – this is how it will be saved in your survey library. The maximum number of characters in the name is 200.
You can set:
- a time limit for completing the poll;
- answer options displayed as letters (A/B/C).
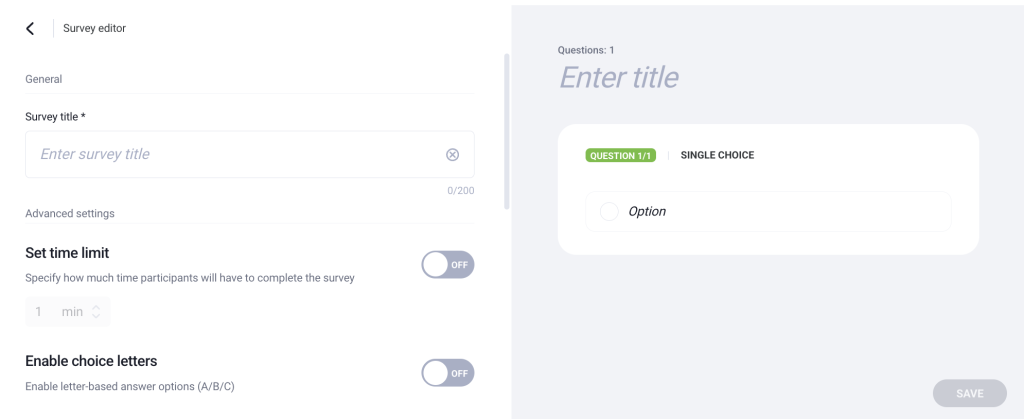
Next, create your question. Enter the question title, optionally add an image, and decide whether the question will be required. The maximum number of characters in a question is 500.
Select the question type: single-choice or multiple-choice. A poll can contain only 1 question.
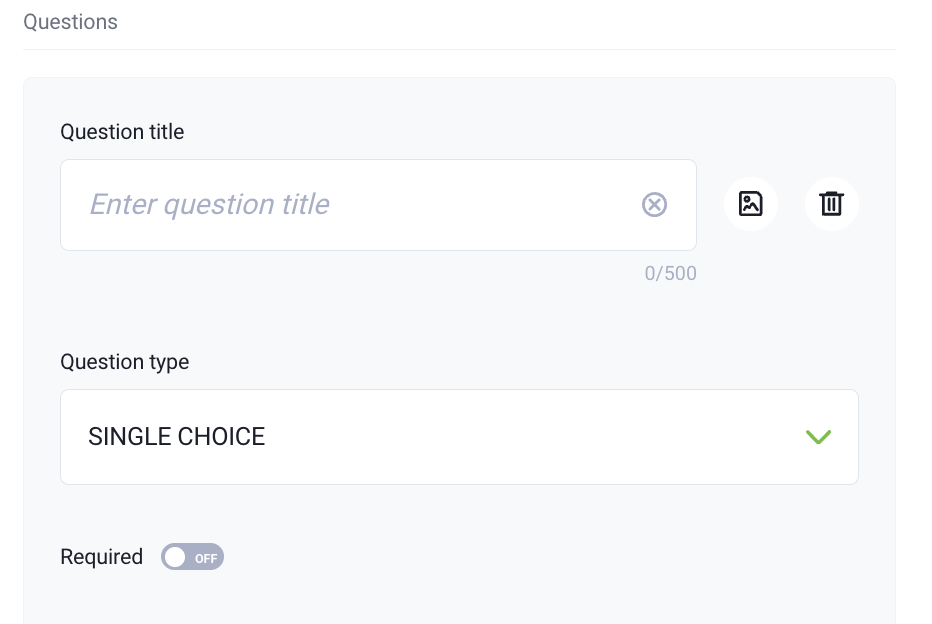
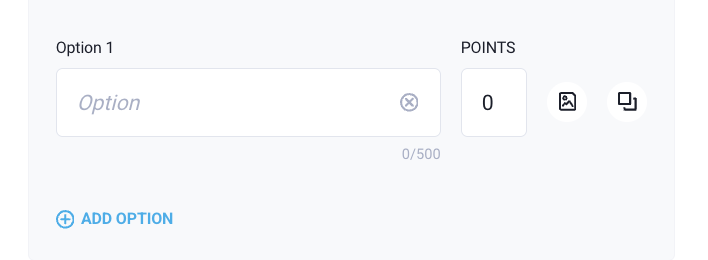
Add as many answer options as you like by clicking Add option. Optionally add images to them. The maximum number of characters in an answer is 500.
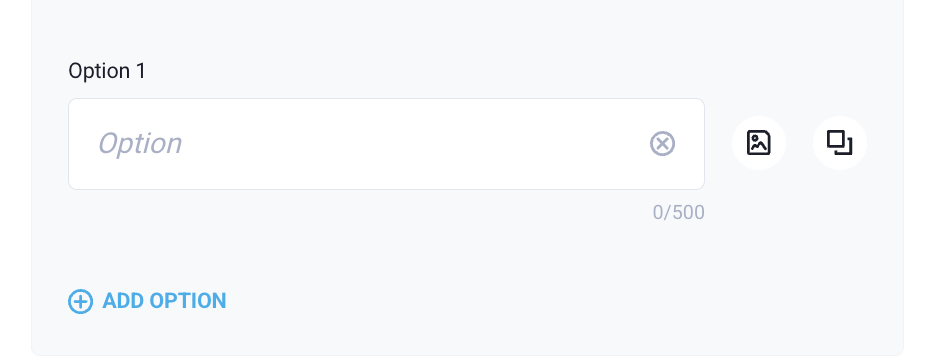
On the right side, you will see a preview of all changes made.
Survey
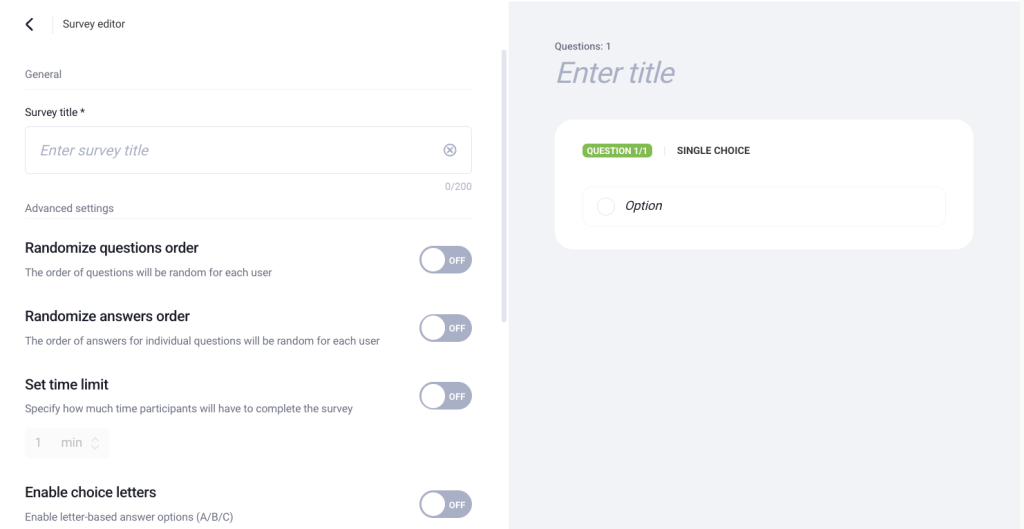
First, enter the name of the survey – this is how it will be saved in your survey library. The maximum number of characters in the name is 200.
You can set:
- a random order of questions for each attendee;
- a random order of answers for each attendee;
- a time limit for completing the survey;
- answer options displayed as letters (A/B/C).
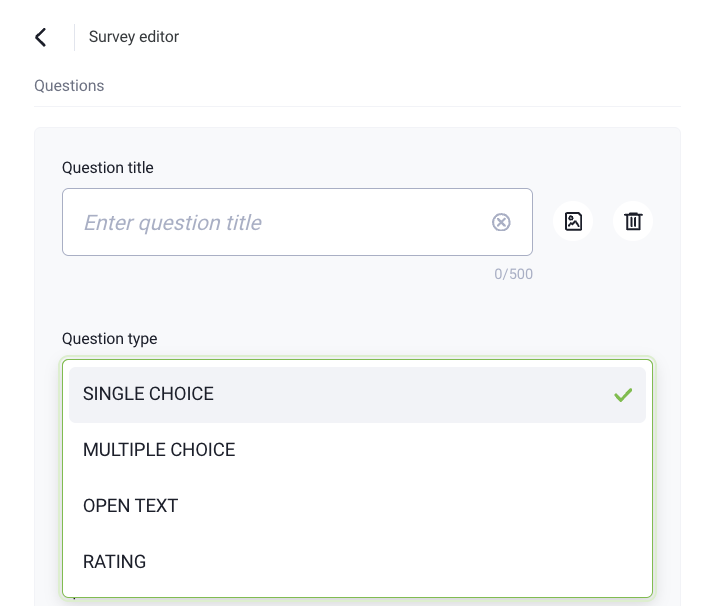
Next, create your questions. Enter the question title, optionally add an image, and decide whether the question will be required. The maximum number of characters in a question is 500.
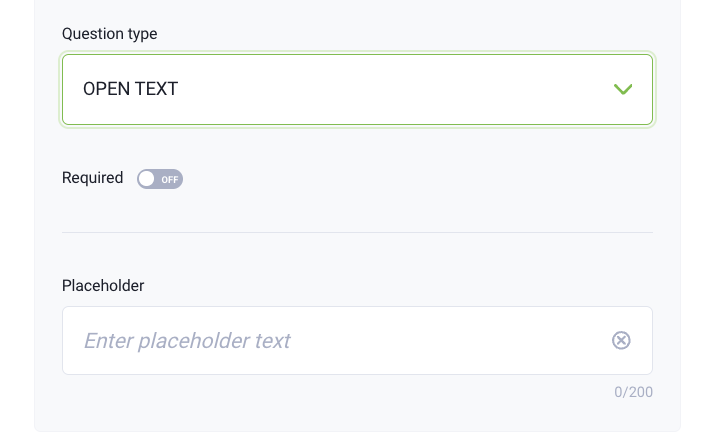
Select the question type: single-choice, multiple-choice, open-ended, or rating.
For single- and multiple-choice questions, add as many answer options as you like by clicking Add option. Optionally add images to them. The maximum number of characters in an answer is 500.
For open-ended questions, you can add placeholder text, e.g. “Type your answer” (max. 200 characters), which will appear to attendees in the answer field. The maximum number of characters in a response is 250.
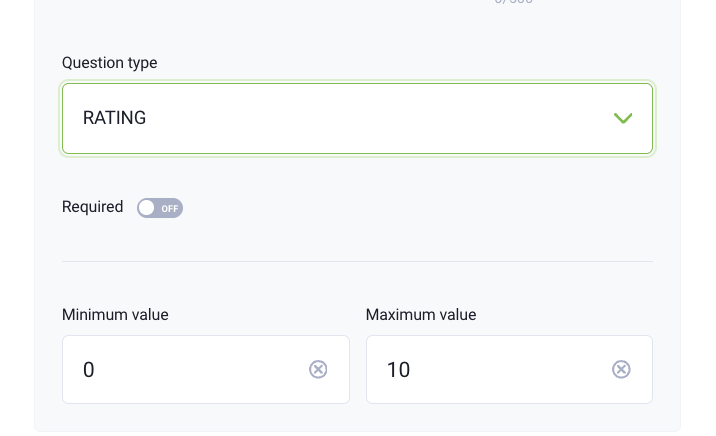
For rating questions, enter the minimum and maximum rating value. Note: negative values are not allowed, and the maximum value is 10.
To add another question, click Add question.

On the right side, you will see a preview of all changes made.
Quiz
First, enter the name of the quiz – this is how it will be saved in your survey library. The maximum number of characters in the name is 200.
You can set:
- a random order of questions for each attendee;
- a random order of answers for each attendee;
- automatic display of results after the quiz is completed – individually for each attendee;
- display of points available for each question;
- a time limit for completing the quiz;
- answer options displayed as letters (A/B/C).
Select the question type: single-choice, multiple-choice, open-ended, or rating.
For single- and multiple-choice questions, add as many answer options as you like by clicking Add option. Optionally add images to them. The maximum number of characters in an answer is 500.
For open-ended questions, you can add placeholder text, e.g. “Type your answer” (max. 200 characters), which will appear to attendees in the answer field. The maximum number of characters in a response is 250.
For rating questions, enter the minimum and maximum rating value. Note: negative values are not allowed, and the maximum value is 10.
Assign points to each answer.
To add another question, click Add question.
On the right side, you will see a preview of all changes made.
Launching, saving, and the survey library
Once you have added all your questions and answers, you have two options: you can launch the form immediately and make it available to attendees, or save it in the survey library as a template – it will not be displayed right away, but will be available to use at any time.
The survey library is shared across the entire account, which means every form you create is available to use at any event.
In the survey library, you can filter forms by type (poll, quiz, survey) and use the search bar.

Survey results
During the event, you will see the percentage distribution of responses. Detailed attendee responses can be found in your account statistics after the event.
Sharing survey results
To stop collecting responses, click the Stop survey button.
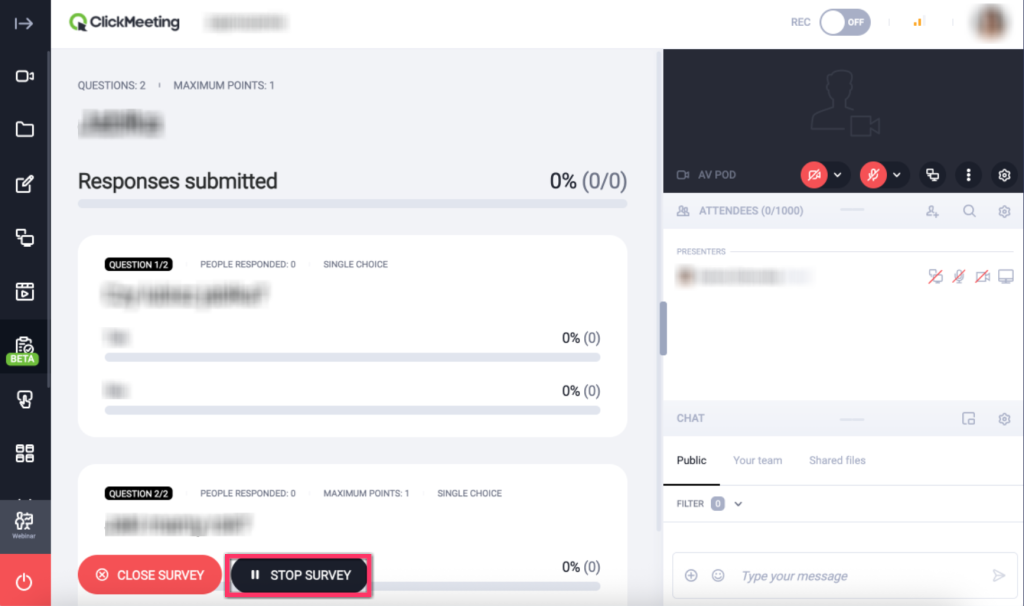
During the event, once the response collection period has ended, decide whether you want to share the survey results with attendees in real time.
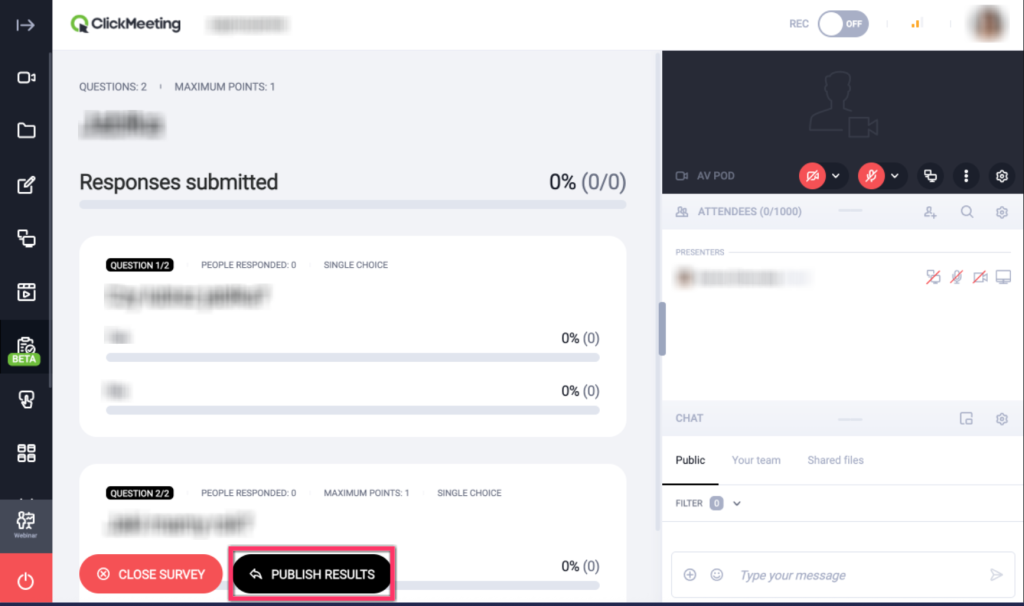
For a poll or survey, attendees will see the percentage distribution of responses.
For a quiz, each attendee will only see their own answers along with their score and point total.
Editing a survey
To edit an existing survey, select Surveys in your account panel or event room. Then click the name of the survey you want to edit – the editing form will open.
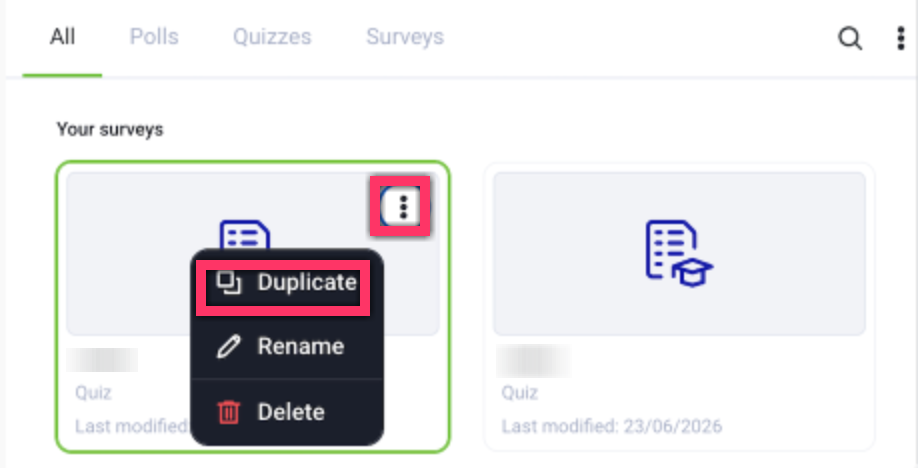
If you want to create a new version of a survey while keeping the original, select Surveys in your account panel or event room, then click the three dots next to the survey name and select Duplicate. Then click the name of the duplicated survey – the editing form will open.
Each survey has a recorded time of last edit, allowing you to track the history of changes.
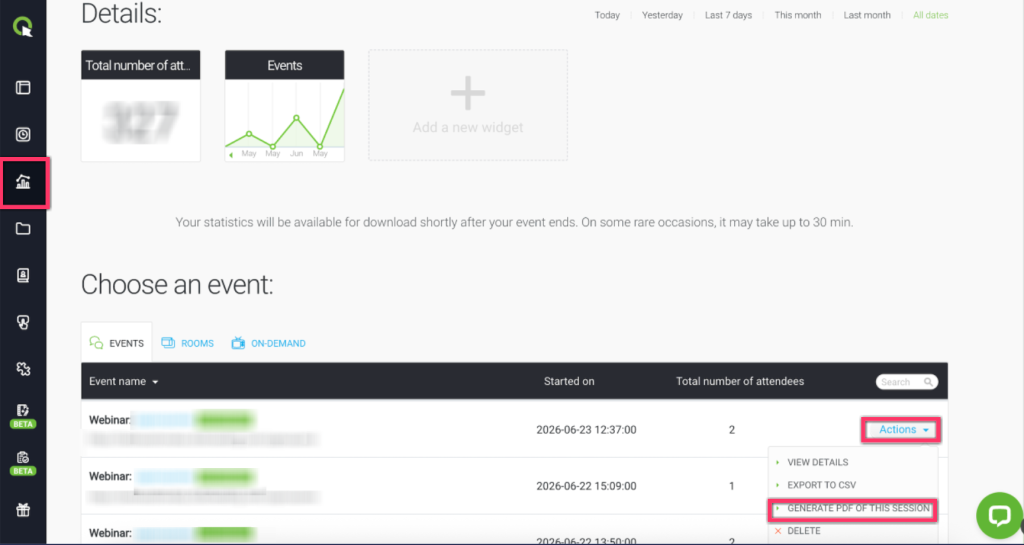
Survey results
Detailed survey results, i.e. responses from individual attendees, can be found in your account panel in two ways:
- PDF report: Statistics > Activities > Generate PDF file for this session > Download full report:
- XLSX file: Surveys > Survey reports > Details > Export as XLSX:

In the results, you will find, among other things, the time each attendee submitted their responses.
What types of events can I schedule on the ClickMeeting platform?
The ClickMeeting platform is a perfect solution for any kind of event. It allows you to create webinars for bigger audiences where you can gather as many attendees as your subscription plan allows you to, or create smaller meetings where you speak, see and listen to up to 40 people at a time.
A live webinar is a great option to spontaneously go live if you would like to discuss some topics with up to 1000 audience members. Choose a specific date and hour of conference, classes, or lecture and interact with your attendees in real-time.
An on-demand webinar lets you share your pre-recorded event with people to watch it at their own pace. Record your sessions and send the URLs to your audience so they can get back to them whenever possible and be redirected to a website of your choice via the Call-To-Action button.
With an automated webinar, you can capture your classes or product demos and present it to your attendees at a chosen date and hour without having to endlessly repeat the process of hosting a live event. Run your events on autopilot and save time along the way. Include additional videos, surveys, or a Call-To-Action button to keep your audience engaged.
A planned meeting will let you collaborate with a small group of up to 40 people. Use this option if you want to host small team meetings and see, hear, and talk to all your coworkers, students, or trainees at the same time!
Meet now! The name speaks for itself. Simply, organize a meeting here and now with up to 40 people and discuss issues, problems, and inquiries on the go!
Huge virtual events, in other words, webcasts. Allow even up to 10,000 people to watch your events and take advantage of your knowledge. Please note a difference between a webinar or an online meeting attendee and a webcast viewer. The last one can only watch the event without a two-way interaction. This solution goes beyond our standard pricing. Make sure to contact our Sales team for more details and a quote.
Please remember that each of the above-described types of events (besides the Meet now option) can also be set up as a paid event, meaning that your attendees will first need to purchase a ticket before they join your webinar or meeting.
To help students stay focused, consider integrating Edu mode into your online presentations and classes. Edu mode can be enabled during meetings and webinars with up to 40 participants. Once enabled, presenters will see all the event attendees, while the attendees will only see the presenters and not one another. Presenter can ask an attendee (or multiple attendees) to speak to the entire group.
During each of the live events, i.e., a live webinar, a scheduled meeting, or a spontaneous Meet now session, you can enable the private mode and treat it as a break for both presenters and attendees. We strongly recommend that you prepare an appropriate slide informing attendees about the current break or display such information on the banner using the Call-To-Action button.
Remember that the maximum event duration time is 14 hours. After this time, the event will end automatically.
How do I end an event?
Click the End event button available in the bottom-left corner of the event room. Choose Exit myself to leave the room and keep it open for attendees who are still downloading files, chatting, or reviewing media. Choose End event to completely close the event window for all people who joined it.

Is it possible to save the room set-up before going live?
Yes, you are enabled to prepare the room set-up before actually starting your event. After joining the webinar room please, choose the Prepare event button to get ready for the event. That way, you can upload your presentation, video, or any other piece of content into the event room, save the settings, and close the window, without worrying it all disappears.
Simply join the event room of your choice and prepare all the elements that are crucial for your conference. Upload files and choose how they ought to be displayed.
The layout of the event room is in your hands. That’s why you are also able to choose how it looks on your and your audience’s side. With the layout synchronization, you can dock the AV pod to the upper right corner of the screen or undock it and leave it as a small window. You can also completely hide the AV pod and leave the bar with microphone and camera icons only, hide the right-side panel or expand it, as well as stretch the chatbox vertically.
Decide if you would like to synchronize the layout or not by clicking on the synchronization switch available in the top bar of the room. After switching it on, you and your viewers will have the same layout displayed on the screens.
After choosing the right tools to be ready for you or your co-presenters in advance, remember to save your settings. After doing so, even if you close the tab in your browser, your settings will remain as you have set them up earlier.
Live stream to Social Media
Live Streaming on 5 Social Media Platforms Simultaneously / Multistream
To increase event visibility and reach new audiences, you can use live streaming on social media. This way, your webinar will be available both to participants gathered in the event room and people following your profiles. You can stream your event simultaneously on up to five platforms. The following services are available to choose from:
1. YouTube
2. Facebook
3. LinkedIn
4. Instagram
5. X
6. Twitch
7. TikTok
8. Vimeo
9. Telegram
10. Services outside the list via custom RTMP url.
While using any plan in ClickMeeting, you can broadcast to 1 external platform of your choice.
The paid plan (Live/Automated) offers an add-on (buy here) that allows you to broadcast on up to 5 platforms at the same time (49 USD/EUR/GBP per month).
How to stream an event on social media?
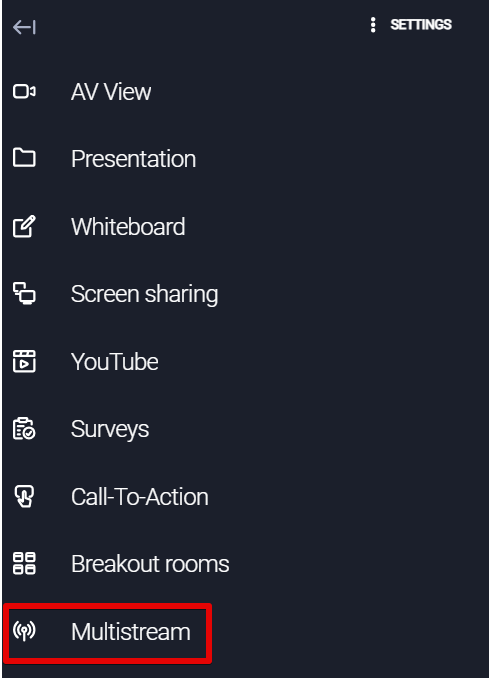
You’ll find the social media streaming function in the left sidebar menu. If you want to start broadcasting, click on this icon:
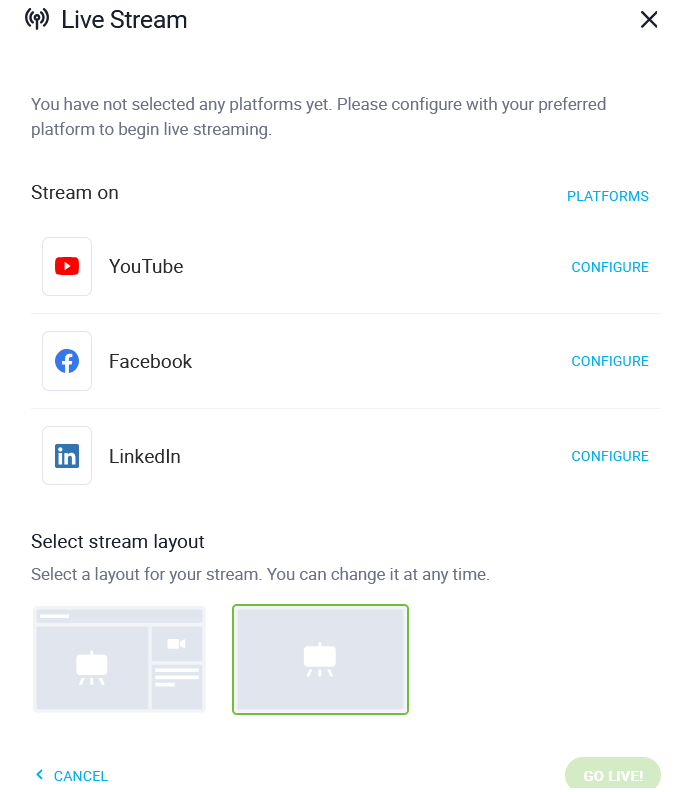
Before your first broadcast, you need to configure the connection with your chosen platform by entering the URL and stream name/key. You can connect to one of the three suggested platforms or choose other platforms. To do this, click the Platforms button.
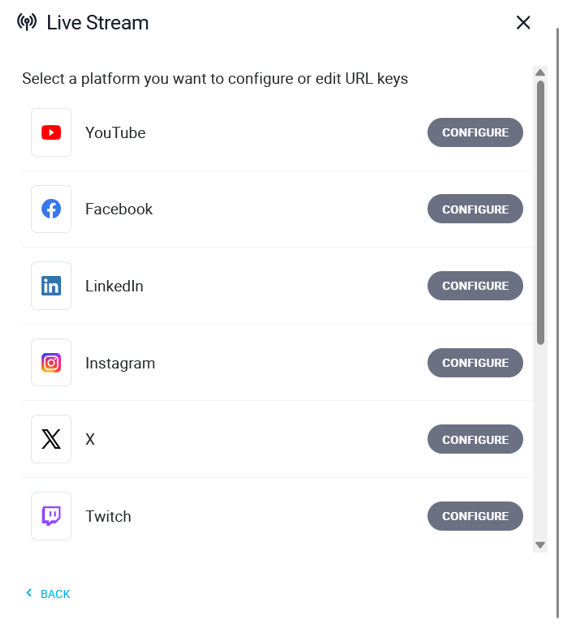
Then click Configure next to your chosen platform and follow the configuration instructions.
The entered URL and stream name/key will be remembered. To make changes, click the Edit button next to the platform whose settings you want to modify. To start streaming, select the platforms you want to broadcast to and click the GO LIVE! button. Done!
A notification about the connection will appear in the event room. An appropriate message will also be displayed if there are any problems with your stream.
Remember to configure the stream on the platform where it will be broadcast.
If you want to stop broadcasting on all social media, go to the streaming window and click the STOP ALL STREAMS button. Remember that you can return to streaming at any time.
If you want to stop broadcasting on a selected platform, go to the streaming window and use the toggle switch next to the specific service, then select Save changes & GO LIVE.
HELP TIPS
- When setting up a live stream, please remember to start a live broadcast in YouTube/LinkedIn/Facebook settings, not just in your ClickMeeting event room.
- When using Facebook live streaming, you can stream to your personal profile/your fanpage/an open or a closed group.
- Please note that YouTube has its own limitations when setting up streaming from the YouTube mobile app if you have fewer than 50 subscribers and fewer than 1,000 subscribers. Read more.
What to pay attention to when setting up a live stream on LinkedIn:
- Number of followers: To start a live stream, you need to have more than 150 followers.
- Scheduled for later stream: You can schedule a stream for later, but only with a maximum of 1 hour in advance. LinkedIn allows you to start a scheduled stream up to 2 hours after the planned time.
- Stream description: Remember that before starting the stream, you must fill in the description field. Otherwise, the system will not allow you to proceed.
If you want to test streaming on LinkedIn, make sure to check out how the LinkedIn Live feature works (find out more here). If you start streaming from ClickMeeting on LinkedIn it will be immediately displayed on your profile.
Can I host a webinar with simultaneous interpreting on ClickMeeting?
Simultaneous translation is a type of interpreting that occurs simultaneously while a presenter is speaking (e.g. a presentation is being delivered in English and is being translated into Polish in real-time for the Polish-speaking audience). It is commonly used at international conferences, meetings, training sessions, cultural events, etc.
To run an event with simultaneous interpreting on ClickMeeting, use RTMP live streaming. Contact our Sales team for more details.