Right side menu
How do I set up my camera and sound?
Camera nad microphone in the event room can be enabled by:
- organisers,
- presenters,
- guest speakers,
- attendees (during meetings or when given the opportunity by the host during webinars).
Each of the above-mentioned roles sees a screen that allows them to first check their audio and video devices, set a virtual background, and start broadcasting audio and video. The microphone and camera are usually turned on automatically, but it may be necessary to give the browser access/permission to use the devices. Once these permissions are granted, a preview is visible.
Then, simply click the Go Live button to be seen and heard by other event participants. For event hosts, the Go Live button also starts the event.
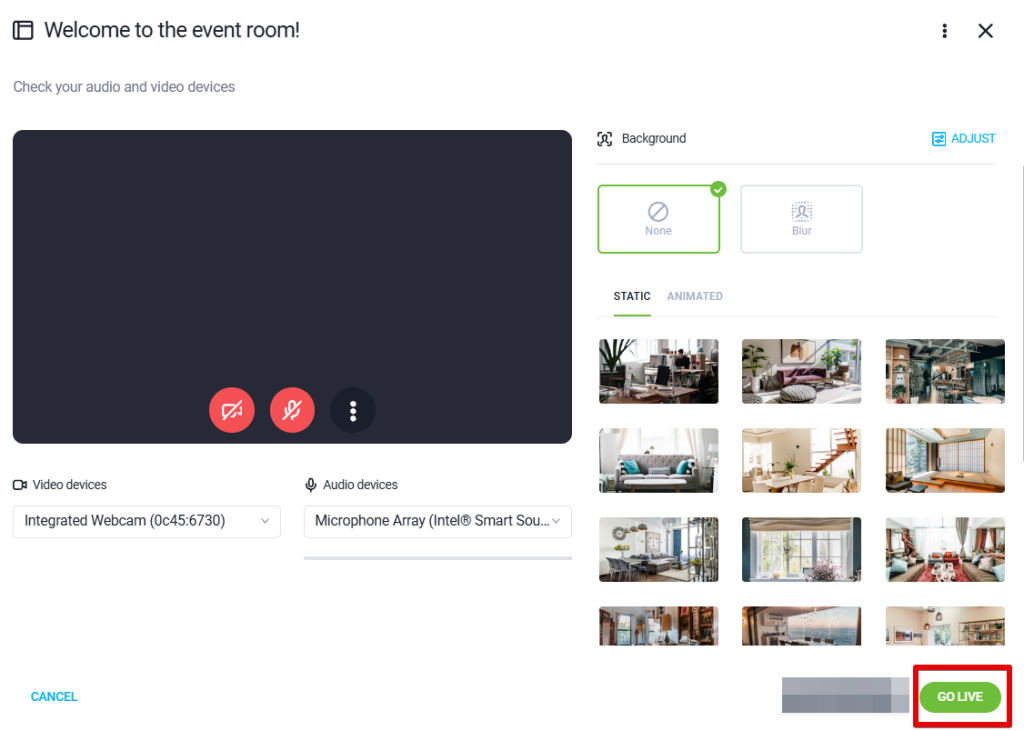
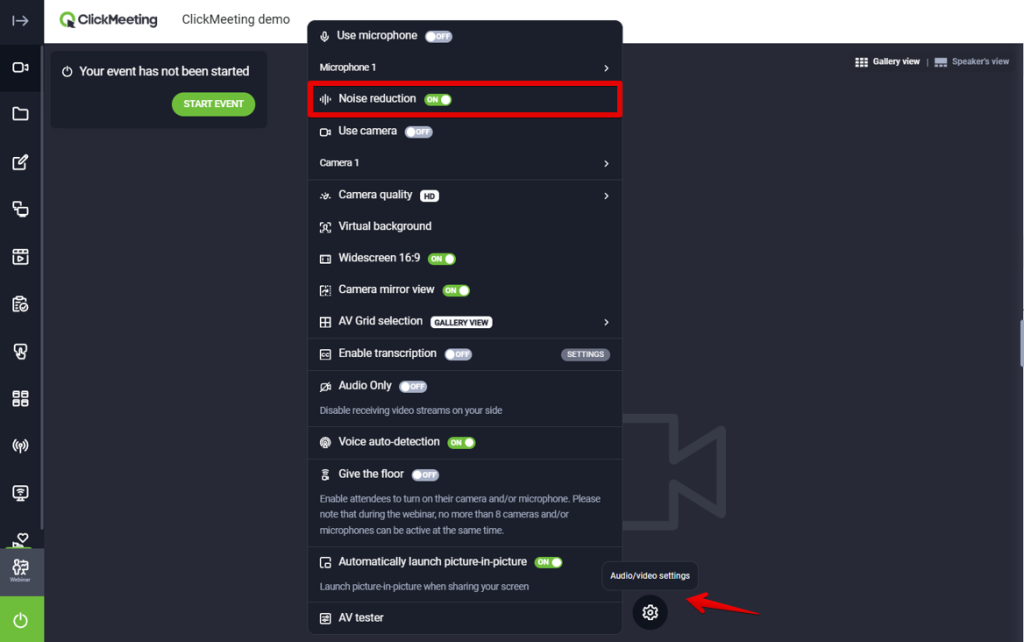
The noise reduction feature is enabled by default (for all browsers except Safari and mobile browsers).
What does it mean that the audio and video pod is floating?
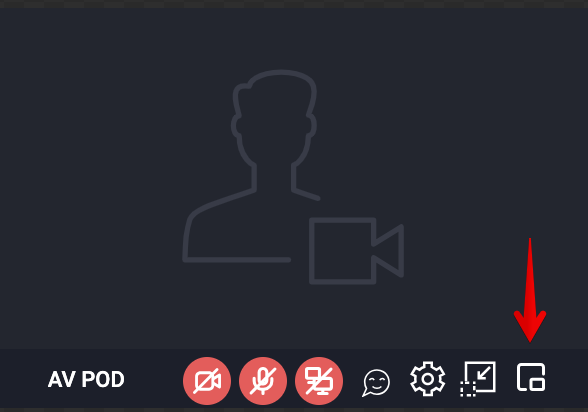
It means that you or your attendees can unpin the pod and pin it in your preferred location for better focus.
Please note that you cannot maximize the audio and video pod to the full screen. To enable it in the main presentation window, go to the Dashboard and enable AV View. Remember you can also pin your camera stream to the bottom, for a better focus on other presenters’ or attendees’ faces. To do so, click the appropriate icon available in your stream.

You can use the picture-in-picture function. During screen sharing or when minimizing the room window, you will see a floating video and audio window.
Note that currently picture-in-picture only works in Chrome, Edge and Opera browsers. The picture-in-picture function is not available if you are using view synchronization. Also, when using picture-in-picture, you will not be able to synchronize views.
Can I use an avatar instead of a camera feed?
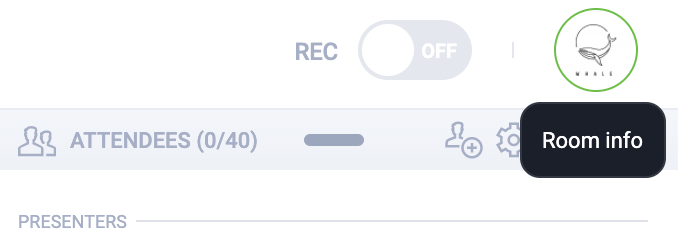
Yes, you can display an avatar instead of a camera feed. Click the Room info button in the top-right corner of the event room, then click the icon with your current avatar/initials. Choose an avatar from the list or upload your own image and click Apply.
Your avatar will be displayed instead of your camera feed once you enable the microphone.
Please note that the avatar feature can be used only by hosts and presenters.
![]()
![]()
Give the floor mode
Want to engage your webinar attendees more and allow them to turn on their cameras and microphones to speak? Turn on the “Give the floor” mode.
When you turn it on, attendees will be informed that they can turn on their cameras and microphones and will be able to do so. Remember that up to 8 audio and video streams can be turned on simultaneously in webinar mode, including presenters.
How to enable the Give the floor mode?
You can enable the Give the floor mode in the audio and video settings in the event room.
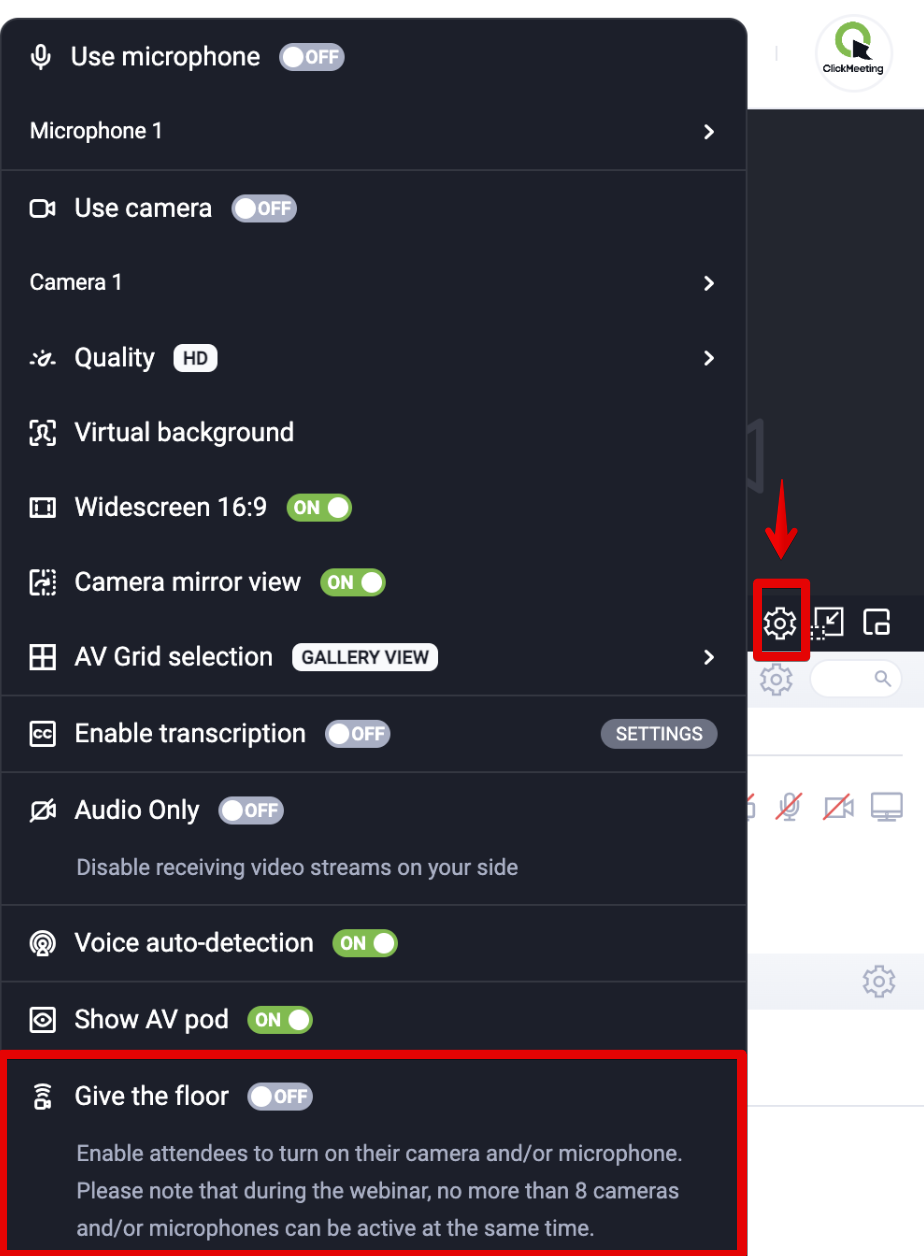
Next, all attendees will be informed that the camera and/or microphone can be turned on.
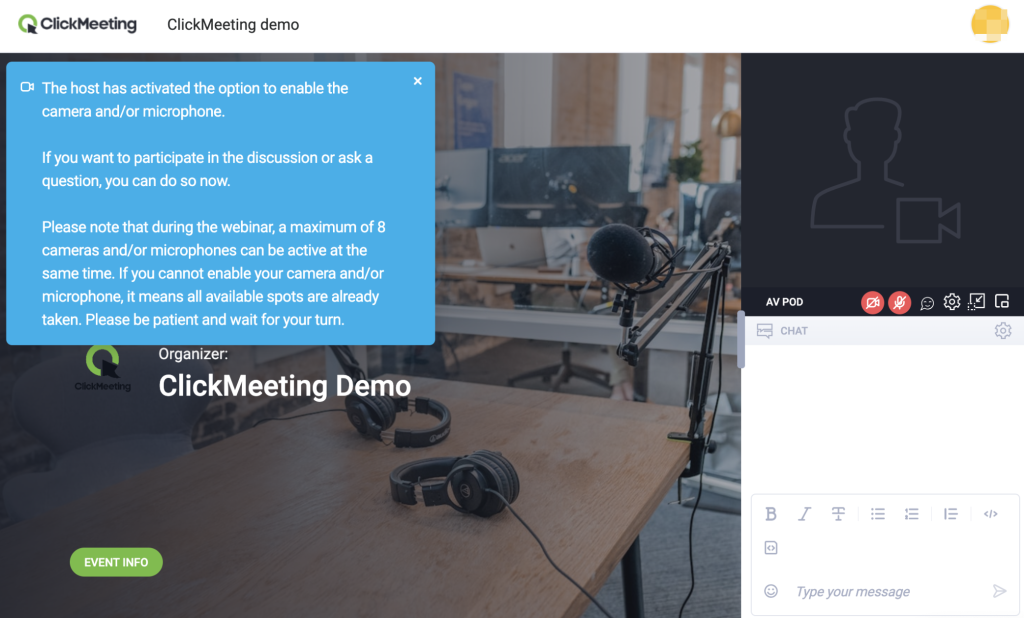
They can use this option by turning on the camera and/or microphone with the button located under the AV window.
When the limit of 8 simultaneously shared audio and video streams is reached, activation of the microphone and camera by subsequent users will be blocked. The option will be re-activated when the space is freed up.
Remember that hosts and presenters can:
- Withdraw microphone and camera activation rights from individual webinar attendees.
- Mute or disable the video shared by a particular attendee.
- Turn off the Give the floor mode at any time.
Managing attendee audio and video permissions
During meetings attendees have microphone and camera permissions by default. These cannot be revoked by the host or presenters. Up to 40 microphones and cameras can be active at the same time.
During webinars a host or presenters can give an attendee permission to enable microphone and/or camera. Up to 8 cameras and microphones can be active at the same time.
In Edu Mode attendees have camera permission by default that cannot be revoked by the host or presenters. They can give an attendee permission to enable microphone.
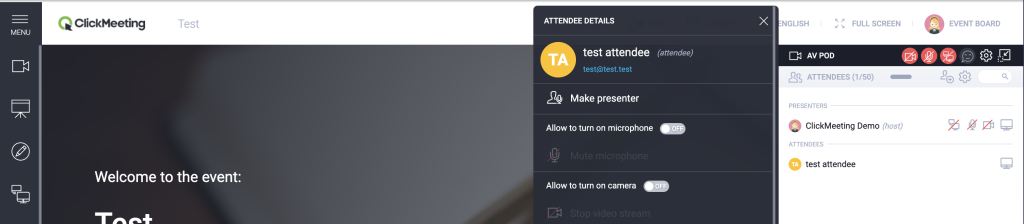
To give an attendee microphone permission, click on their name in the Attendee list. You will see a toggle button in Attendee details: Allow to turn on microphone. Toggle the switch to the ON position to allow the attendee to enable their microphone. If you want them to be able to turn their camera on, toggle Allow to turn on camera to the ON position.
If any of these toggle buttons are ON and not clickable, this means the audio and/or video permission is granted by default (e.g. camera permission in Edu mode), hence This option is not available for this user displayed when hovering over the toggle button.
Once an attendee has been allowed access to microphone and has enabled the device, the host or presenter can disable it by clicking Mute microphone under the Allow to turn on microphone toggle button. With some attendees forgetting to mute their mic after they have finished speaking and accidentally generating echo, this feature comes in really handy. Similarly, you can disable attendee’s camera by clicking Stop stream under Allow to turn on camera. Please note that muting attendee’s microphone or disabling their camera does not revoke a permission to enable audio and/or video granted by the host or presenter. To revoke that permission, enter Attendee details and toggle the switch (Allow to turn on microphone and/or Allow to turn on camera) to the OFF position.
Alternatively, you can mute attendee’s microphone by clicking on the mic icon displayed in their AV stream. The Mute microphone and Stop stream icons are also accessible next to each attendee in the Attendee list directly.
Please note that once an audio/video permission has been granted to an attendee, they will keep it with any event type changes. E.g. if someone is granted audio permission in Edu mode, they will not lose this permission after the event has been changed into a Webinar.
In the webinar room, can I change someone from an attendee to a presenter?
Yes. Click the person’s name on the Attendees list and choose Make Presenter. The newly assigned presenter will be able to speak to everyone and share a presentation.
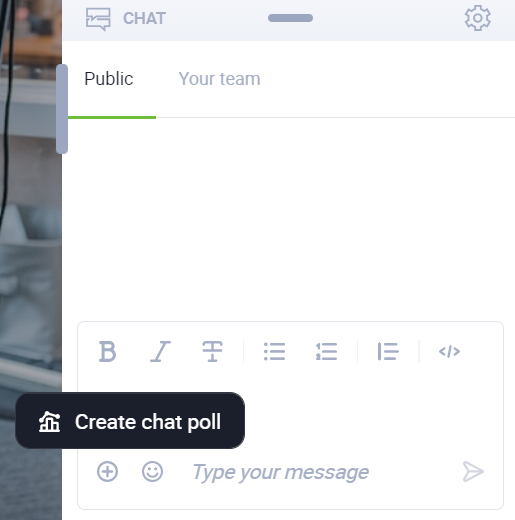
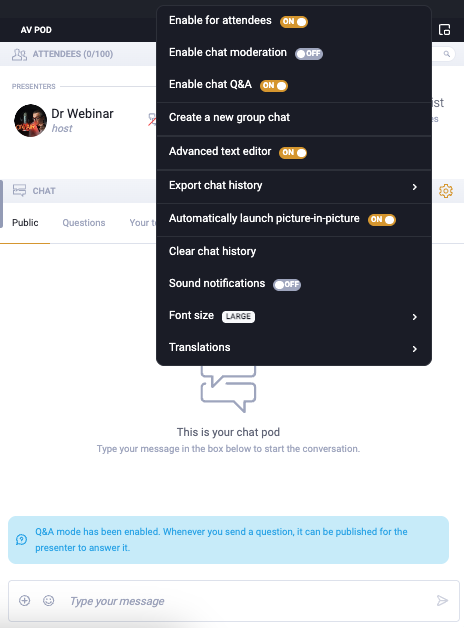
How does the chat in the event room work?
The chat window, available in the lower right corner of the event room, allows the organizer, presenters and attendees to interact by exchanging text messages. To send a message in the chat window, click the message entry bar, enter your message and click Enter. You can also add emoji to make it more interactive and express emotions more effectively. To do so, click the small emoticon available in the bar and choose among hundreds of suggestions.
In addition, the chat allows you to:
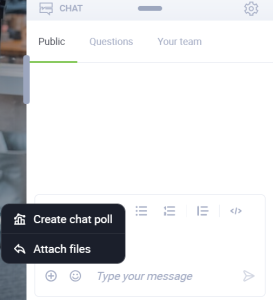
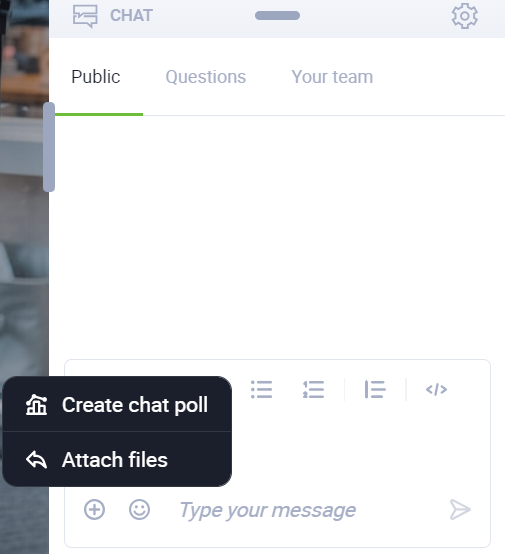
- Create quick polls. To do this, click the “+” button and select the appropriate option. Once completed, the results will be published in the form of a post on the chat.
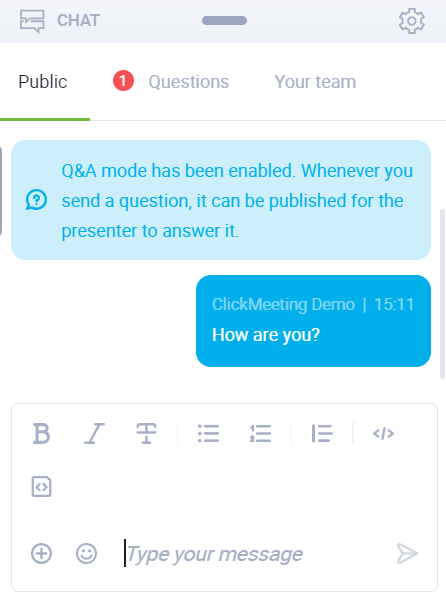
- Manage Q&A session and ask questions: questions asked by users will be automatically added to the Q&A session question pool. You will decide on your own whether to display them. You will also find Q&A session settings in the chat settings window.
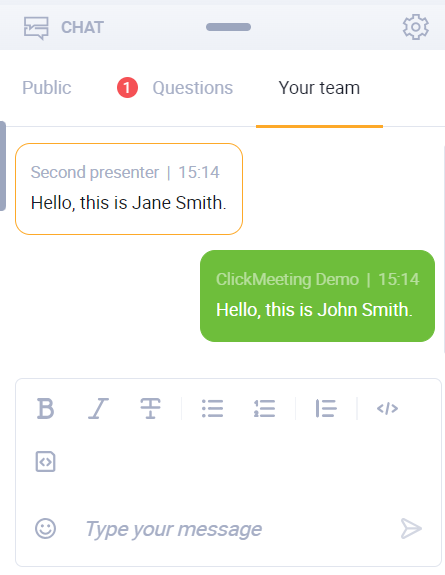
- Host event team chats: in the “my team” window, event organizers, presenters, moderators and/or support staff can host an independent chat hidden from other attendees.
- Have group chats with event participants: in the chat settings you will find the option Create new chat. Once you have selected the appropriate participants to chat together, a new tab will appear in the chat window where you can have a separate group chat.
- Have private chats: the chat allows you to have conversations between the event organizer and attendees. You can start a conversation by selecting a specific attendee on the attendee list or via chat: to do so, click on the three dots next to the attendee’s message and select “Start chat.” A new tab will appear that will allow you to have a conversation hidden from other people.

- Uploade files: the host can upload files available in the ClickMeeting account’s file library via chat. To do so, use the plus icon and select the appropriate option.

A new tab, Shared files, will appear in the chat window to make the downloading process easier for attendees. They will find there all of the shared documents. The attendees can download them on their computer.
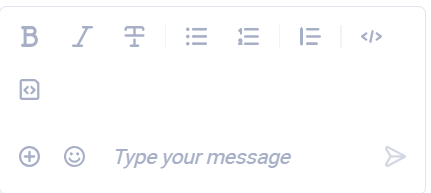
- Format the text: you can use various text input and editing modes. You will apply bold and italic text, strikethrough, bullets, numbered lists, quote and code fields, among others.
If you don’t need text editing in messages right now, you can hide these options by clicking on Chat options and setting ‘Advanced text edit’ to OFF.
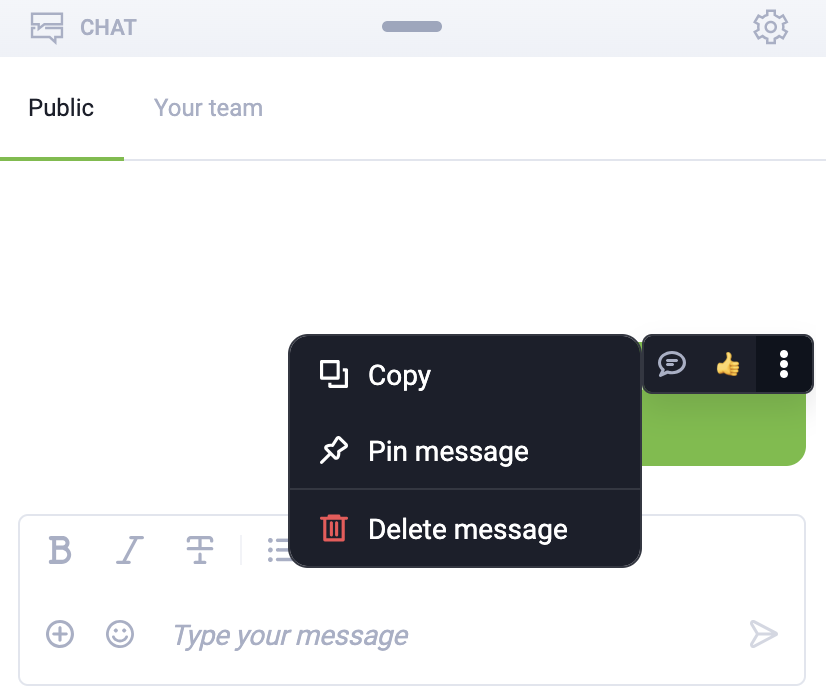
- Delete messages: In the public chat window, hover your mouse over the message you want to delete, click the three dots, and then select “Delete message”.


Block users: To block a participant from sending messages in the chat, hover over their message and click the three dots. In the menu, select the option to block the user.
Chat moderator – they can support the organiser and presenters by responding to participants’ messages, approving and deleting messages from the moderated chat or by starting a private chat with specific participants. The chat moderator must be provided with the relevant event URL from the Details >> chat moderator room URL.

 In the event room, the moderator can access and freely manage the chat settings, they also belong to Your team. Other features and settings are not available to them.
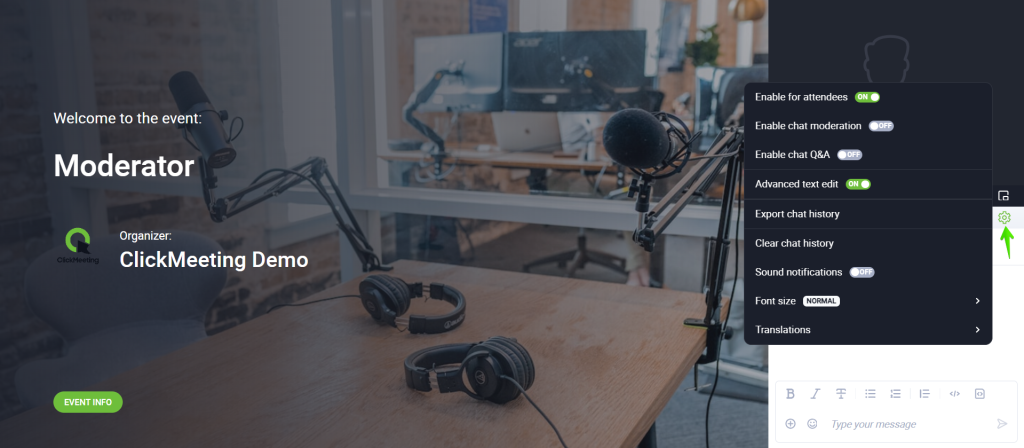

The chat moderator takes place for a presenter. You would need to make sure that you have enough seats for your presenters including the moderator. Plans 50 contain 1 additional presenter seat by default, 100-200 contain 2 seats and 500-1000 contain 3 seats. Additional presenter/moderator seats can be purchased here if required.With the moderator’s role restricted to the chat area only, the organiser is assured that all other elements, features and information about the room or participants remain invisible to the moderator.
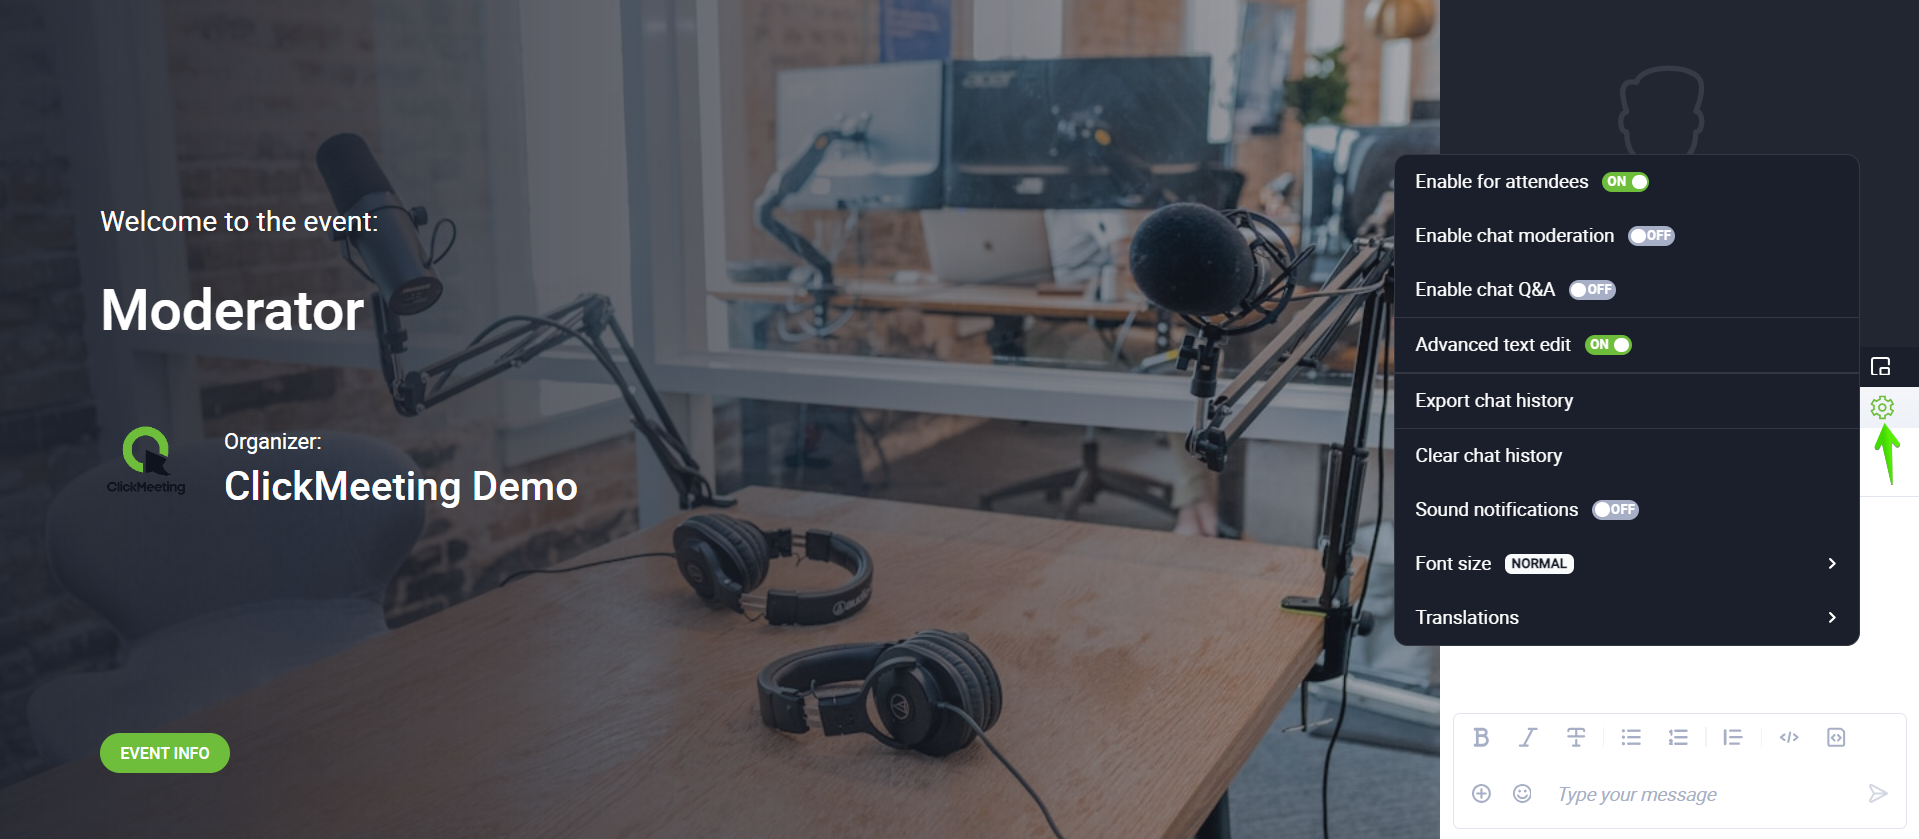
Click the gear icon in the chat window to see more helpful options. Decide if you want to enable the chat window for your attendees or shut it down completely. You can also decide which content will be visible to your audience by choosing the moderated chat option. That way, only chosen messages will appear in the chat window. We also highly recommended asking another presenter to manage the chat moderation on your behalf while you deliver your presentation.
If you host events for multinational audiences, consider using a simultaneous translation of chat messages. Your attendees can choose one of 52 available languages and understand the conversation in their native language. The translations are immediately ready and visible in the chat window.
At the end of the event, you can also manually export the chat history as a zip file. Chat records from breakout rooms will be included there as well. If you don’t do this, no worries. All conversations are saved automatically in the Storage.
How do I save chat sessions from my event?
Chat sessions are saved automatically. You can access them in your account panel under Storage → Chat and Q&A logs. Alternatively, you can export them during an event from the Chat settings in the event room.
How do I use simultaneous chat translation?
Click the options icon in the lower-right corner of the chat window (“wheel”) and select language by Translations. Your chat will be automatically translated whenever a new message is posted in the chat pod.
QA session
In the chat settings window, you can enable Q&A mode. When activated, questions asked by attendees via chat during your event are automatically moved to a special tab.
Organizers, presenters, and moderators can also manually mark any messages as questions, even if they don’t end with a question mark.
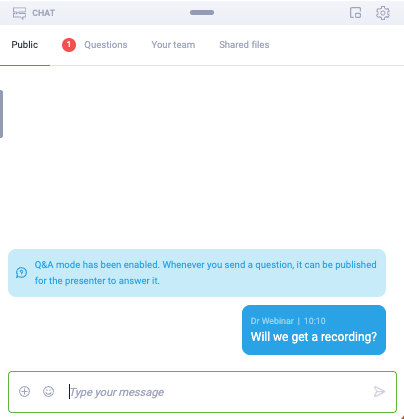
Then, at any point during your event, for example, after finishing your presentation, you can display these questions and answer them. They’ll appear in the presentation window, making them visible to everyone. This dedicated Q&A session helps you maintain control over your event flow while encouraging attendees to ask questions.
Managing Q&A in the chat window
The Questions tab has received several new features that make managing Q&A sessions even simpler:
- Priority Marking: Presenters, organizers, and moderators can now create a hierarchy of questions by marking selected ones with a star. You can also mark questions as rejected without removing them from public chat windows.
- Question Voting: Attendees now can like questions. This creates a quick voting system that helps you identify which questions are most important to your audience.

- Visual Indicators: Both likes and stars are visible during the Q&A session, making it easy to see which questions are popular or prioritized.
- Quick Sorting: Create a question hierarchy based on the number of likes or submission time, so you’ll never wonder which question to answer first.
- Filtering Options: Filter questions by category (starred, liked, rejected, published) for better organization.
What hotkeys can I use during my online events?
To display a list of keyboard shortcuts, join an event room and press Cmd+ / (for macOS) or Alt L + / (for Windows). Alternatively, enter the Event board tab in the top right corner of the event room and click the Hotkeys tab.
Keyboard shortcuts allow you to navigate the event room without using your mouse. Availability of options may depend on your role and/or permissions during the event.
Can I manage my video aspect ratio in ClickMeeting?
ClickMeeting Live and Automated plans allow you to choose between a default 16:9 ratio (widescreen) and a 4:3 ratio. You can manage your video aspect ratio in the AV settings of the event room.
Due to technical limitations the 16:9 ratio is not supported in Firefox.
Note that 4:3 is the only option available when you enable your camera in the ClickMeeting mobile app or in a mobile browser. If someone using a computer/laptop enables the 16:9 ratio, though, your mobile device will reflect that.
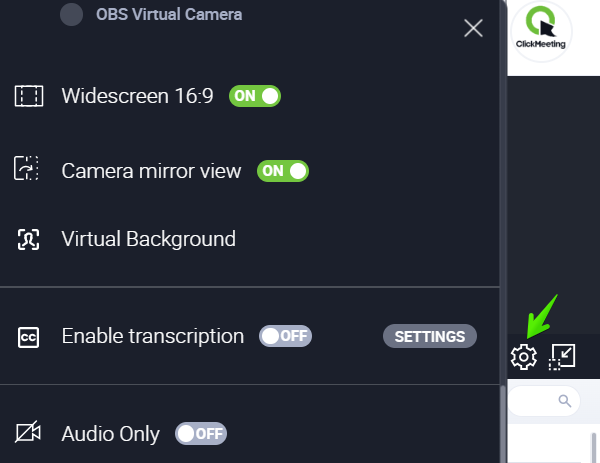
What is Audio Only used for?
Once you enable Audio Only, you stop receiving other participants’ video streams. Other people’s video streams will remain active, though, and they will continue seeing you if your video stream is enabled.
The Audio Only mode will come in handy if your Internet connection is weak/unstable during an online ClickMeeting event.
To enable this mode, click in the gear icon in the AV pod and toggle Audio Only ON.
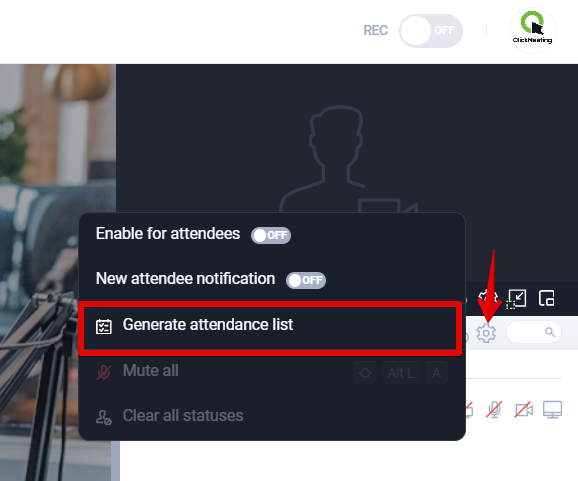
Attendance list
In the attendee list settings, there is an option ‘Generate attendance list’, which allows the organiser and presenters to download a list of people attending an event.
This function can be particularly useful in several situations:
- Attendance monitoring: This option allows you to quickly and efficiently track who has attended a webinar or online meeting. This gives the organiser a full view of which attendees were present, which can be important for the purposes of event management, reporting or issuing certificates of attendance.
- Simplicity and automation: once the list is generated, a CSV file is automatically downloaded to the device. The file contains all the necessary data.
- Useful for reports and documentation: This type of list is an excellent tool for preparing reports that may be required in various situations, such as attendance verification, internal audits or participant engagement analysis.
How does it work:
- The ‘Generate attendance list’ option is available in the list settings (under the cogwheel) for the organiser and presenters only.
- Once generated, the list is available in CSV format and automatically downloaded to the device.
- The generated file contains the name, email address of the attendees, as well as details of the date, time of export and the name of the event.
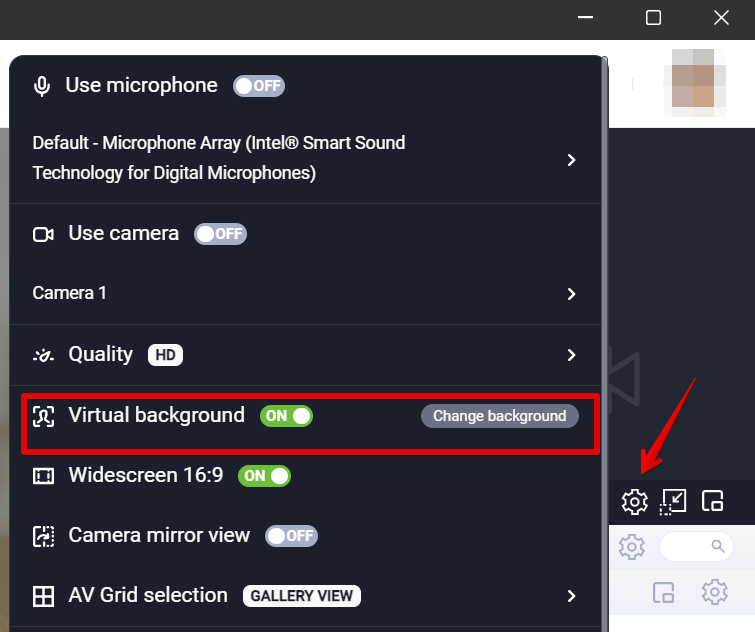
How do I enable virtual background?
The virtual background is available in both browsers and the desktop application. It allows you to set the background that will be visible during video calls. Virtual background is off by default.
1) Browser:
Where to enable?
- before the event starts / before the microphone and camera are switched on in the audio and video test space and then in the sound/image settings

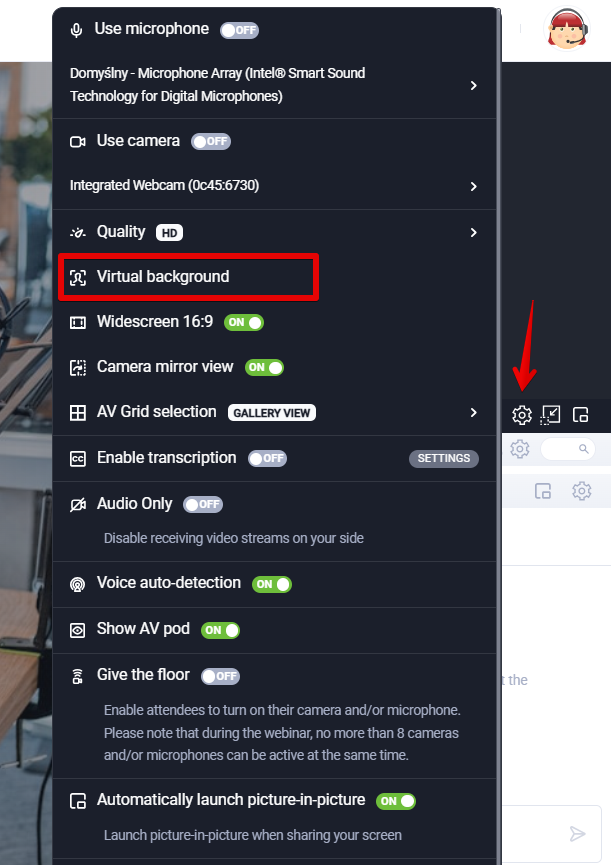
- it is possible to choose a virtual background from a range of suggested images or add your own one
- available for Chrome, Firefox, Edge, Opera browsers
2) Desktop application:
- download the desktop application here
Where to enable?
- in Settings >> Background, then in Sound/Image settings
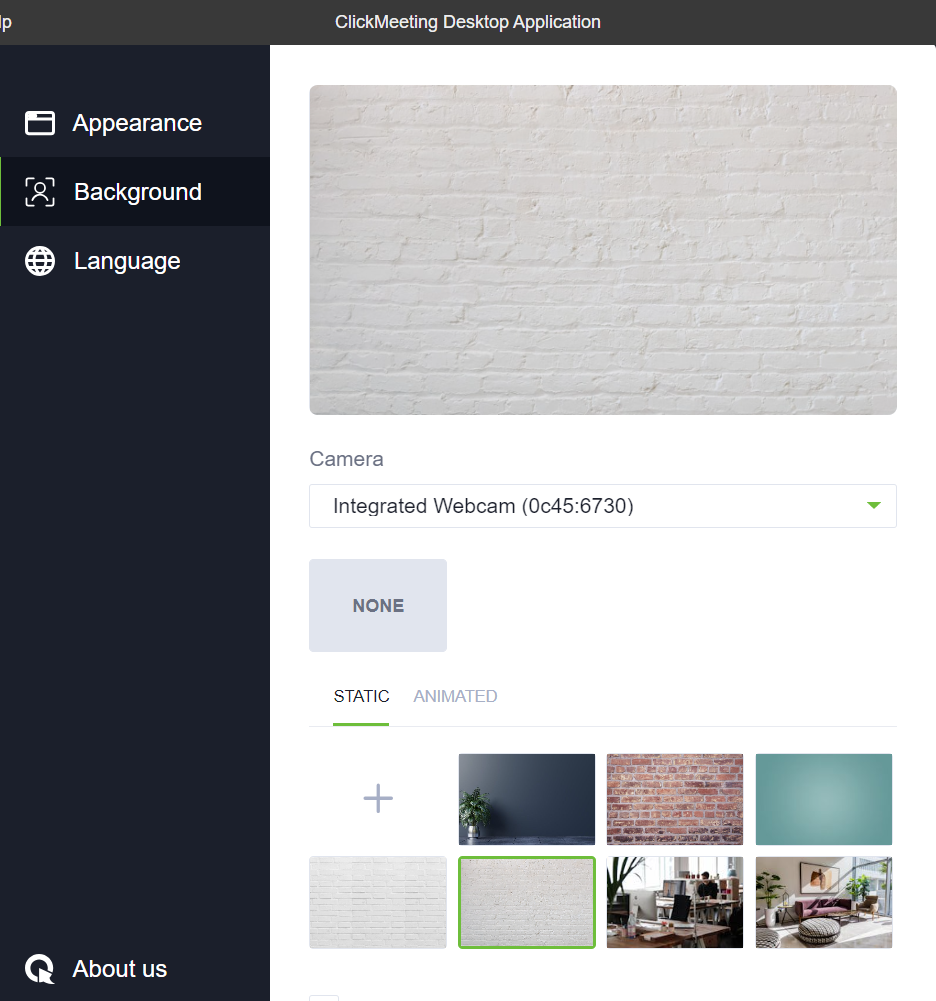
- on a Mac it is possible to use the shortcut cmd + , to access the settings.
Available options for Virtual Background:
- None – no virtual background.
- Blur background – blur background. Animated and static backgrounds can additionally be blurred on the desktop application.
- Static background – available for selection on the ‘Static’ tab.
- Animated background – available for selection on the ‘Animated’ tab.
- Upload your own background – using the plus icon in the desktop application
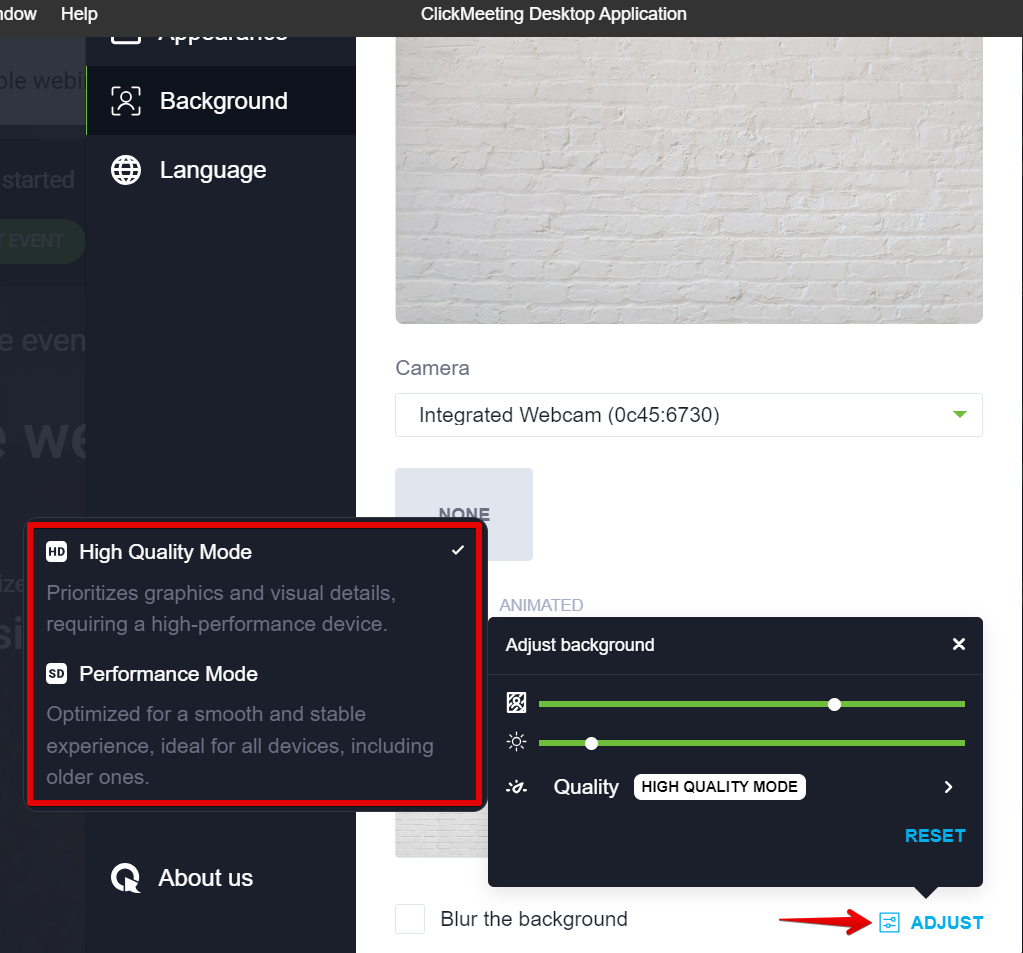
Customisation:
- Performance mode – performance-focused optimisation, ideal for devices with weaker performance.
- High quality mode – optimisation focused on image and background quality, ideal for high-performance devices.
- Blur level – ability to set the level of background blur.
- Background brightness – light manipulation, only available in the desktop app.
Resolving difficulties with the virtual background function
1) The broadcast quality of my audio and video has dropped. The event room or browser crashes.
The first step is to free up as many resources as possible – the bandwidth and processing power of the device:
- changing the Adjust option from High Quality Mode to Performance Mode;
- disabling programs and browser tabs on the device that are not needed at the moment;
- making sure nothing is updating or downloading on the device;
- disabling the virtual background / background blur.
2) I do not have access to the Virtual Background.
First, it is a good idea to refresh the browser page in which we have the webinar room open. If this action has no effect, close the browser completely and restart it.
If the above two actions do not work, open the following URLs in the same browser:
- https://get.webgl.org/
- https://get.webgl.org/webgl2/
If the page says that webgl technology is not supported then the virtual background is also not supported. We recommend changing the browser or using the desktop application.
3) Virtual background/blur enabled results in a black camera image.
Disable the virtual background or blur in the first instance. Refresh the browser page where you have the event room enabled and re-enable the virtual background.
Changing the browser will also help in this case.
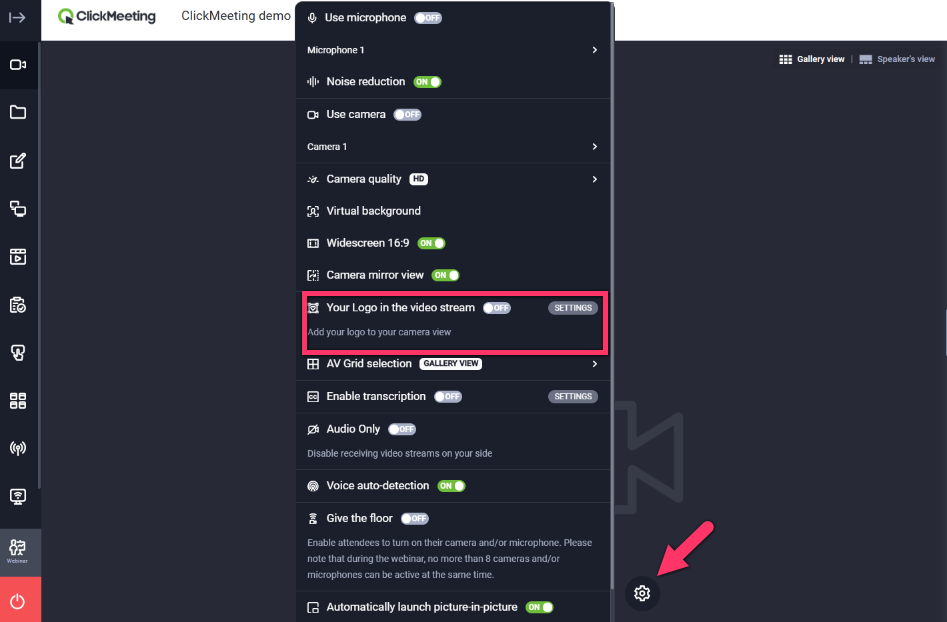
Logo on the camera
Place your own logo within the camera view.
- This feature is available to the organiser, presenters and guest speakers.
- In the audio/video settings, enable the ‘Logo in video stream’ option and add your chosen image.
- The logo will appear in the upper-left corner of the camera view.
Related materials