Top bar
How can I record an event?
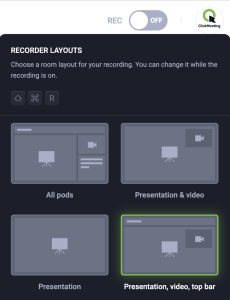
To record your conference, create any event within your ClickMeeting account or organize a spontaneous Meet now session. Directly in the event room, you will see the REC option available in the top bar.
Click it to start recording your event – blinking red dot means that your event is being recorded and the timer next to it indicates how long the recording will be. Please remember that the free trial account allows you to record only 30 minutes of your event. After this time, the recorder will stop automatically.
Please bear in mind that all your event recordings will not include the chatbox or attendee list by default. You can change these settings by choosing the appropriate recorder layout directly in the event room. Choose between three more layouts if you would like your recording to compose of different elements.
When you stop recording, ClickMeeting automatically saves recorded content in mp4 file format. You can find it in your ClickMeeting account panel in the Storage >> Recordings tab.
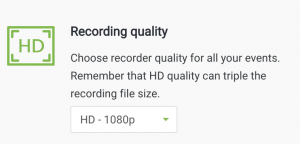
You can record your events in two resolutions – SD and HD. Make sure you set it up in your account panel Advanced settings before joining the event room. Please note that these settings will apply only to your future recordings, not to already created ones. You can enable recording HD quality individually for each event in the Automation tab of a given event → Recording quality. If you choose to record events in HD, this will not affect the available recording time (minutes) in your account. However, keep in mind that HD files will take up much more space on your computer if you decide to download them. The HD option is available in all paid ClickMeeting plans.
If you have used up all of your recording space and your event hasn’t ended yet – don’t worry. The system allows you to keep on recording until your event ends.
Note when you change the conference mode during your event to Presenters only, your audio and video will not be recorded.
Use the potential of your recordings and include them in your thank-you emails, follow-up messages, or your profile page. The recordings can also be used in automated or on-demand webinars and serve as a lead generation machine.
What information can I find in the Event board tab?
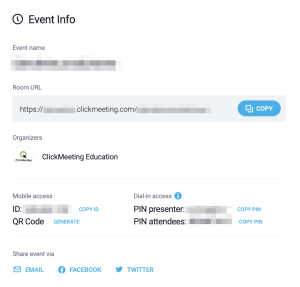
The platform allows you to have all the details regarding your conference at your fingertips. Simply, log in to your event room and hover over the pointer to the right upper corner of the screen and click on the Event board option. A new window will appear on your screen where you can find all information about this very conference room.
You will find there details about the date and hour of your event as well as the direct URL address that you can copy and share on your social media, through an email message, or via any other platform at your disposal.
The Event board also consists of details concerning access through the smartphone or the dial-in option. Please note that the mobile access might require downloading an additional application, whereas, in the case of phone access, the attendees will be charged for such a call depending on the fees their phone providers offer. Expand the list of phone numbers to see which one would be best for your audience if you would like them to join your event that way. Remember that attendees can also join the event with their browses (Chrome and Safari) on mobile devices using the direct URL.
Decide whether you want to synchronize the view for everyone at the event using the synchronization switch. When enabled, you and your audience will have the same layout of items displayed on the screen.
Here you will also find a list of Keyboard Shortcuts that allow you to navigate the event room without using the mouse.
The Event board is where you generate a QR code to seamlessly switch from your desktop to a mobile device without having to re-enter your login details. Use it to continue engaging in an event on a mobile device when things change.
You can also get in touch with our 5-star Customer Success Team in case of any questions by clicking the Live Tech Support button.
If you would like to limit the access to your event room, click the Lock icon to lock the room and prevent more people from joining it. You can unlock your room at any time, which will enable the attendees to enter your live event immediately. Please also note that you can lock the webinar room only after you start the event. If you choose to prepare your event first, the room will be locked by default and attendees will stay in the Waiting room.
If you decide to block access after the event has started then your participants will have the option to use the button – Ask to be let in. When a participant uses this button in the room the facilitators will see information about who among the participants has asked to be let into the room.
This option is useful when meetings, consultations or 1:1 workshops are held one after the other in the same room. People waiting in line can knock on the event room and thus inform the presenters that they are already waiting their turn.
In addition, you can open the room in full-screen mode by clicking on the Full Screen button.
The Event Panel also includes a feature that allows users to change the Language of the room.
Currently, 23 languages are supported: English, Arabic, Bulgarian*, Czech*, Danish*, Estonian*, Finnish*, French, Greek*, Spanish, Dutch*, German, Norwegian*, Polish, Portuguese (Brazilian variant), Russian, Romanian*, Slovak*, Swedish*, Turkish*, Ukrainian, Hungarian*, Italian.
*Please note that some AI-generated translations may not be 100% accurate.
Remember you can exit or end the event in the Event board tab as well.


